계속해서 배포에 실패하는 나···
다시 처음부터 차근차근 기록해가면서 놓친 부분 찾기 시작 !!
VPC
vpc 생성
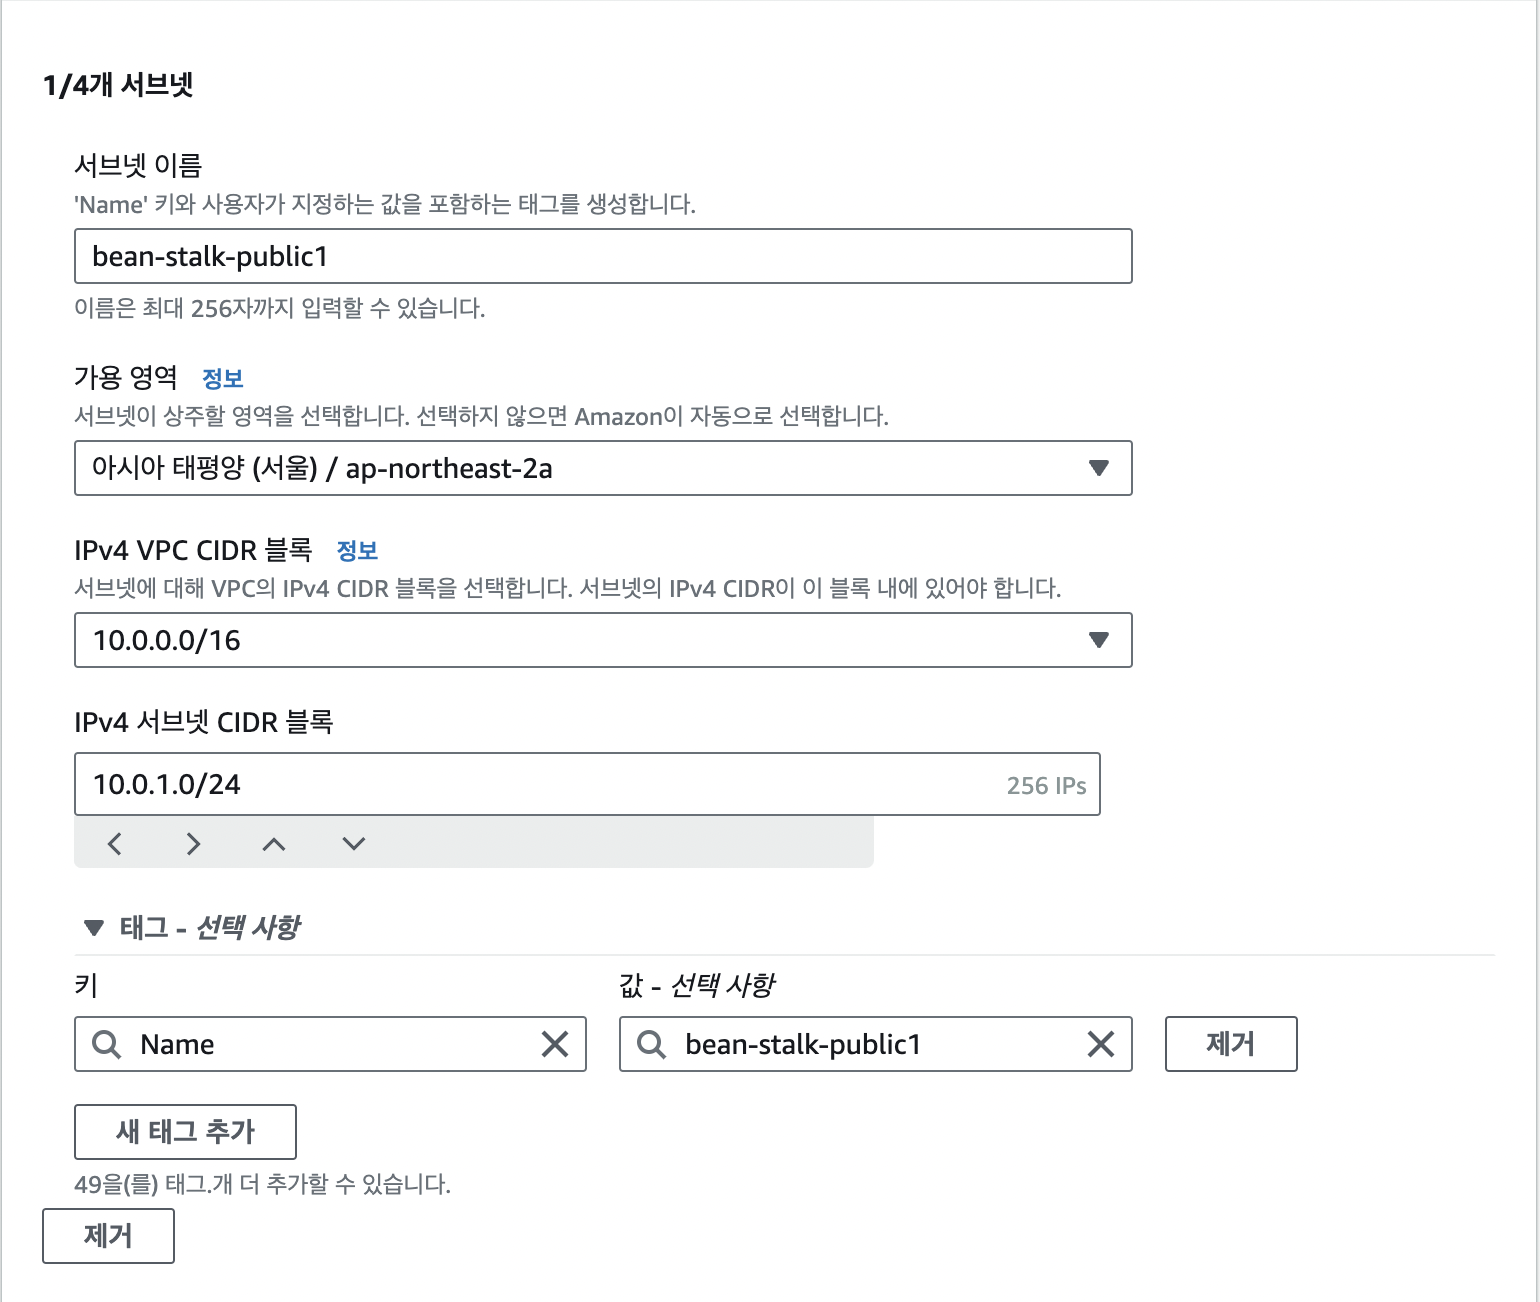
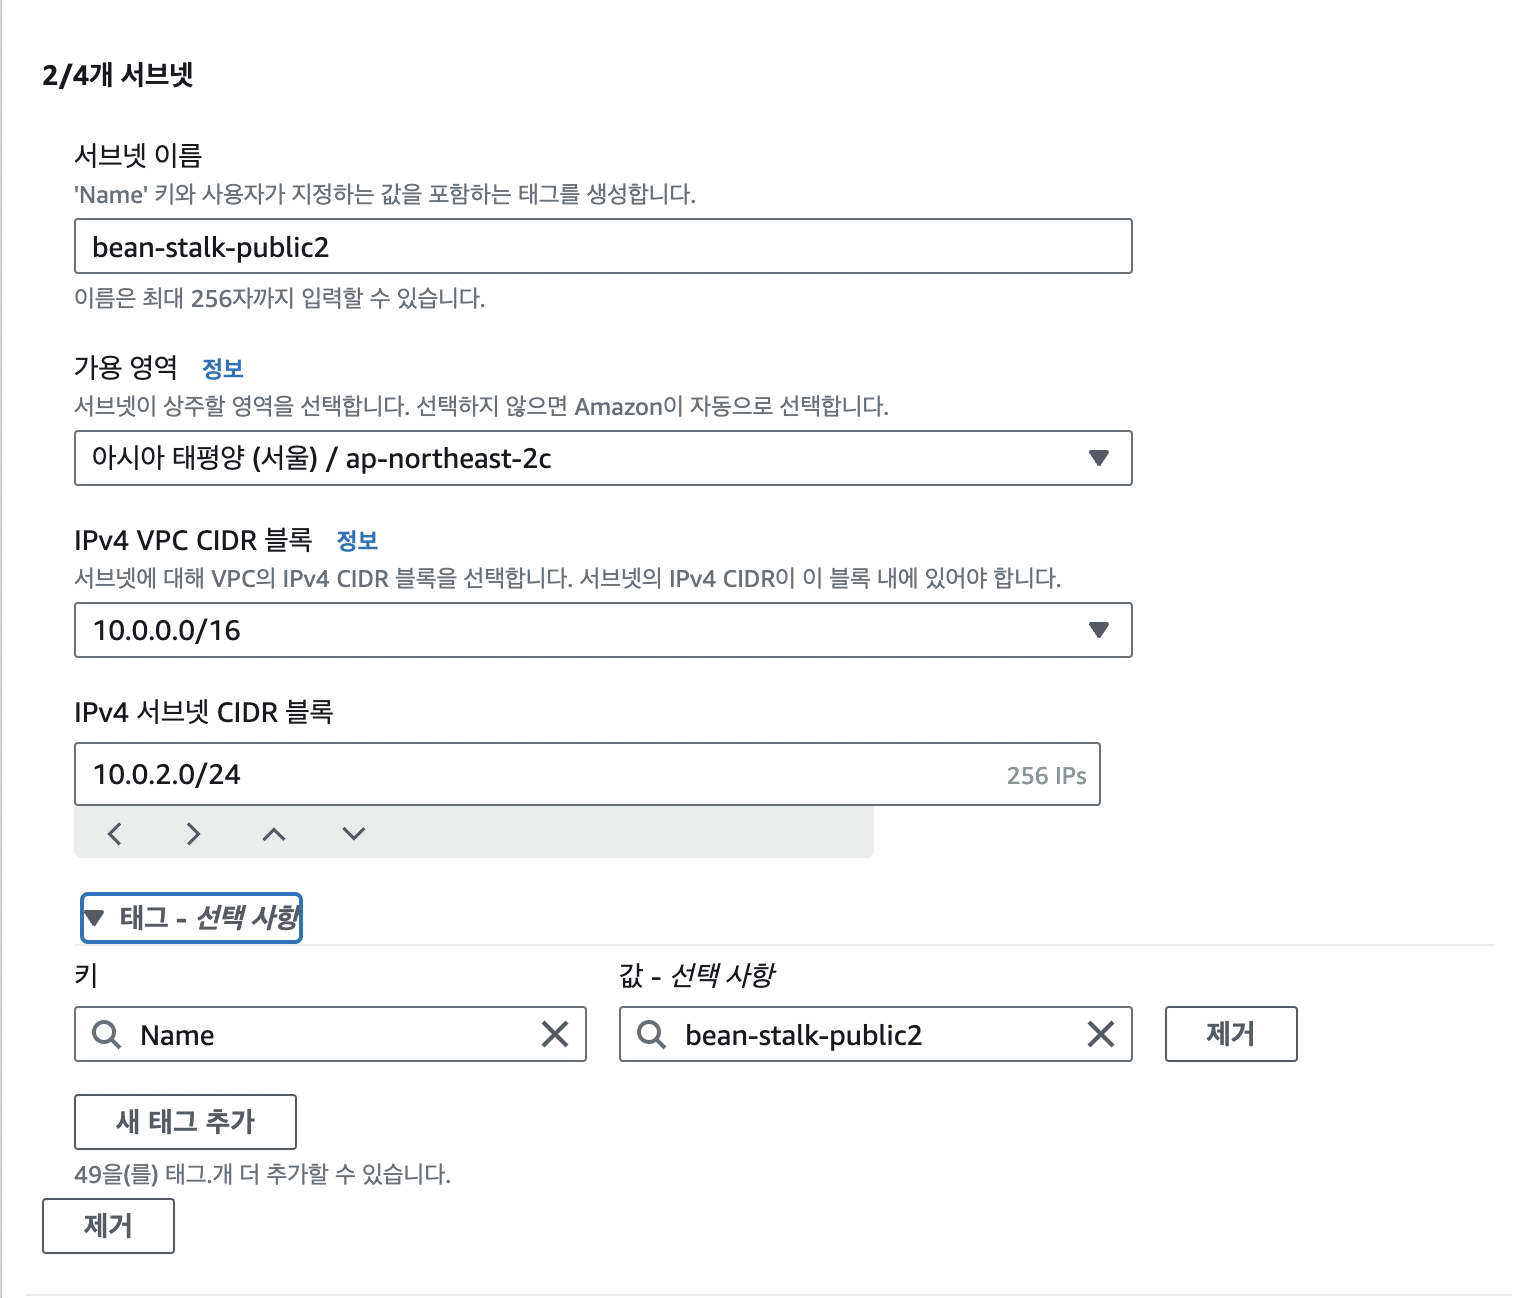
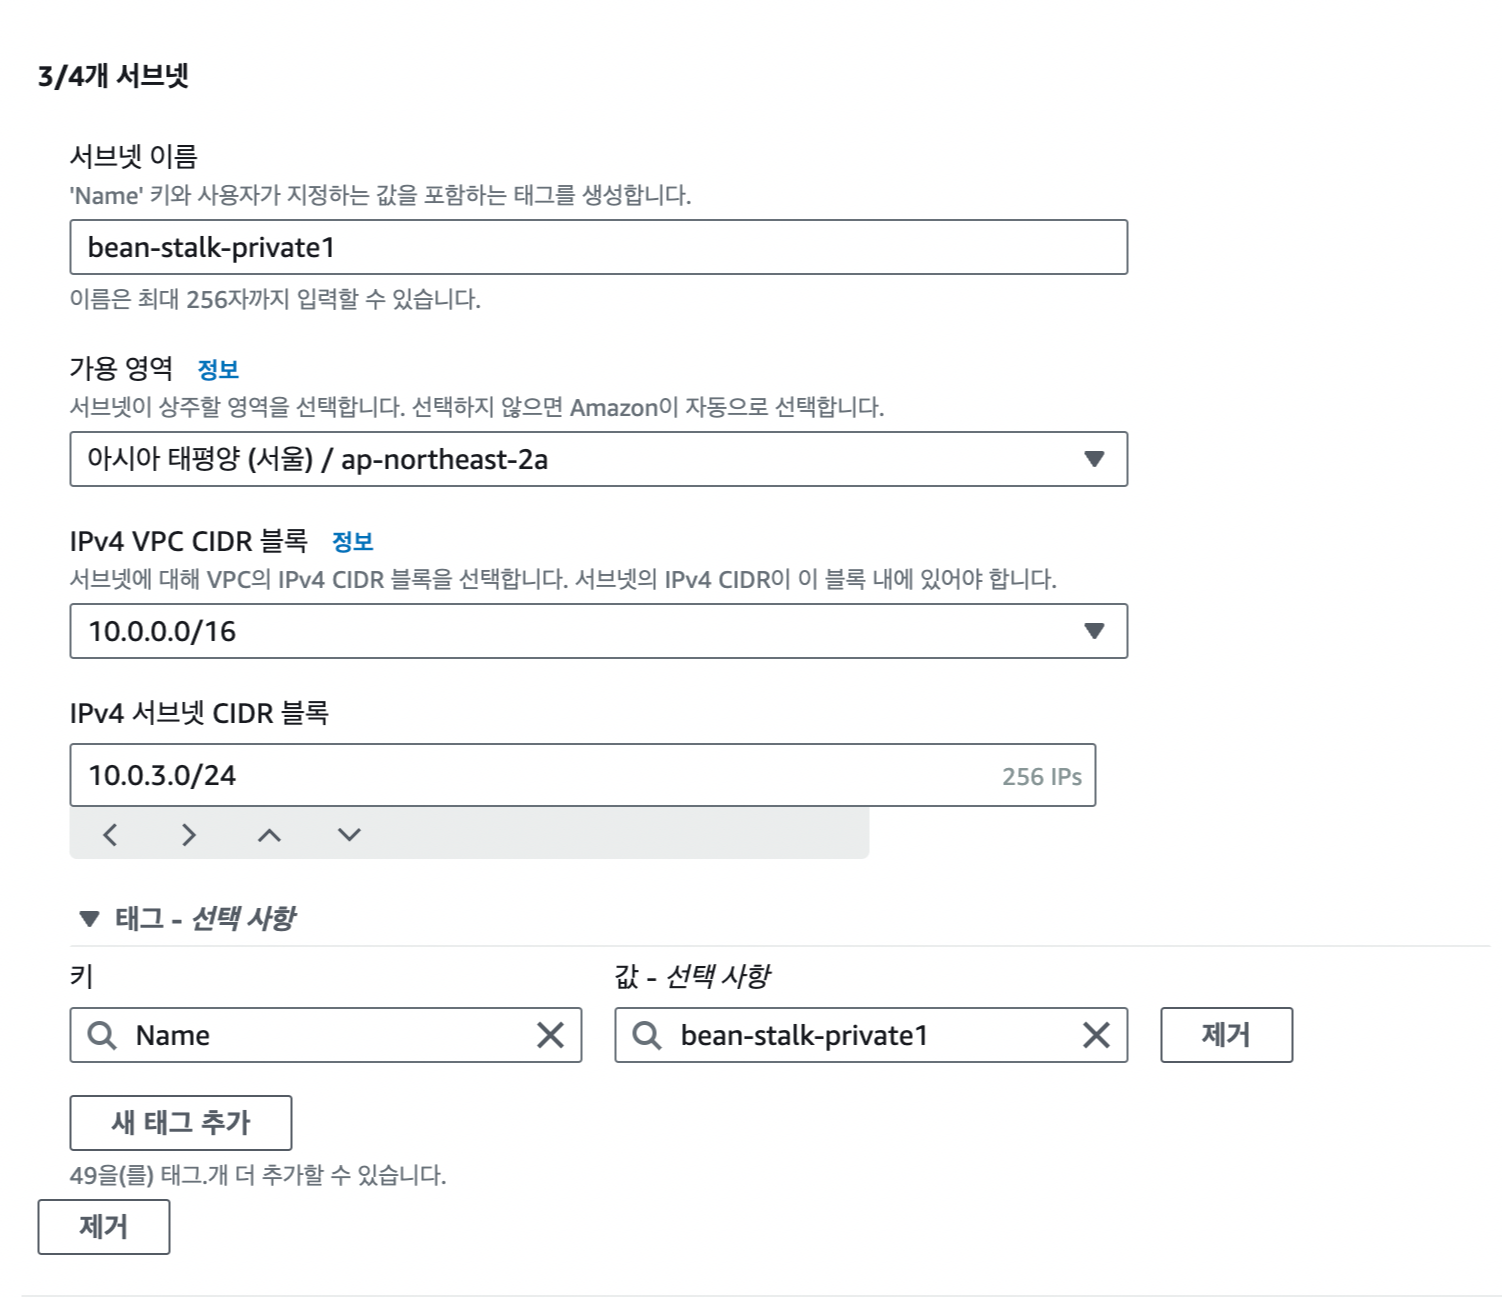
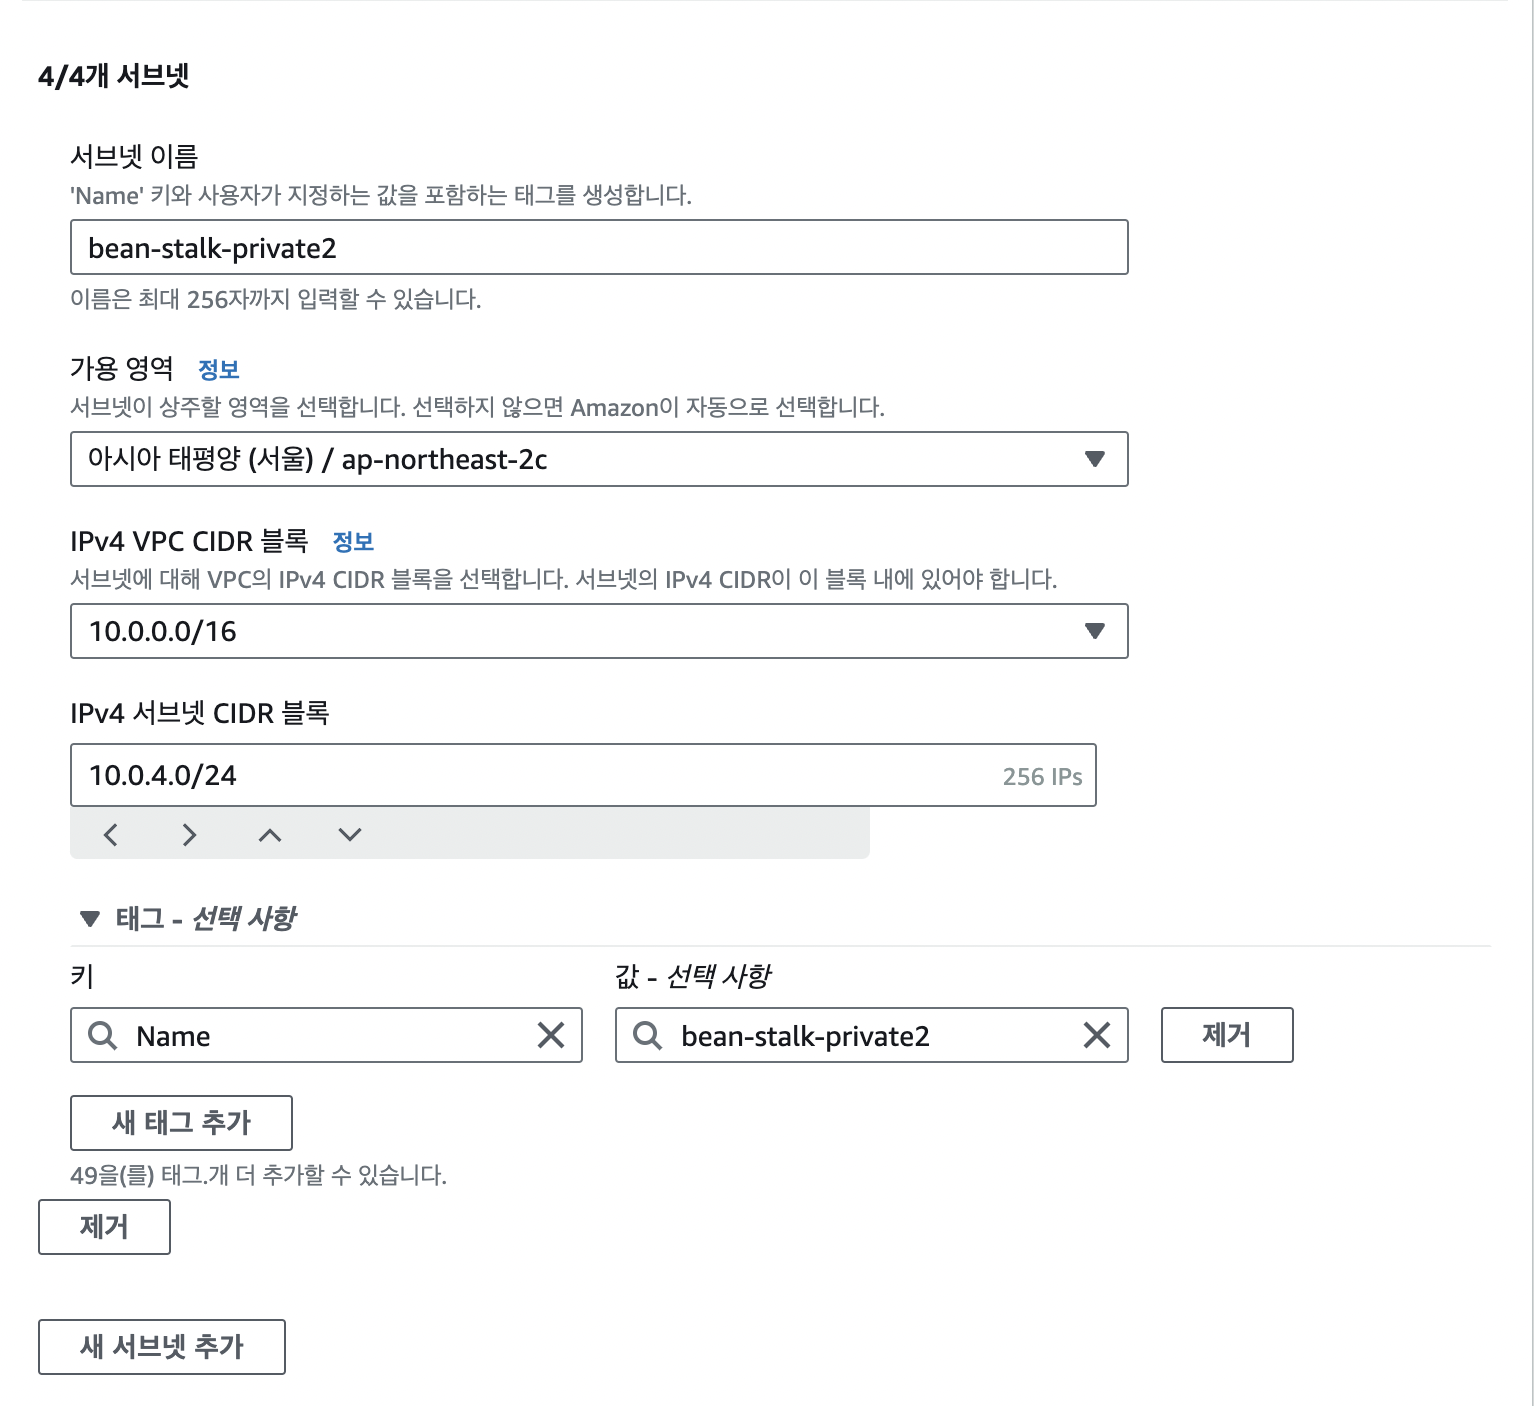
총 4개의 서브넷 (public 2개, private 2개) 를 만들 예정
public 2개 - Elastic Beanstalk이 요구
private 2개 - RDS에서 서브넷 그룹 생성 시 필요

서브넷 생성
public, private 각각 가용영역 a와 c에 하나씩 만들어준다
인터넷 게이트웨이 생성
인터넷 게이트웨이 생성 후 위에서 만든 VPC에 할당
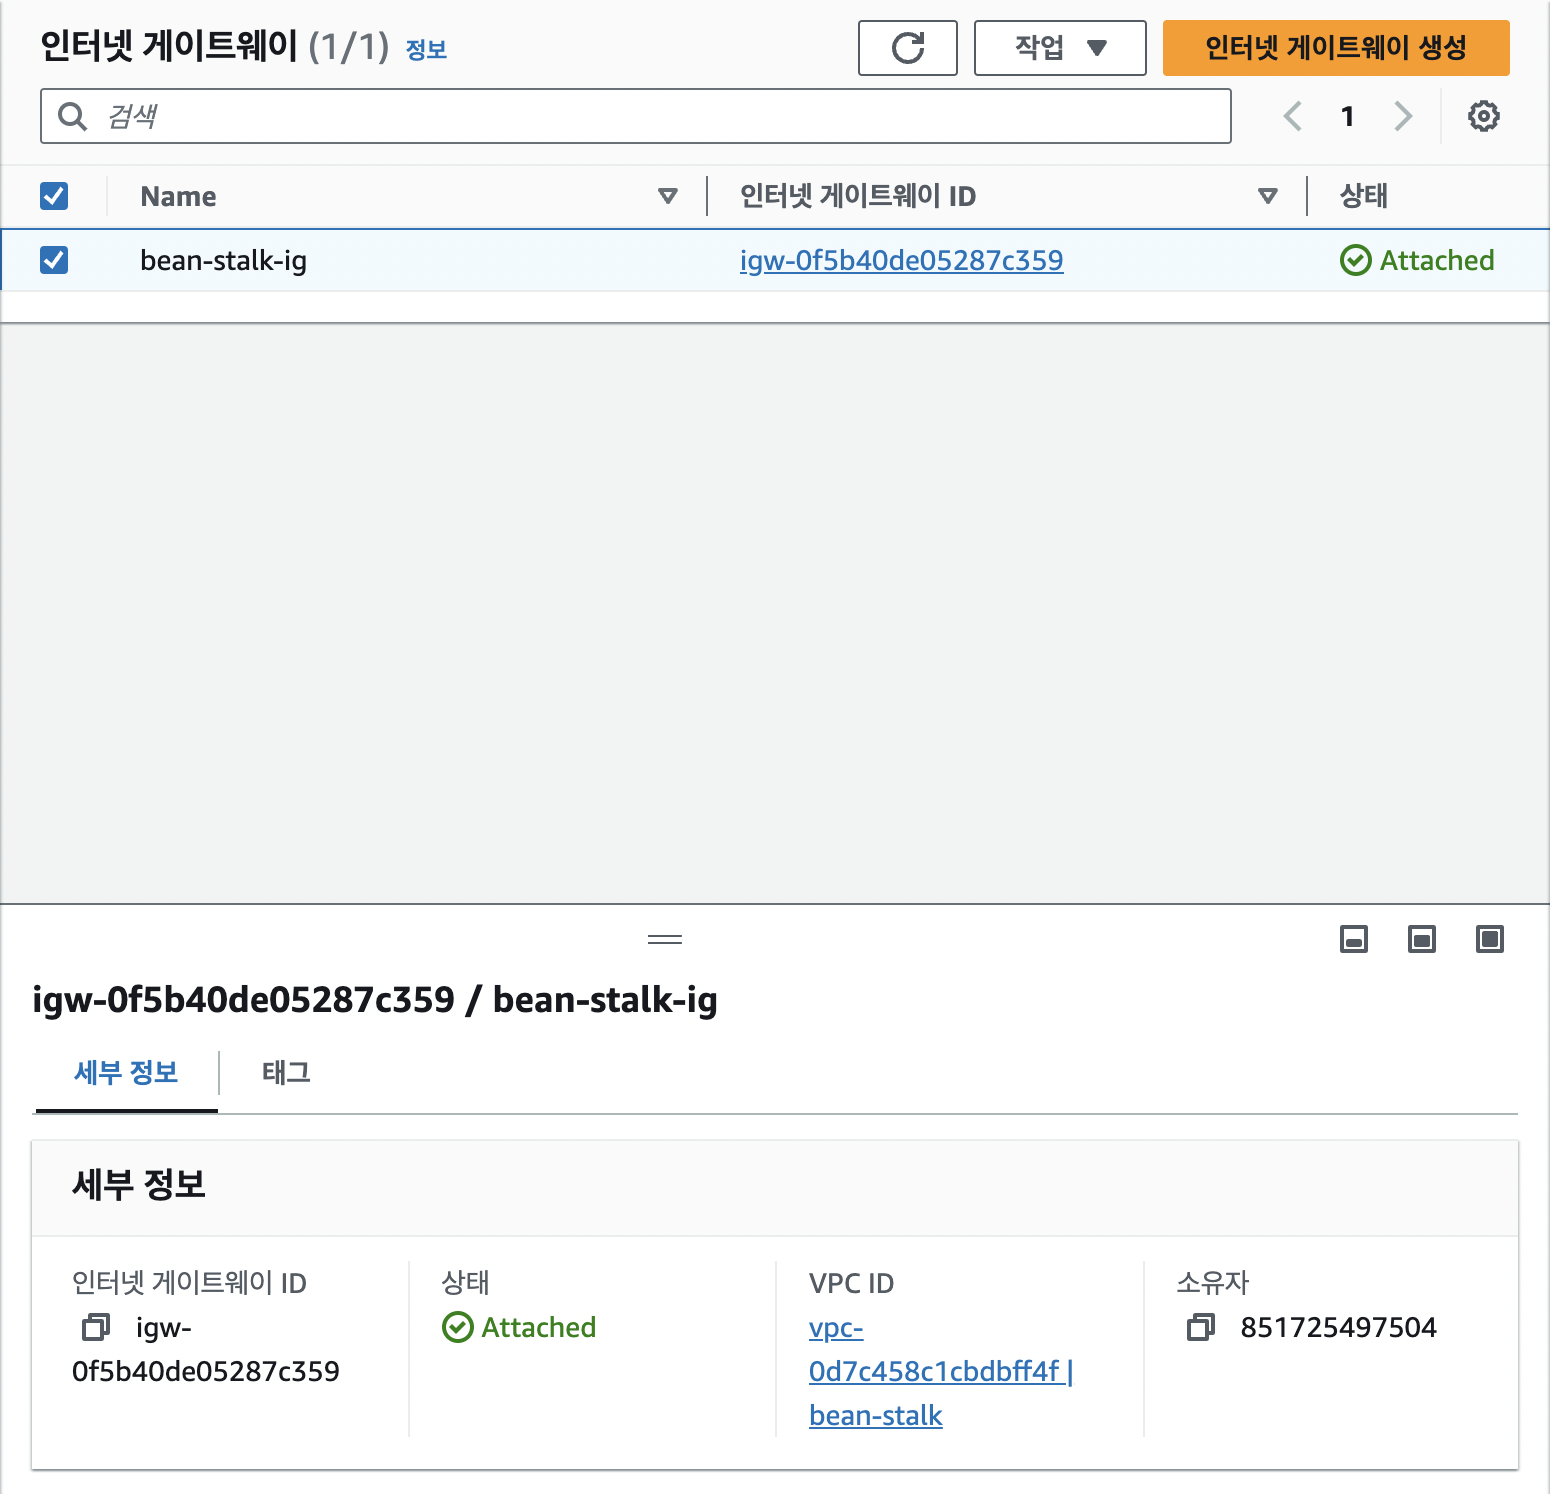
인터넷 게이트웨이만 연결했다고 해서 퍼블릭 서브넷이 되는 것은 아님
라우팅 테이블 생성 필요
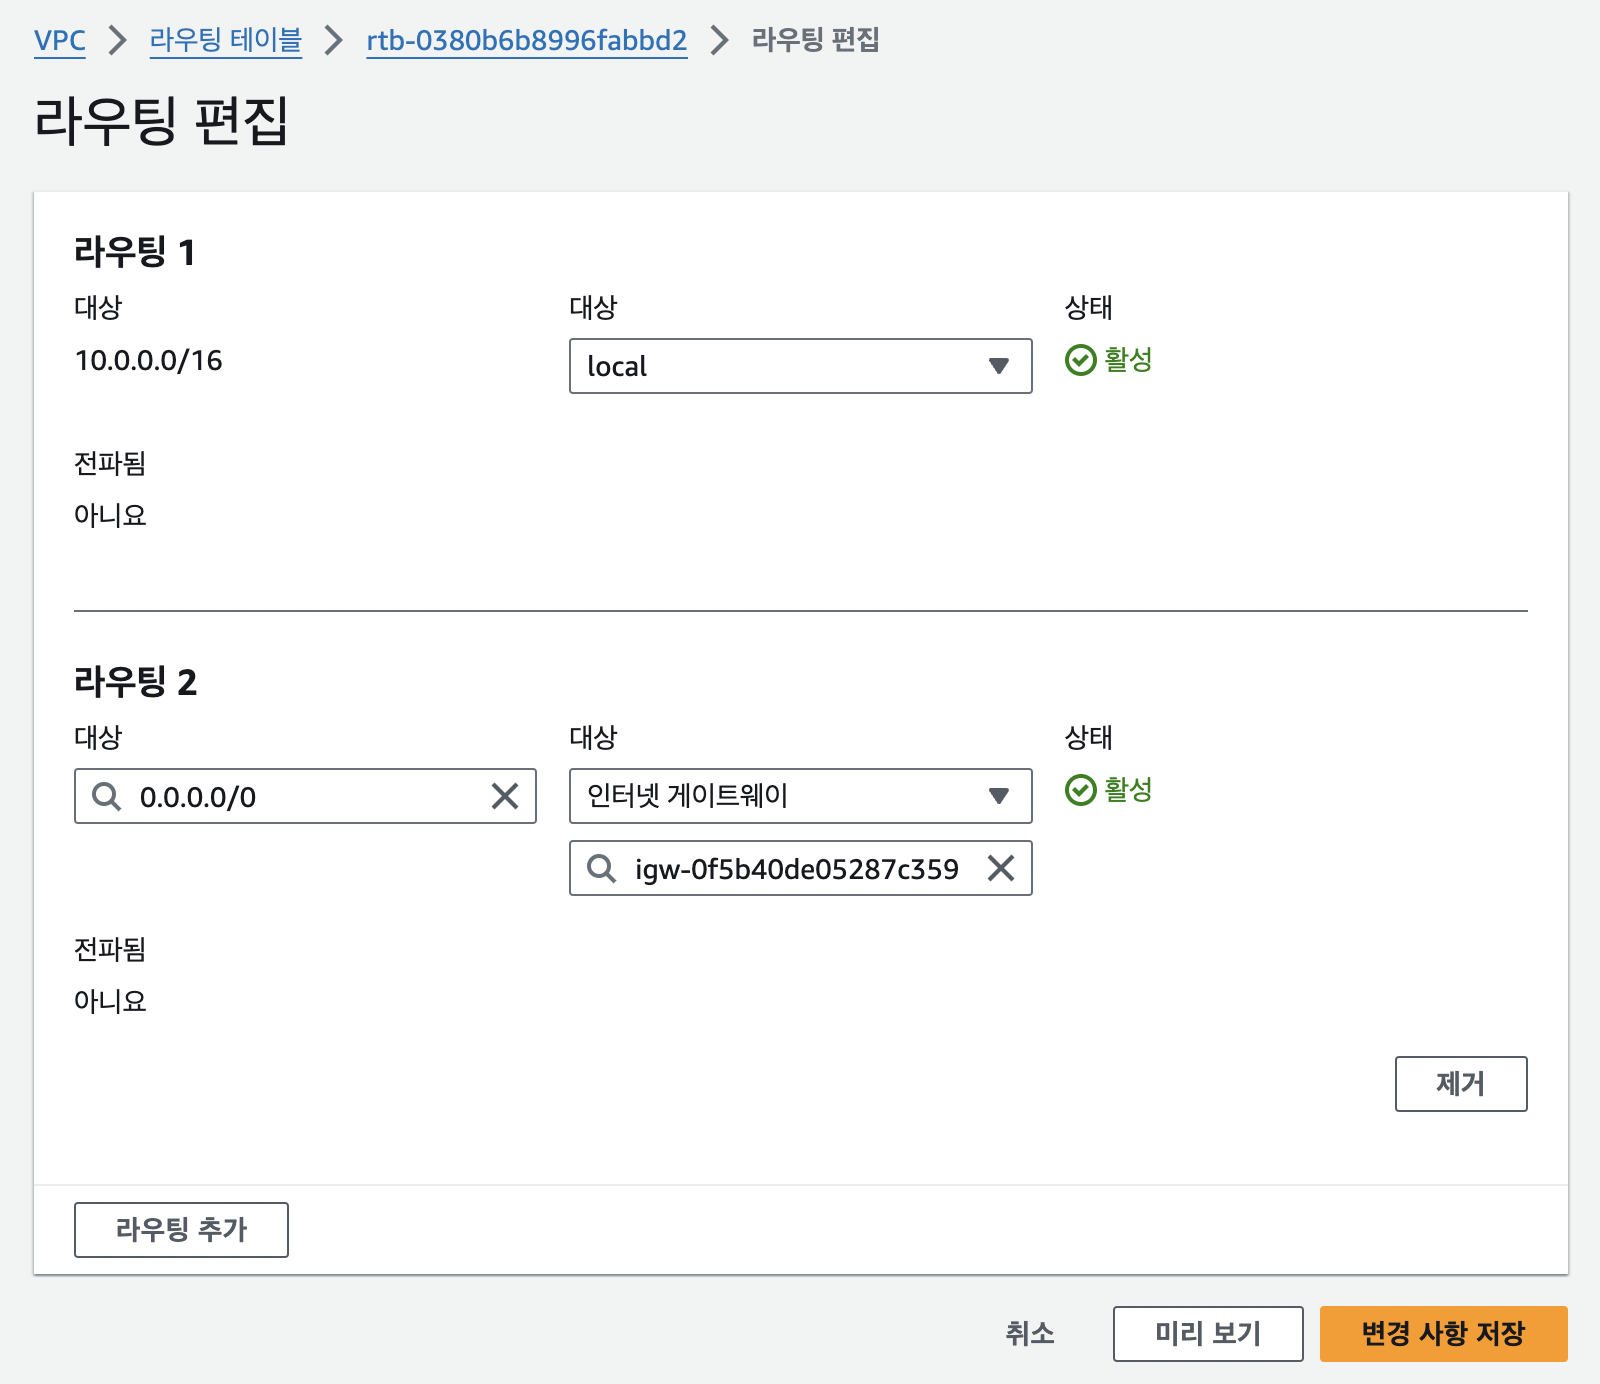
라우팅 테이블 생성
위에서 만든 VPC에 대한 라우팅테이블 생성 후
라우팅 편집 - 아웃바운드 설정해주기!
0.0.0.0/0 : 모든 ip 주소에 대해서
밖으로 나갈때 인터넷 게이트웨이를 통해 나가도록
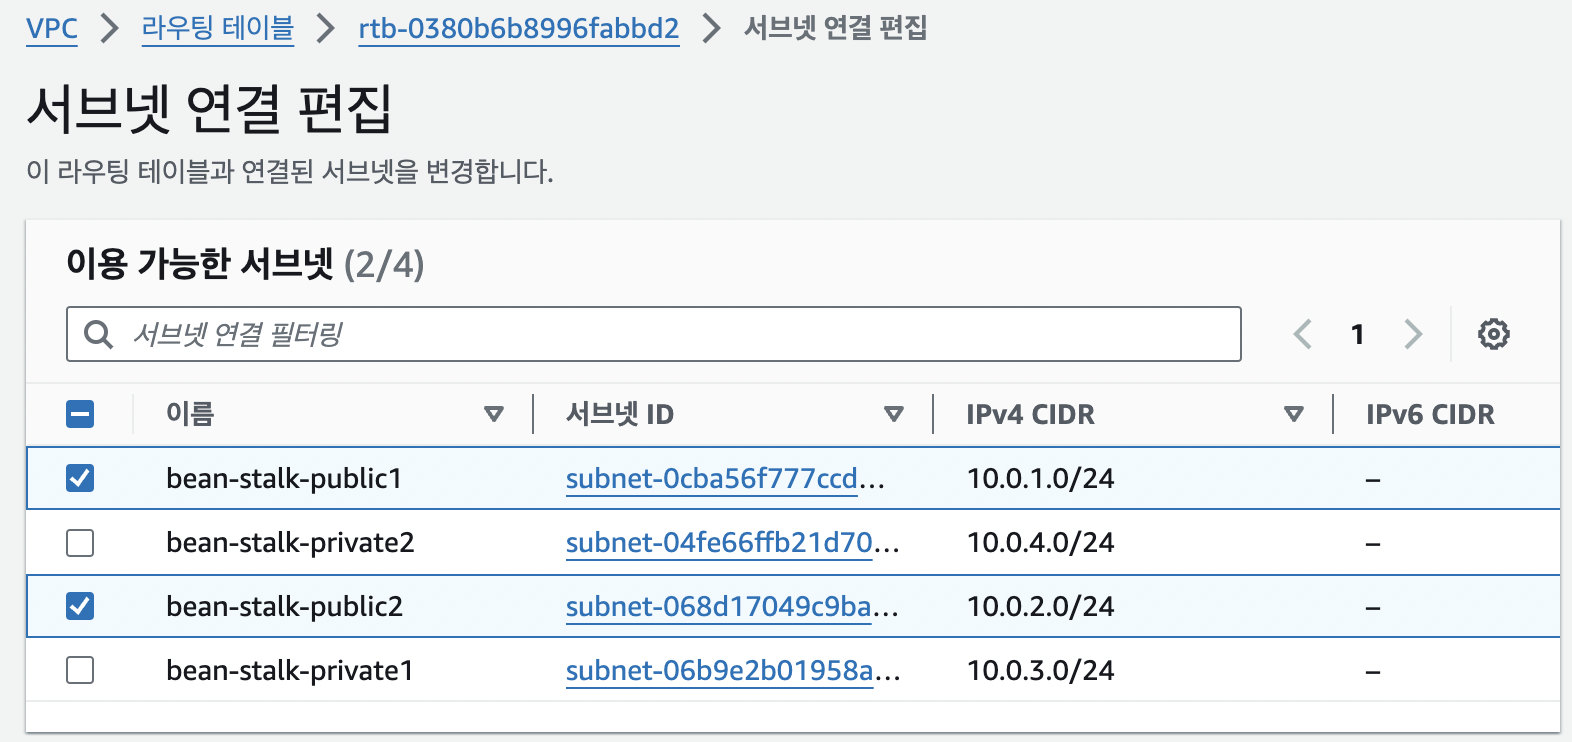
그리고 라우팅 테이블 - 서브넷 연결 - 명시적 서브넷 연결에서
아까 만든 퍼블릭 서브넷 2개 연결해주기
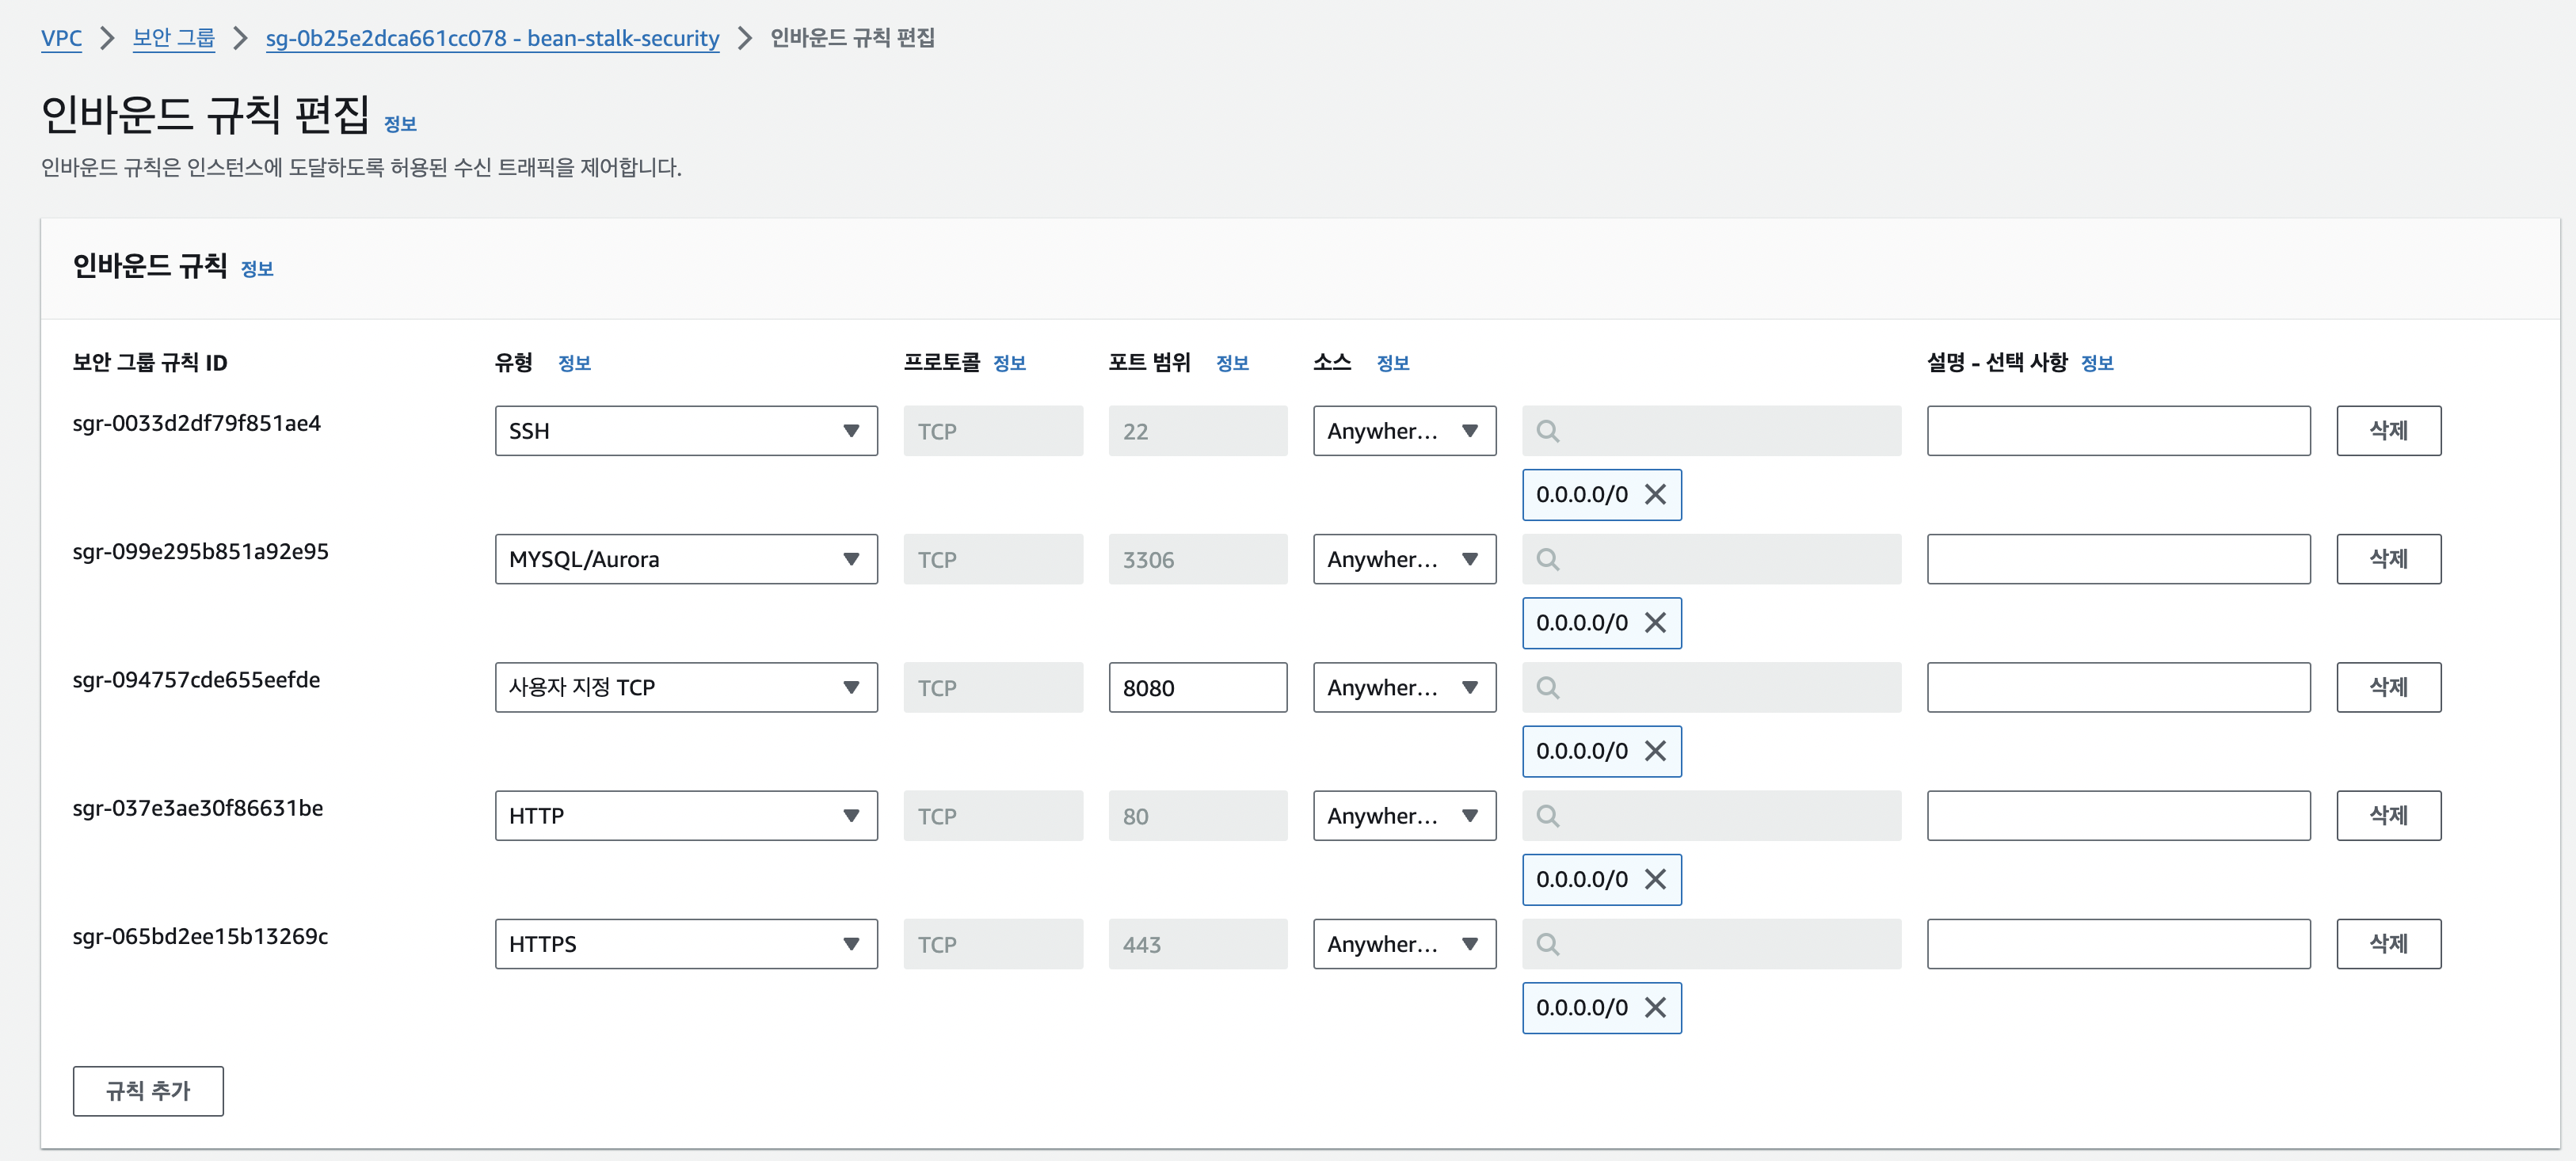
보안 그룹 생성
보안그룹을 생성하고 인바운드 규칙을 추가
여기까지 하면 VPC 설정 끝!
CI/CD
CI : Continuous Integration 지속적 통합
CD: Continuous Delivery/Deployment 지속적 제공/배포
CI를 깃허브액션, CD를 Elastic Beanstalk을 이용해 구현할 것이다
브랜치 전략
개발 인프라 - develop 브랜치에 merge될 때 CI/CD가 돌아가야 함
릴리즈 인프라 - release 브랜치에 merge될 때 CI/CD가 돌아가야 함
* 프로젝트 초반에는 개발 인프라만 만들고 마지막에 릴리즈 인프라 만들기
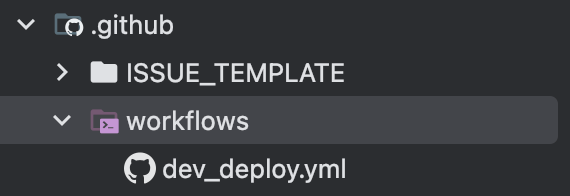
프로젝트 최상단에 .github/workflows 디렉토리 생성 후
dev_deploy.yml 파일 생성
dev_deploy.yml 전체 코드
name: VitaMate Dev CI/CD
on:
pull_request:
types: [closed]
workflow_dispatch: # (2).수동 실행도 가능하도록
jobs:
build:
runs-on: ubuntu-latest # (3).OS환경
if: github.event.pull_request.merged == true && github.event.pull_request.base.ref == 'develop'
steps:
- name: Checkout
uses: actions/checkout@v2 # (4).코드 check out
- name: Set up JDK 17
uses: actions/setup-java@v3
with:
java-version: 17 # (5).자바 설치
distribution: 'adopt'
- name: Grant execute permission for gradlew
run: chmod +x ./gradlew
shell: bash # (6).권한 부여
- name: Build with Gradle
run: ./gradlew clean build -x test
shell: bash # (7).build 시작
- name: Get current time
uses: 1466587594/get-current-time@v2
id: current-time
with:
format: YYYY-MM-DDTHH-mm-ss
utcOffset: "+09:00" # (8).build 시점의 시간확보
- name: Show Current Time
run: echo "CurrentTime=$"
shell: bash # (9).확보한 시간 보여주기
- name: Generate deployment package
run: |
mkdir -p deploy
cp build/libs/*.jar deploy/application.jar
cp Procfile deploy/Procfile
cp -r .ebextensions_dev deploy/.ebextensions
cp -r .platform deploy/.platform
cd deploy && zip -r deploy.zip .
- name: Beanstalk Deploy
uses: einaregilsson/beanstalk-deploy@v20
with:
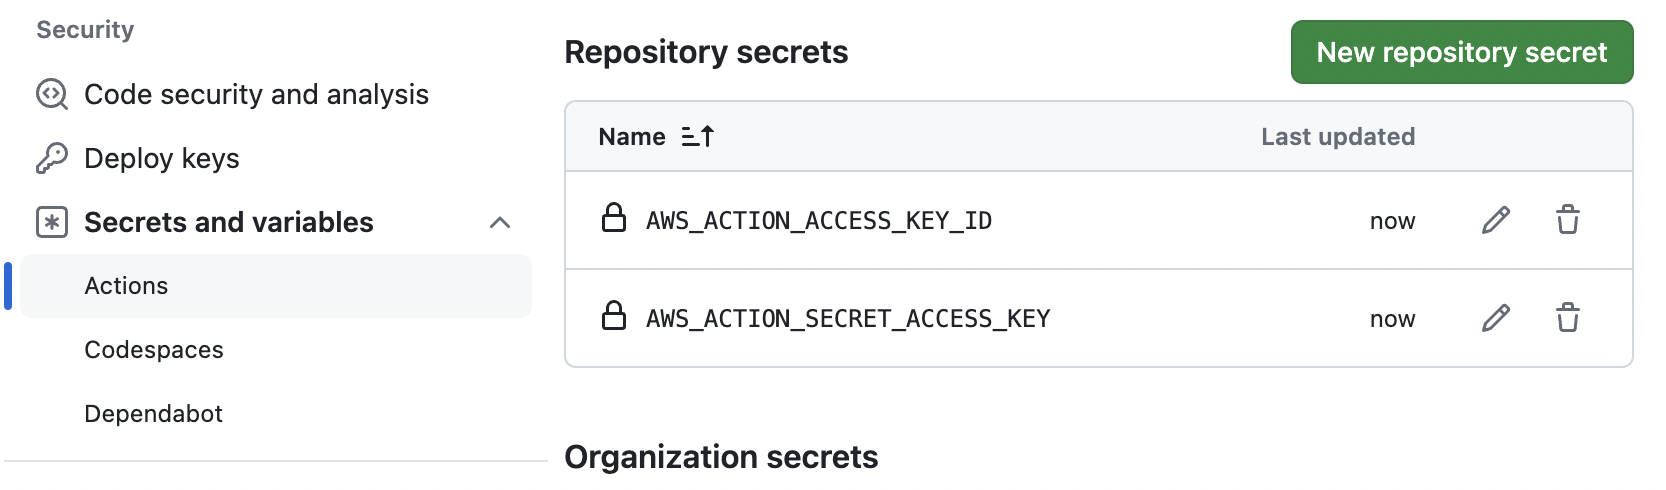
aws_access_key: ${{ secrets.AWS_ACTION_ACCESS_KEY_ID }}
aws_secret_key: ${{ secrets.AWS_ACTION_SECRET_ACCESS_KEY }}
application_name: # Elastic Beanstalk 어플리케이션 이름
environment_name: # Elastic Beanstalk 환경 이름
version_label: github-action-${{ steps.current-time.outputs.formattedTime }}
region: ap-northeast-2
deployment_package: deploy/deploy.zip
wait_for_deployment: false
on:
  pull_request:
    types: [closed]
PR이 closed 되었을때 돌아라! -> merge될 때 돌아라!
jobs:
  build:
    runs-on: ubuntu-latest # (3).OS환경
    if: github.event.pull_request.merged == true && github.event.pull_request.base.ref == 'develop'
아무데나 merge 될 때 돌면 안되니까
develop 브랜치에 merge될 때 돌아라!
* 릴리즈 만들땐 release로 수정
      - name: Generate deployment package
        run: |
          mkdir -p deploy
          cp build/libs/*.jar deploy/application.jar
          cp Procfile deploy/Procfile
          cp -r .ebextensions_dev deploy/.ebextensions
          cp -r .platform deploy/.platform
          cd deploy && zip -r deploy.zip .
이부분에서 Procfile, .ebextensions, .platform 등이 필요하다는걸 알 수 있음
일단 홀드하고 이제 Elastic Beanstalk 만들러 다시 AWS로 넘어가자
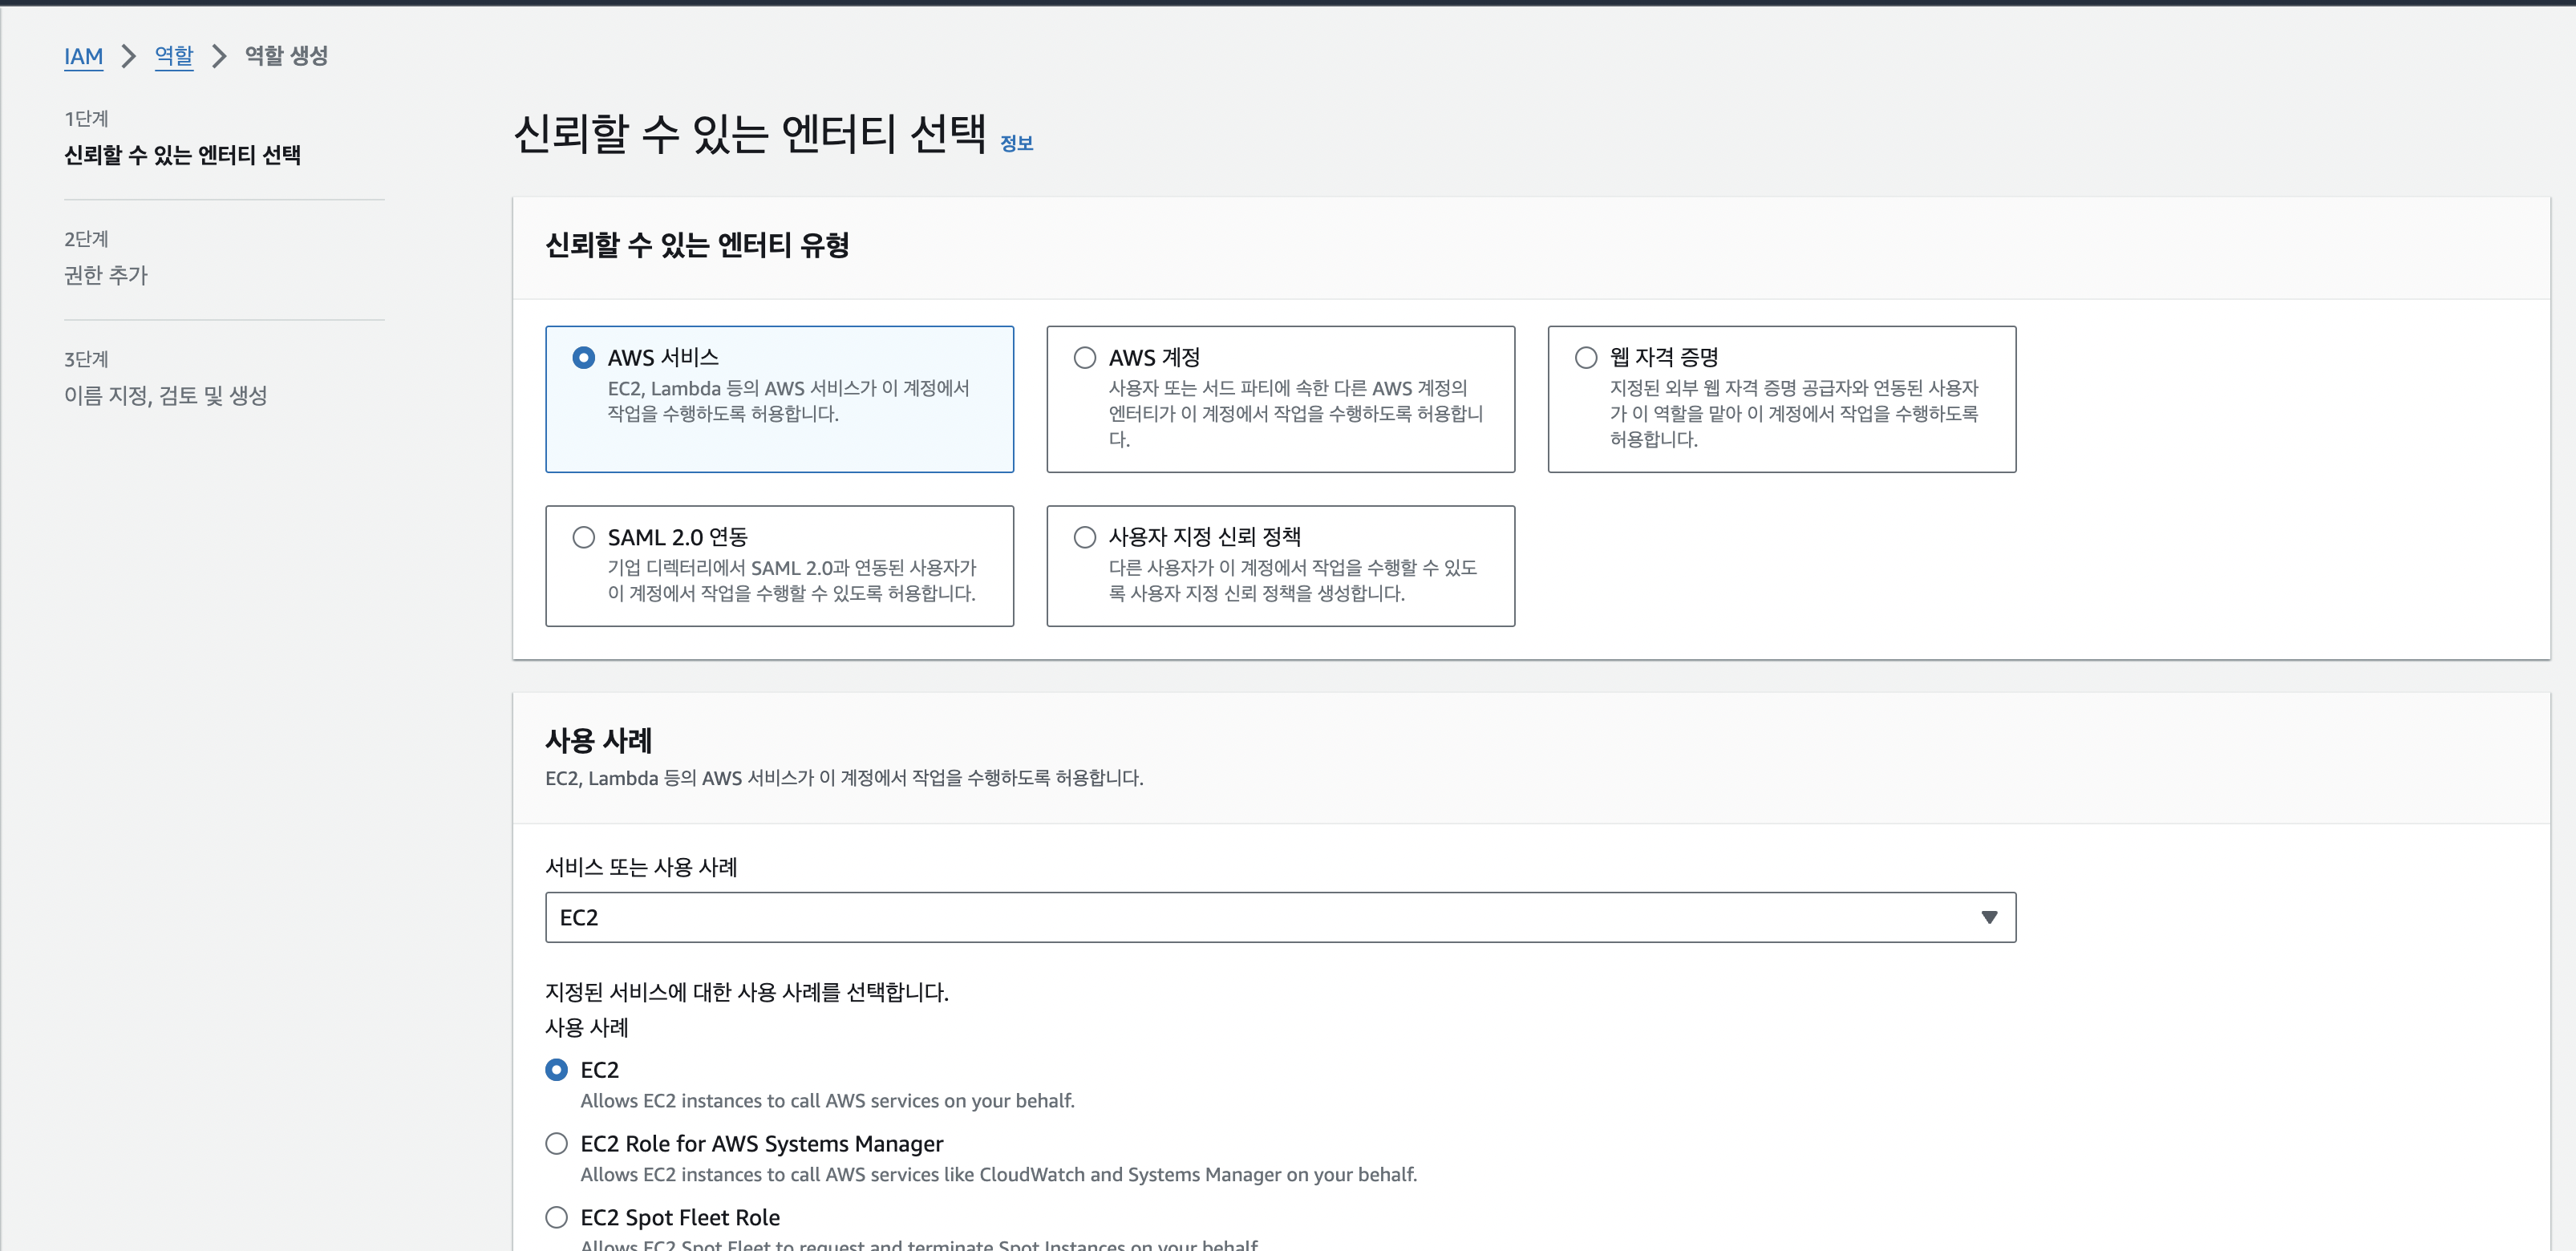
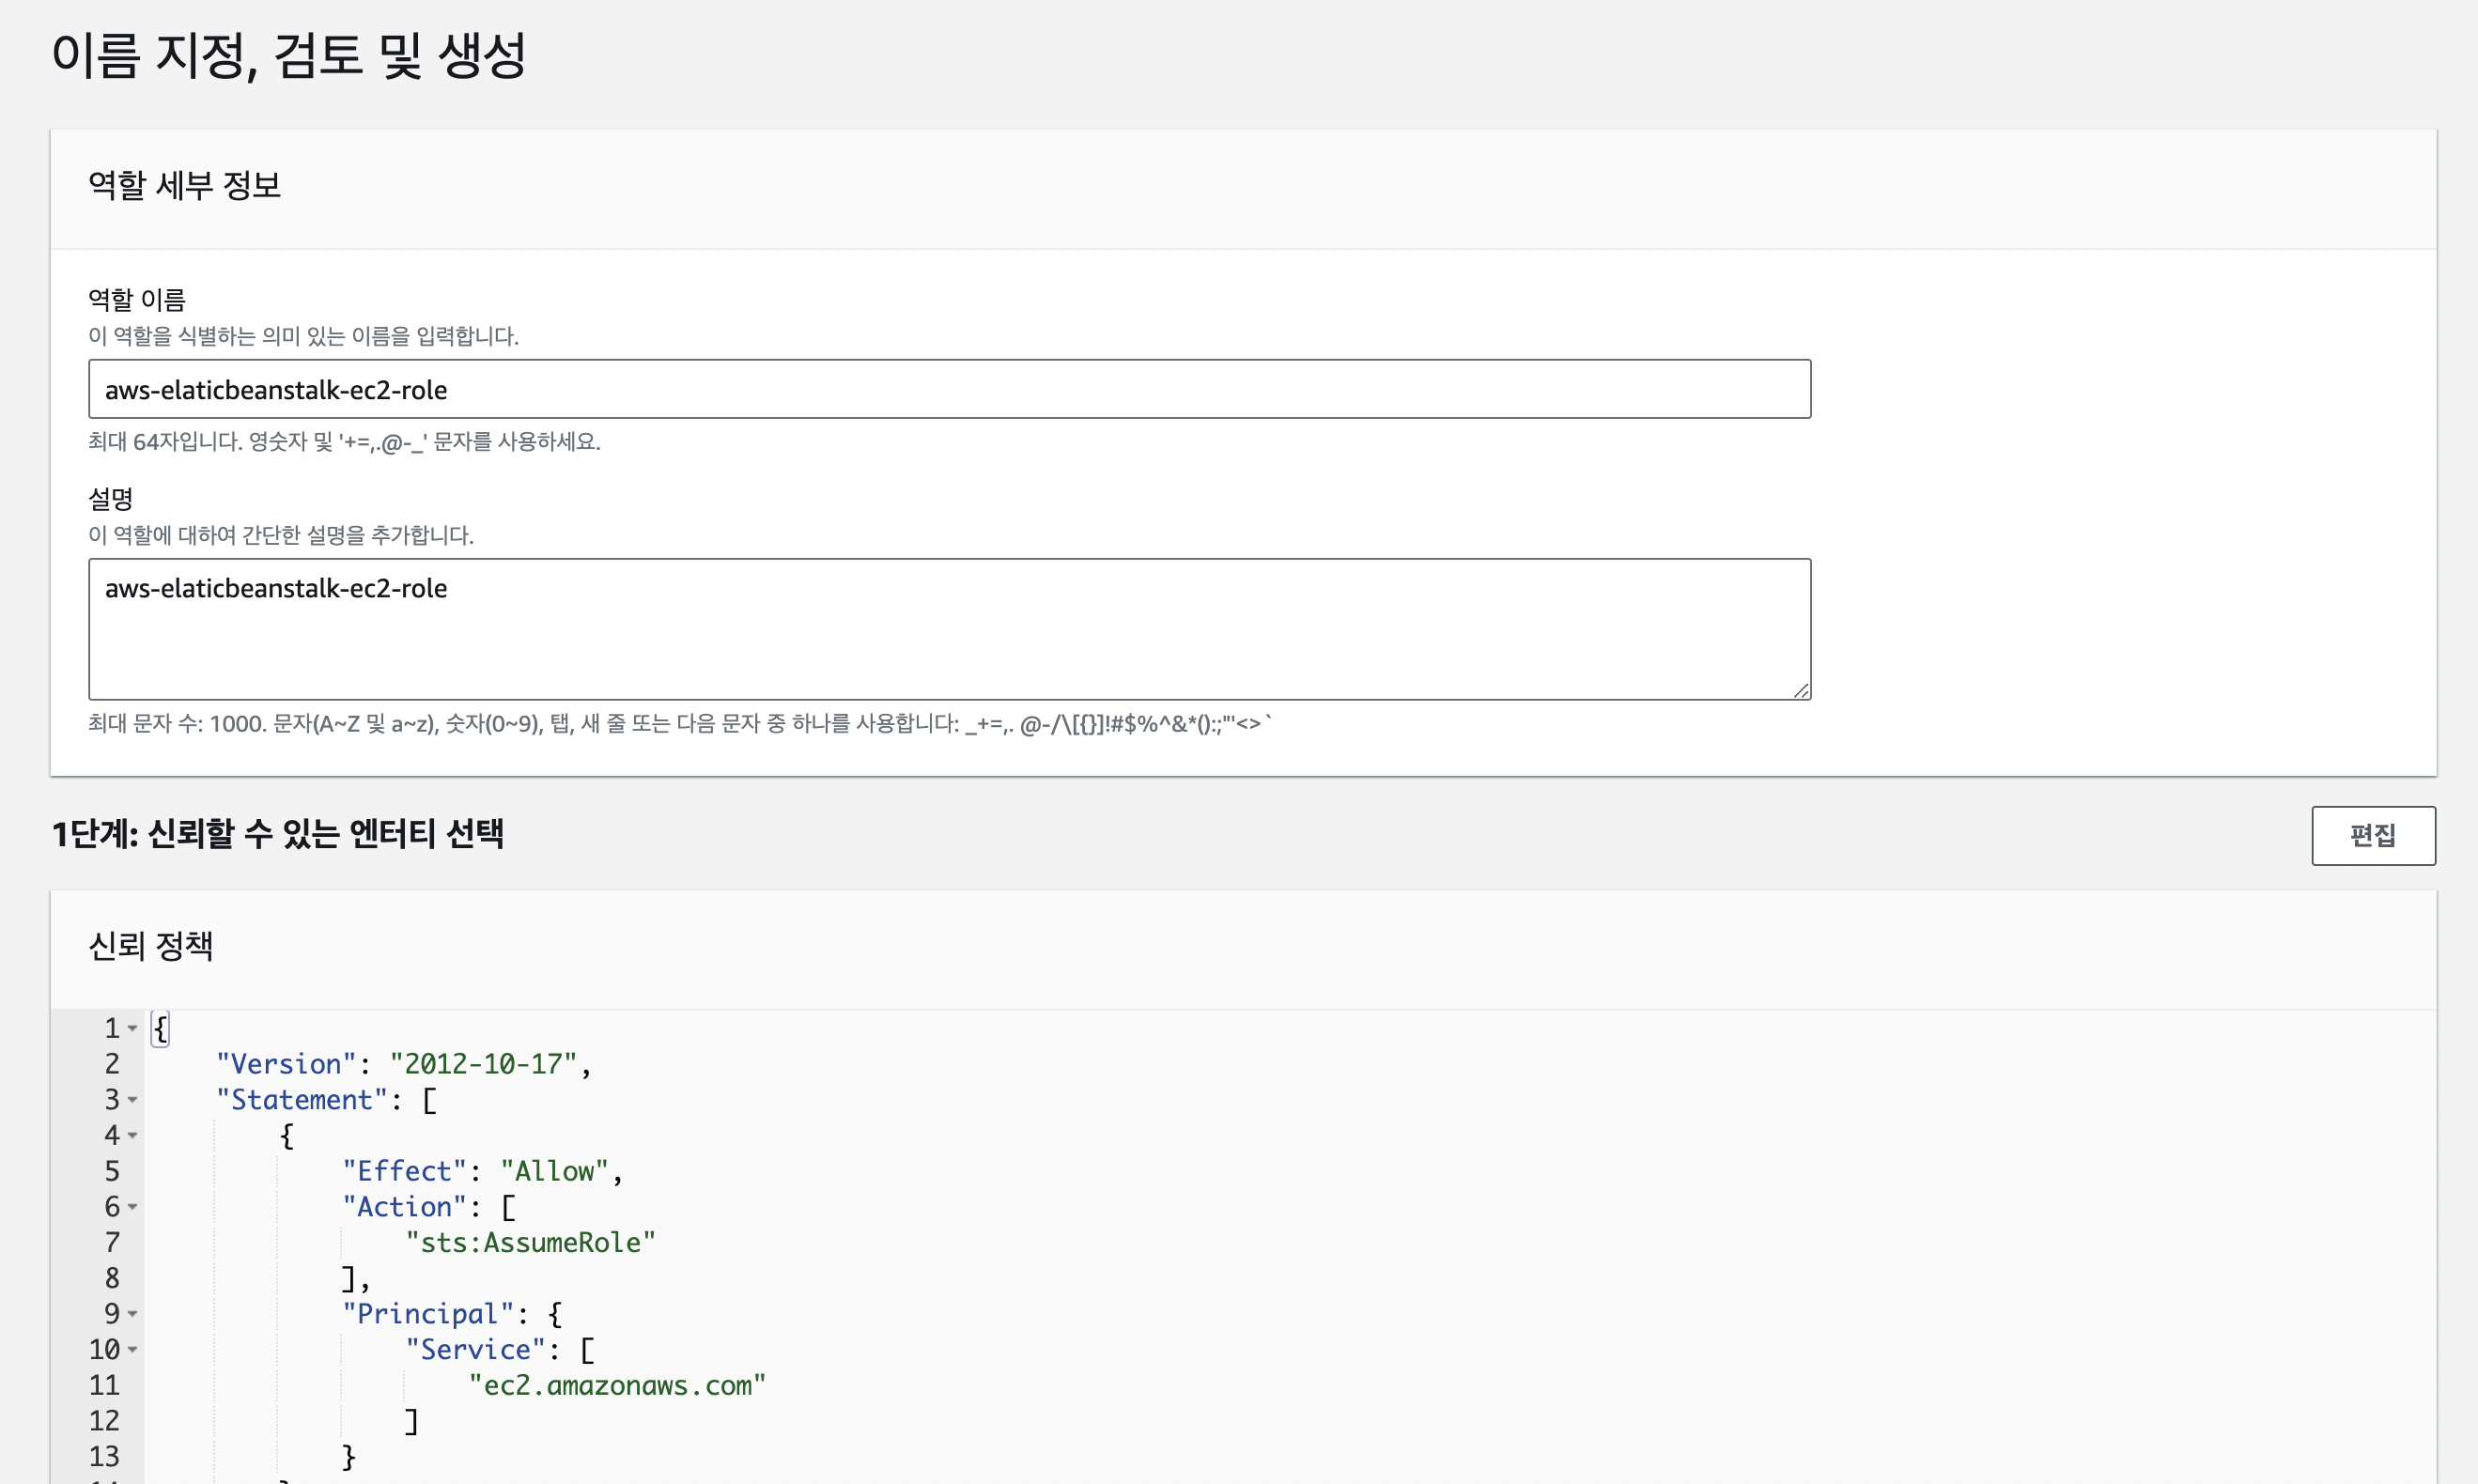
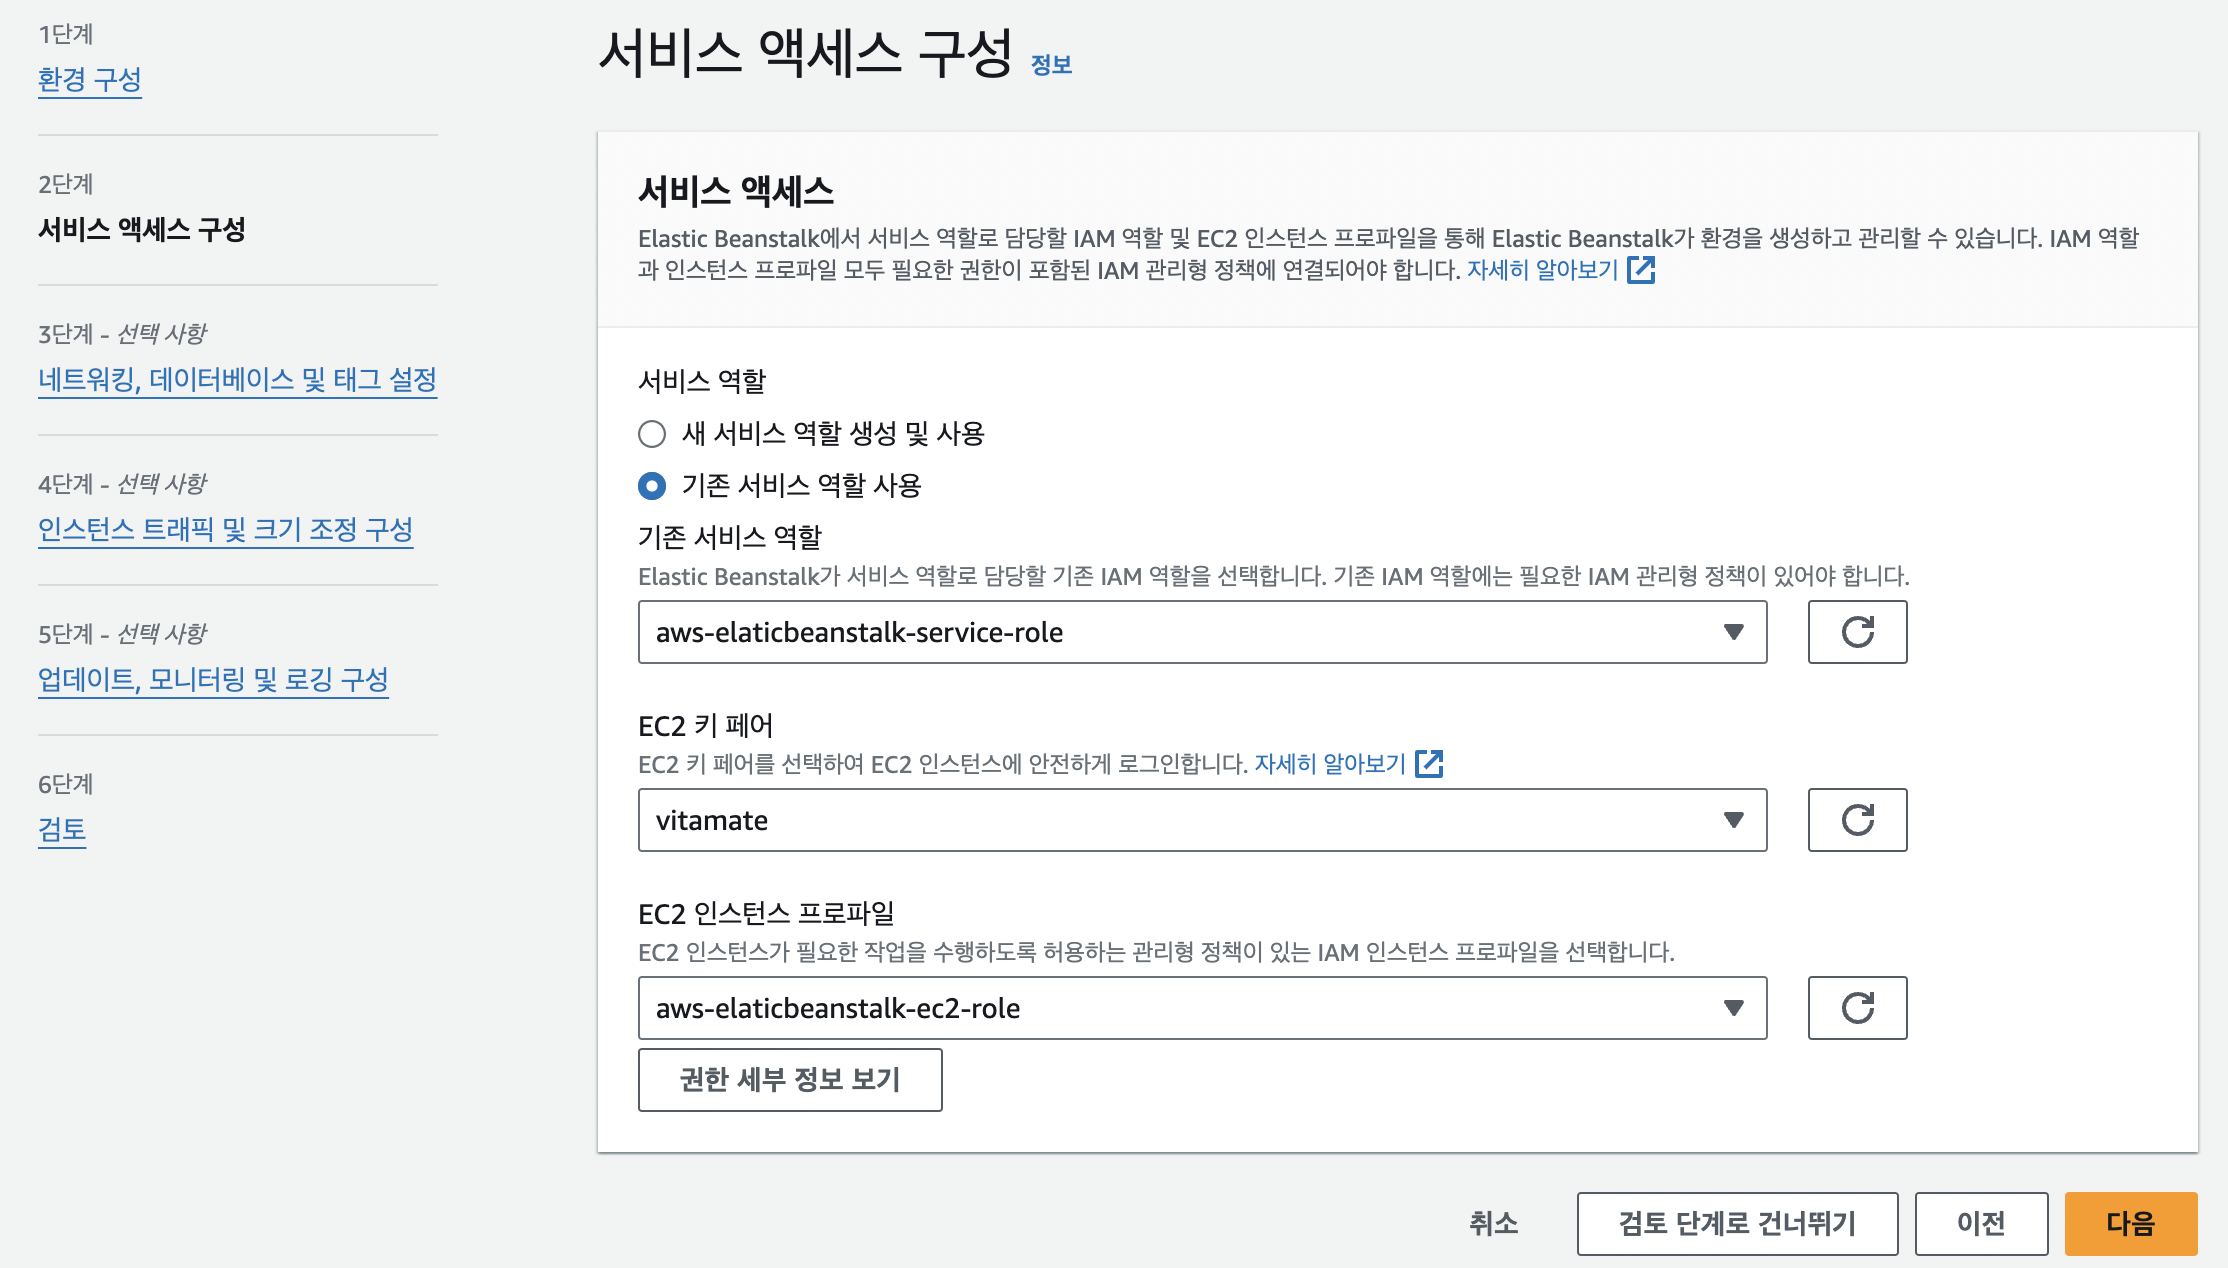
IAM - 역할 생성
Elastic Beanstalk이 정상적으로 작동하기 위해서는 두 가지 역할이 필요하다
1. Elastic Beanstalk 자체의 권한
2. Elastic Beanstalk이 만들 Ec2 권한
1. Elastic Beanstalk 자체 역할 생성
권한 정책은
AWSElasticBeanstalkEnhancedHealth
AWSElasticBeanstalkManagedUpdatesCustomerRolePolicy
이렇게 두 개 선택
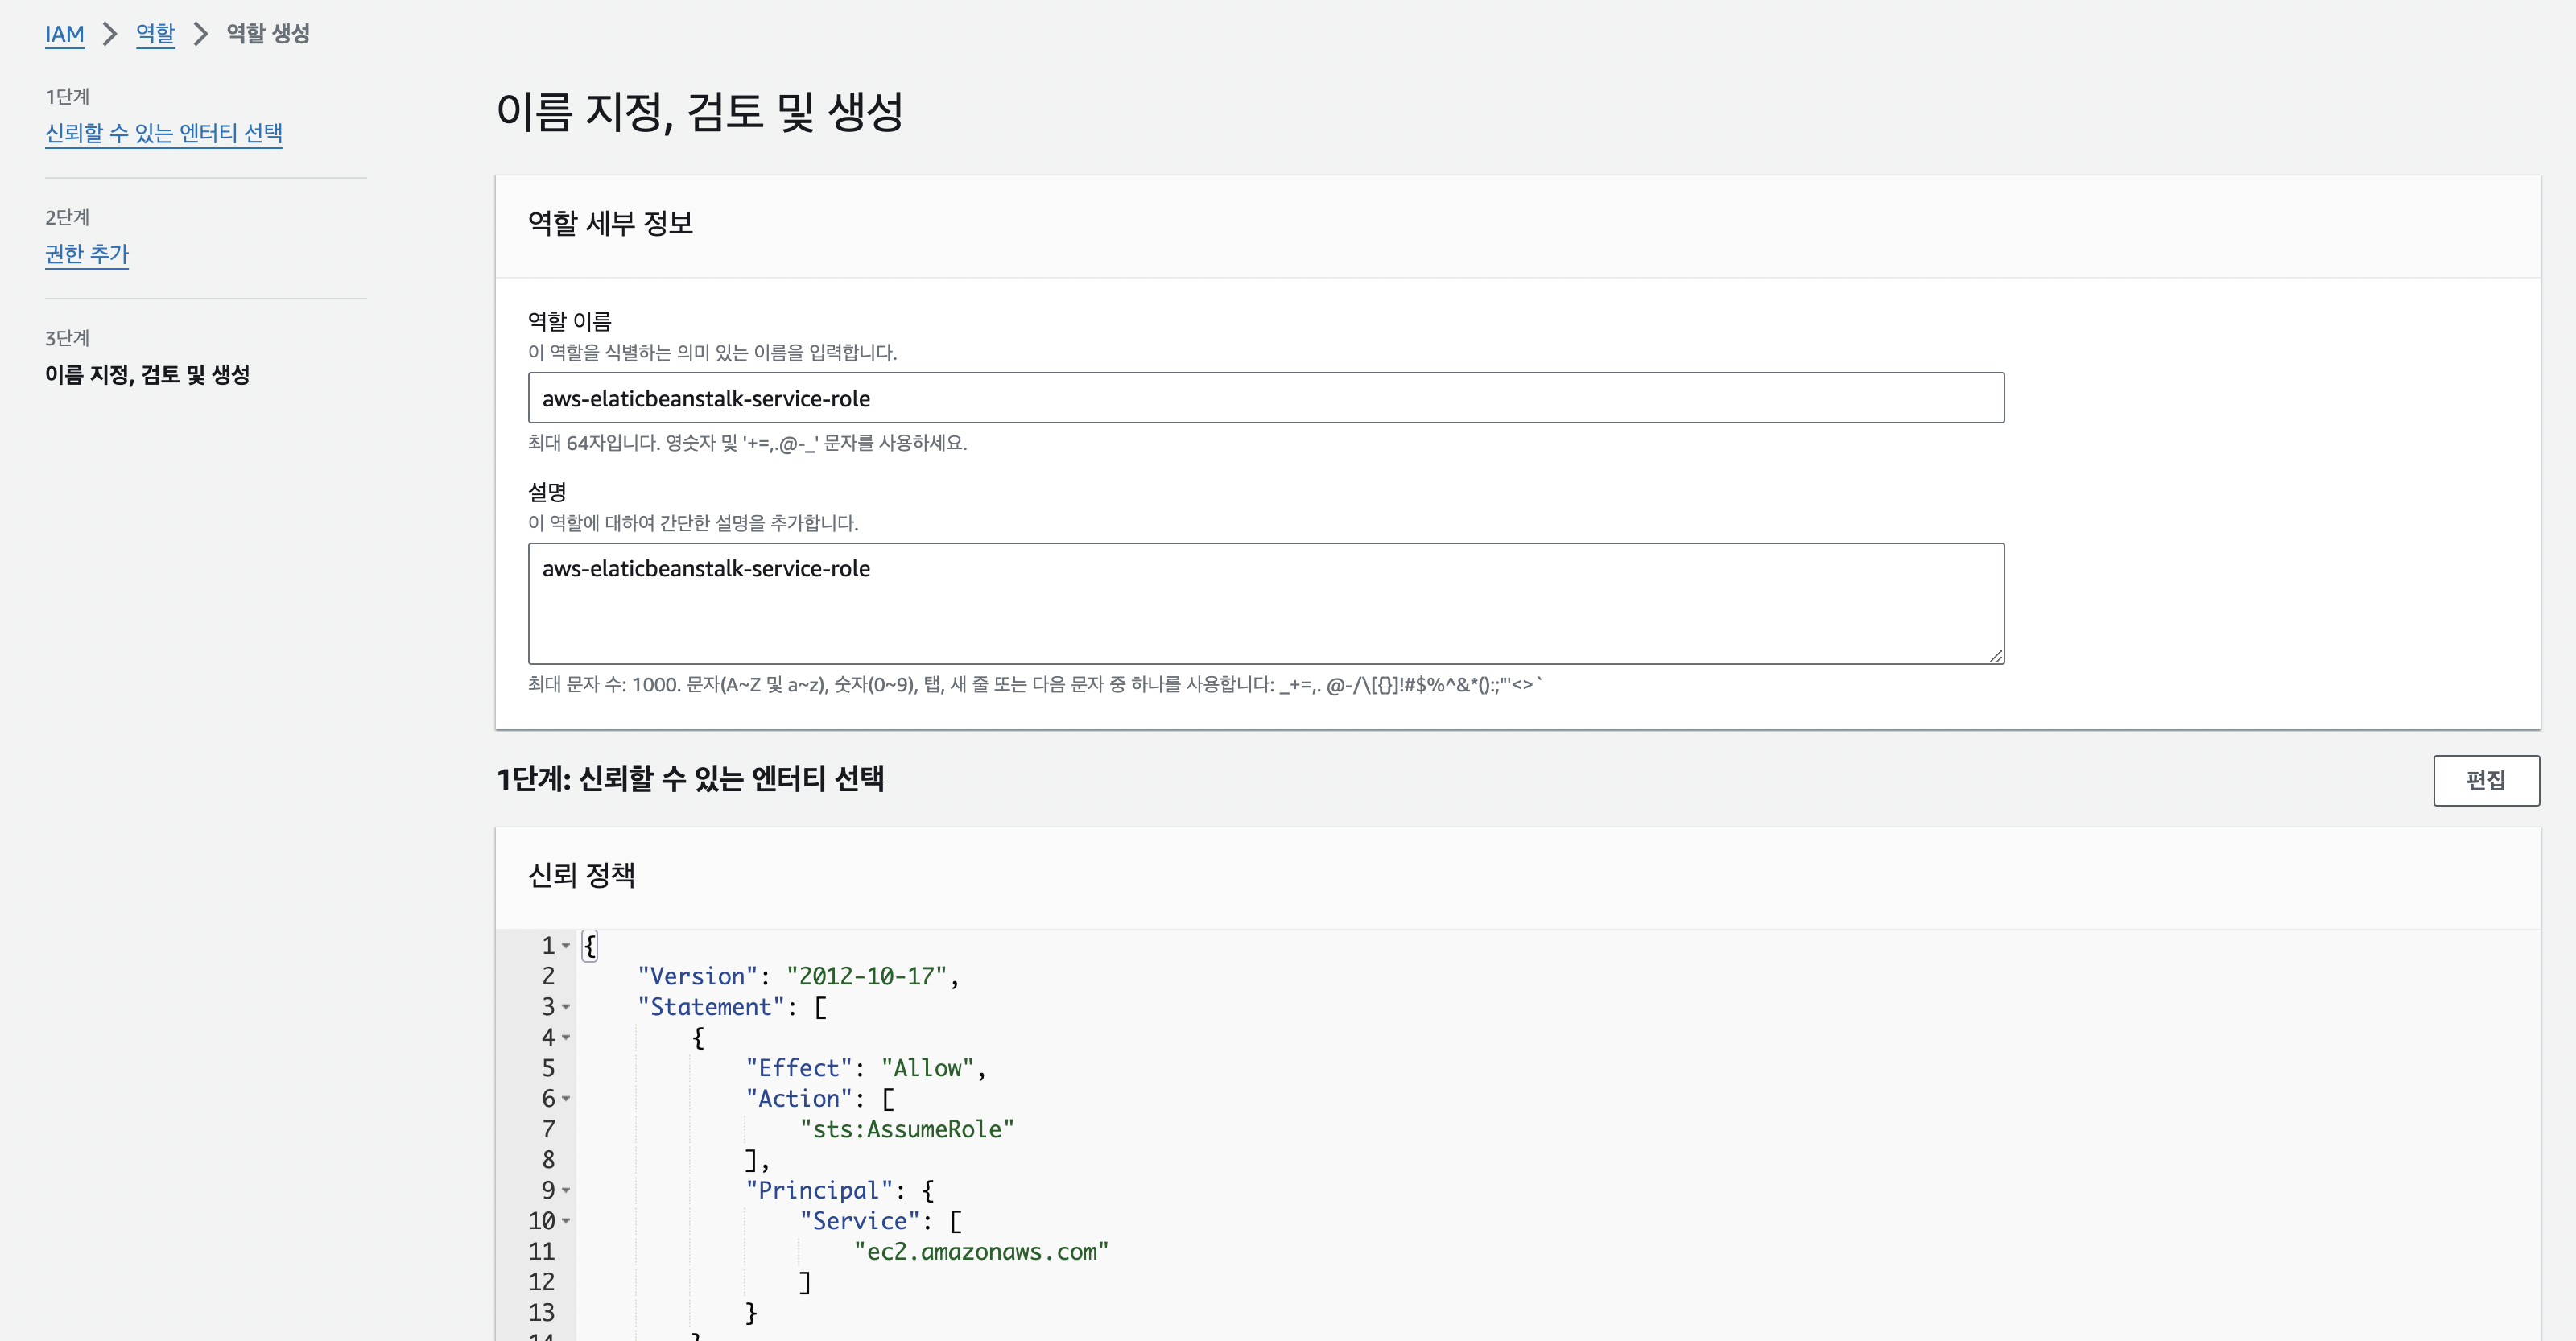
역할 이름 적고
설명 부분 꼭 넣기!!
신뢰 정책 건너뛰고 역할 생성
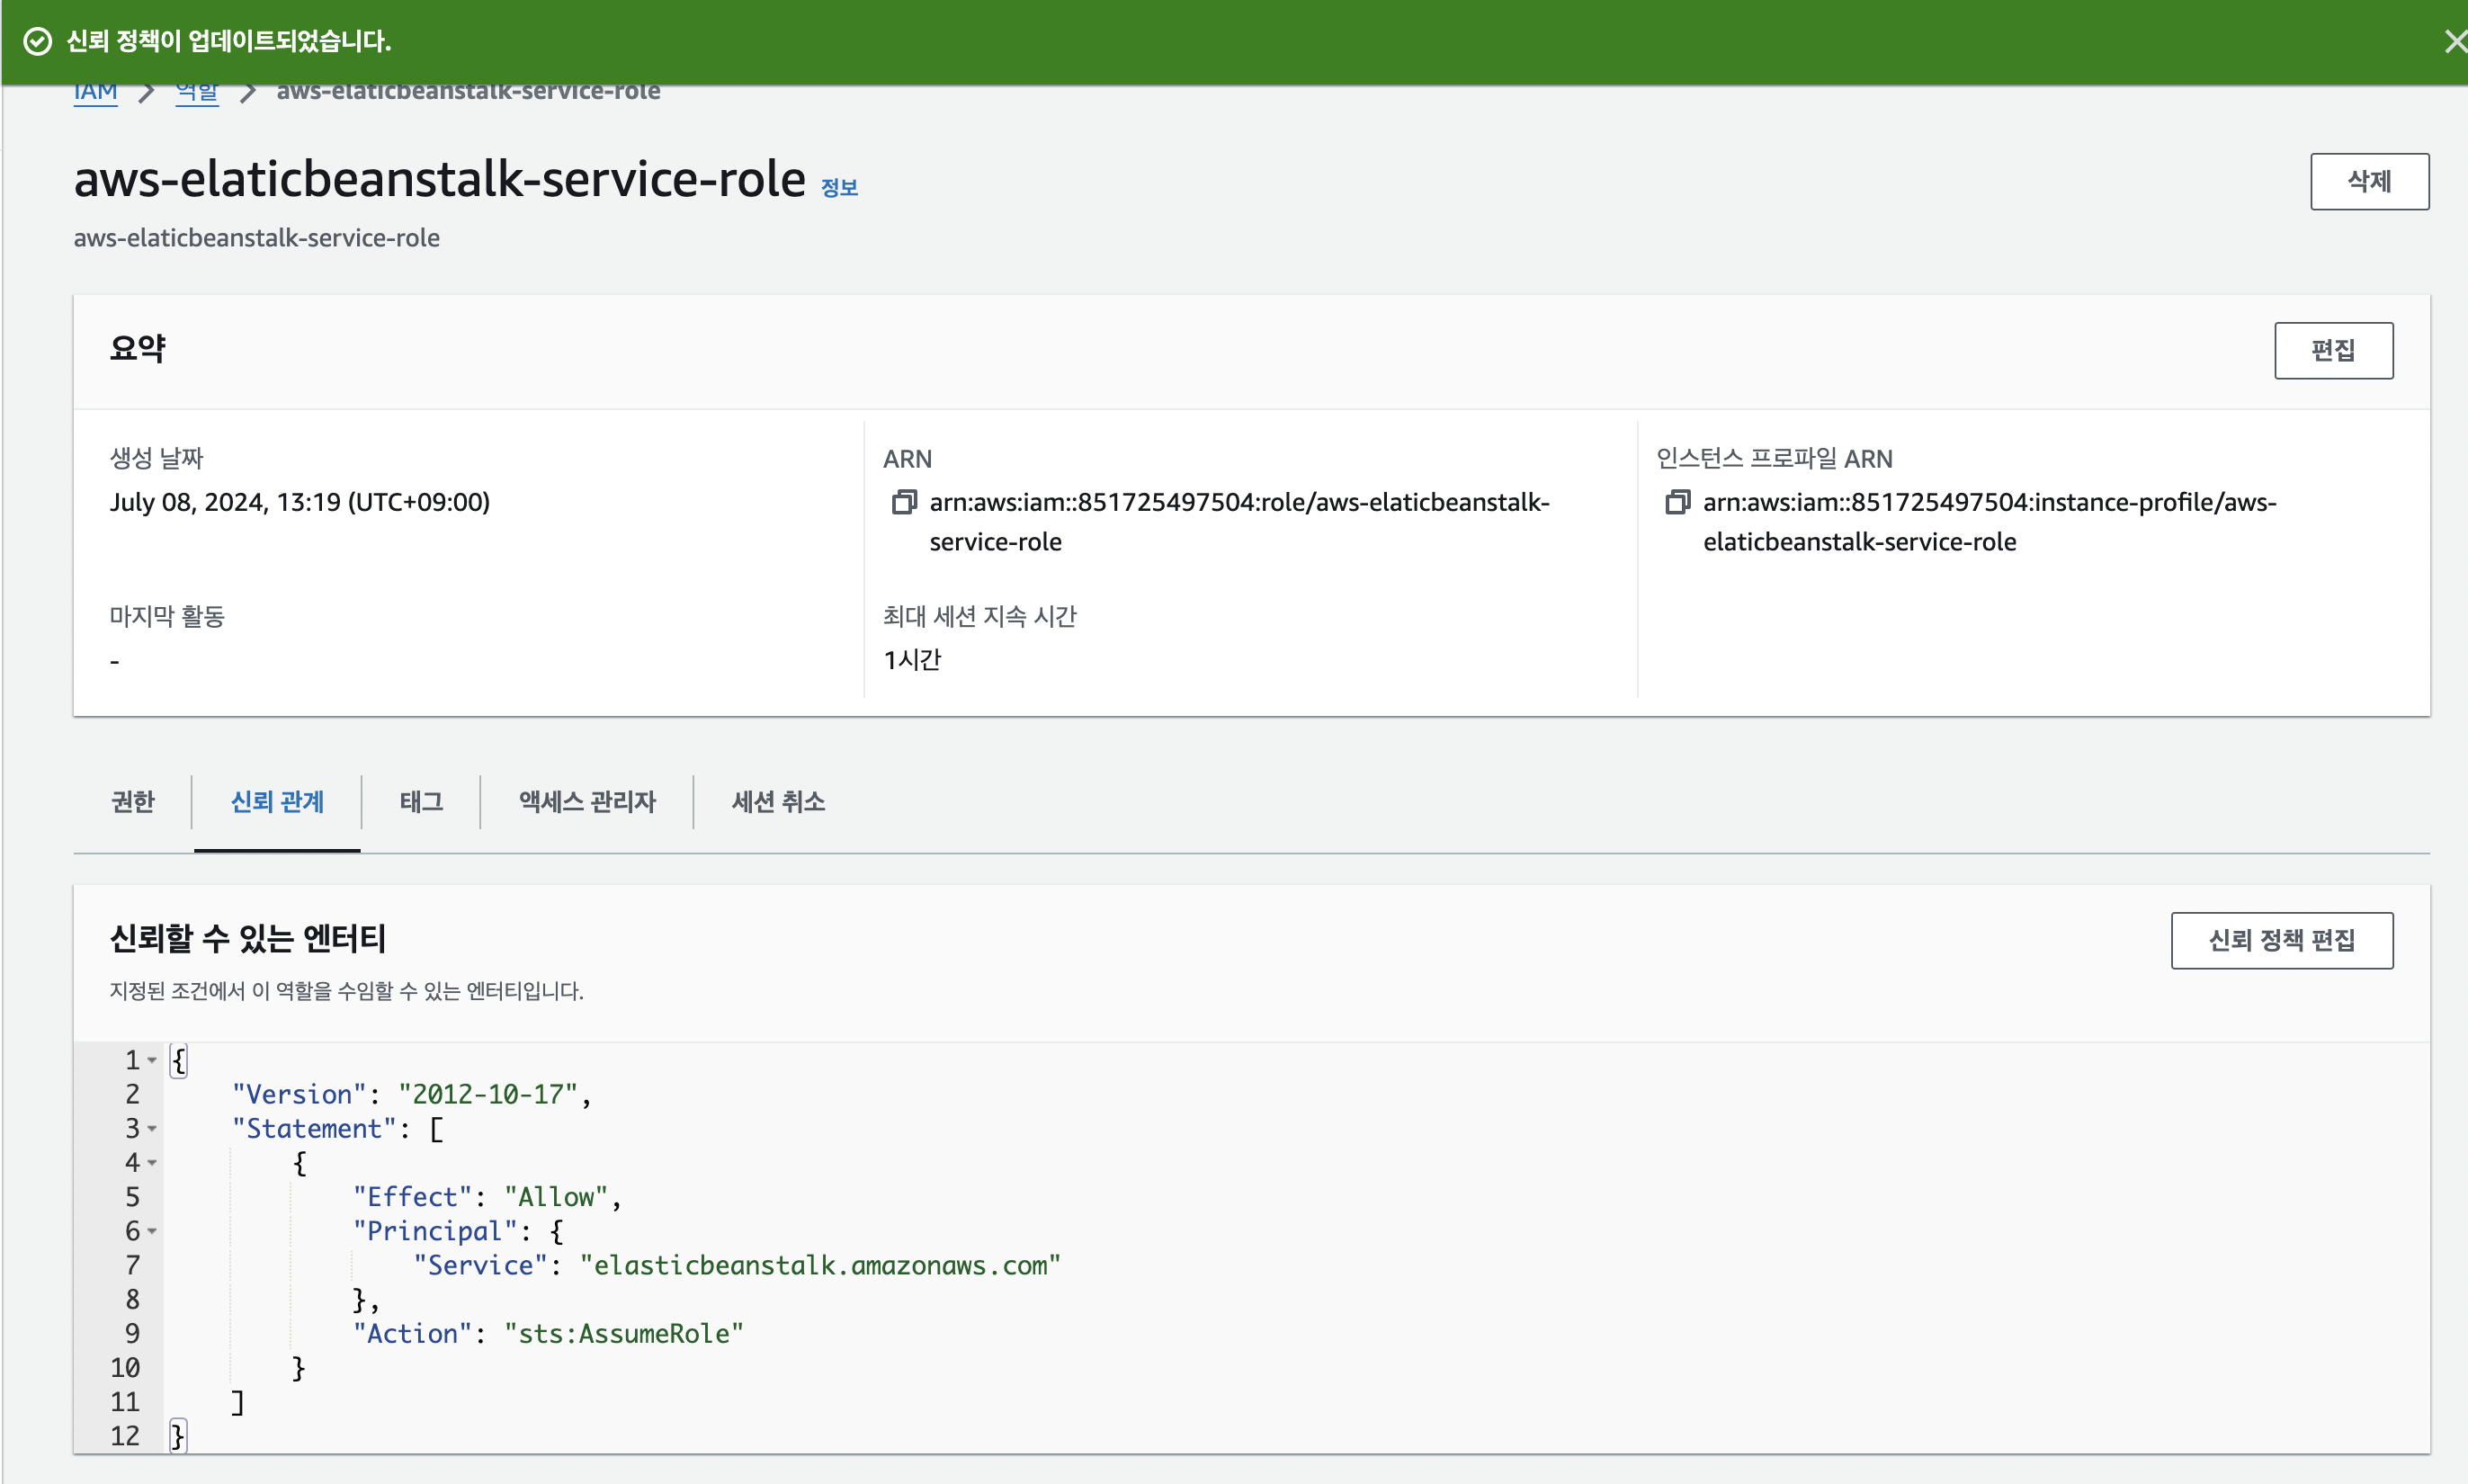
역할 생성 후 -> 신뢰 정책 편집
"Service": "elasticbeanstalk.amazonaws.com" 로 변경
2. EC2 역할 생성
앞 단계 동일
권한 정책은
AWSElasticBeanstalkMulticontainerDocker
이렇게 3개 선택
Elastic Beanstalk 만들기
환경 생성
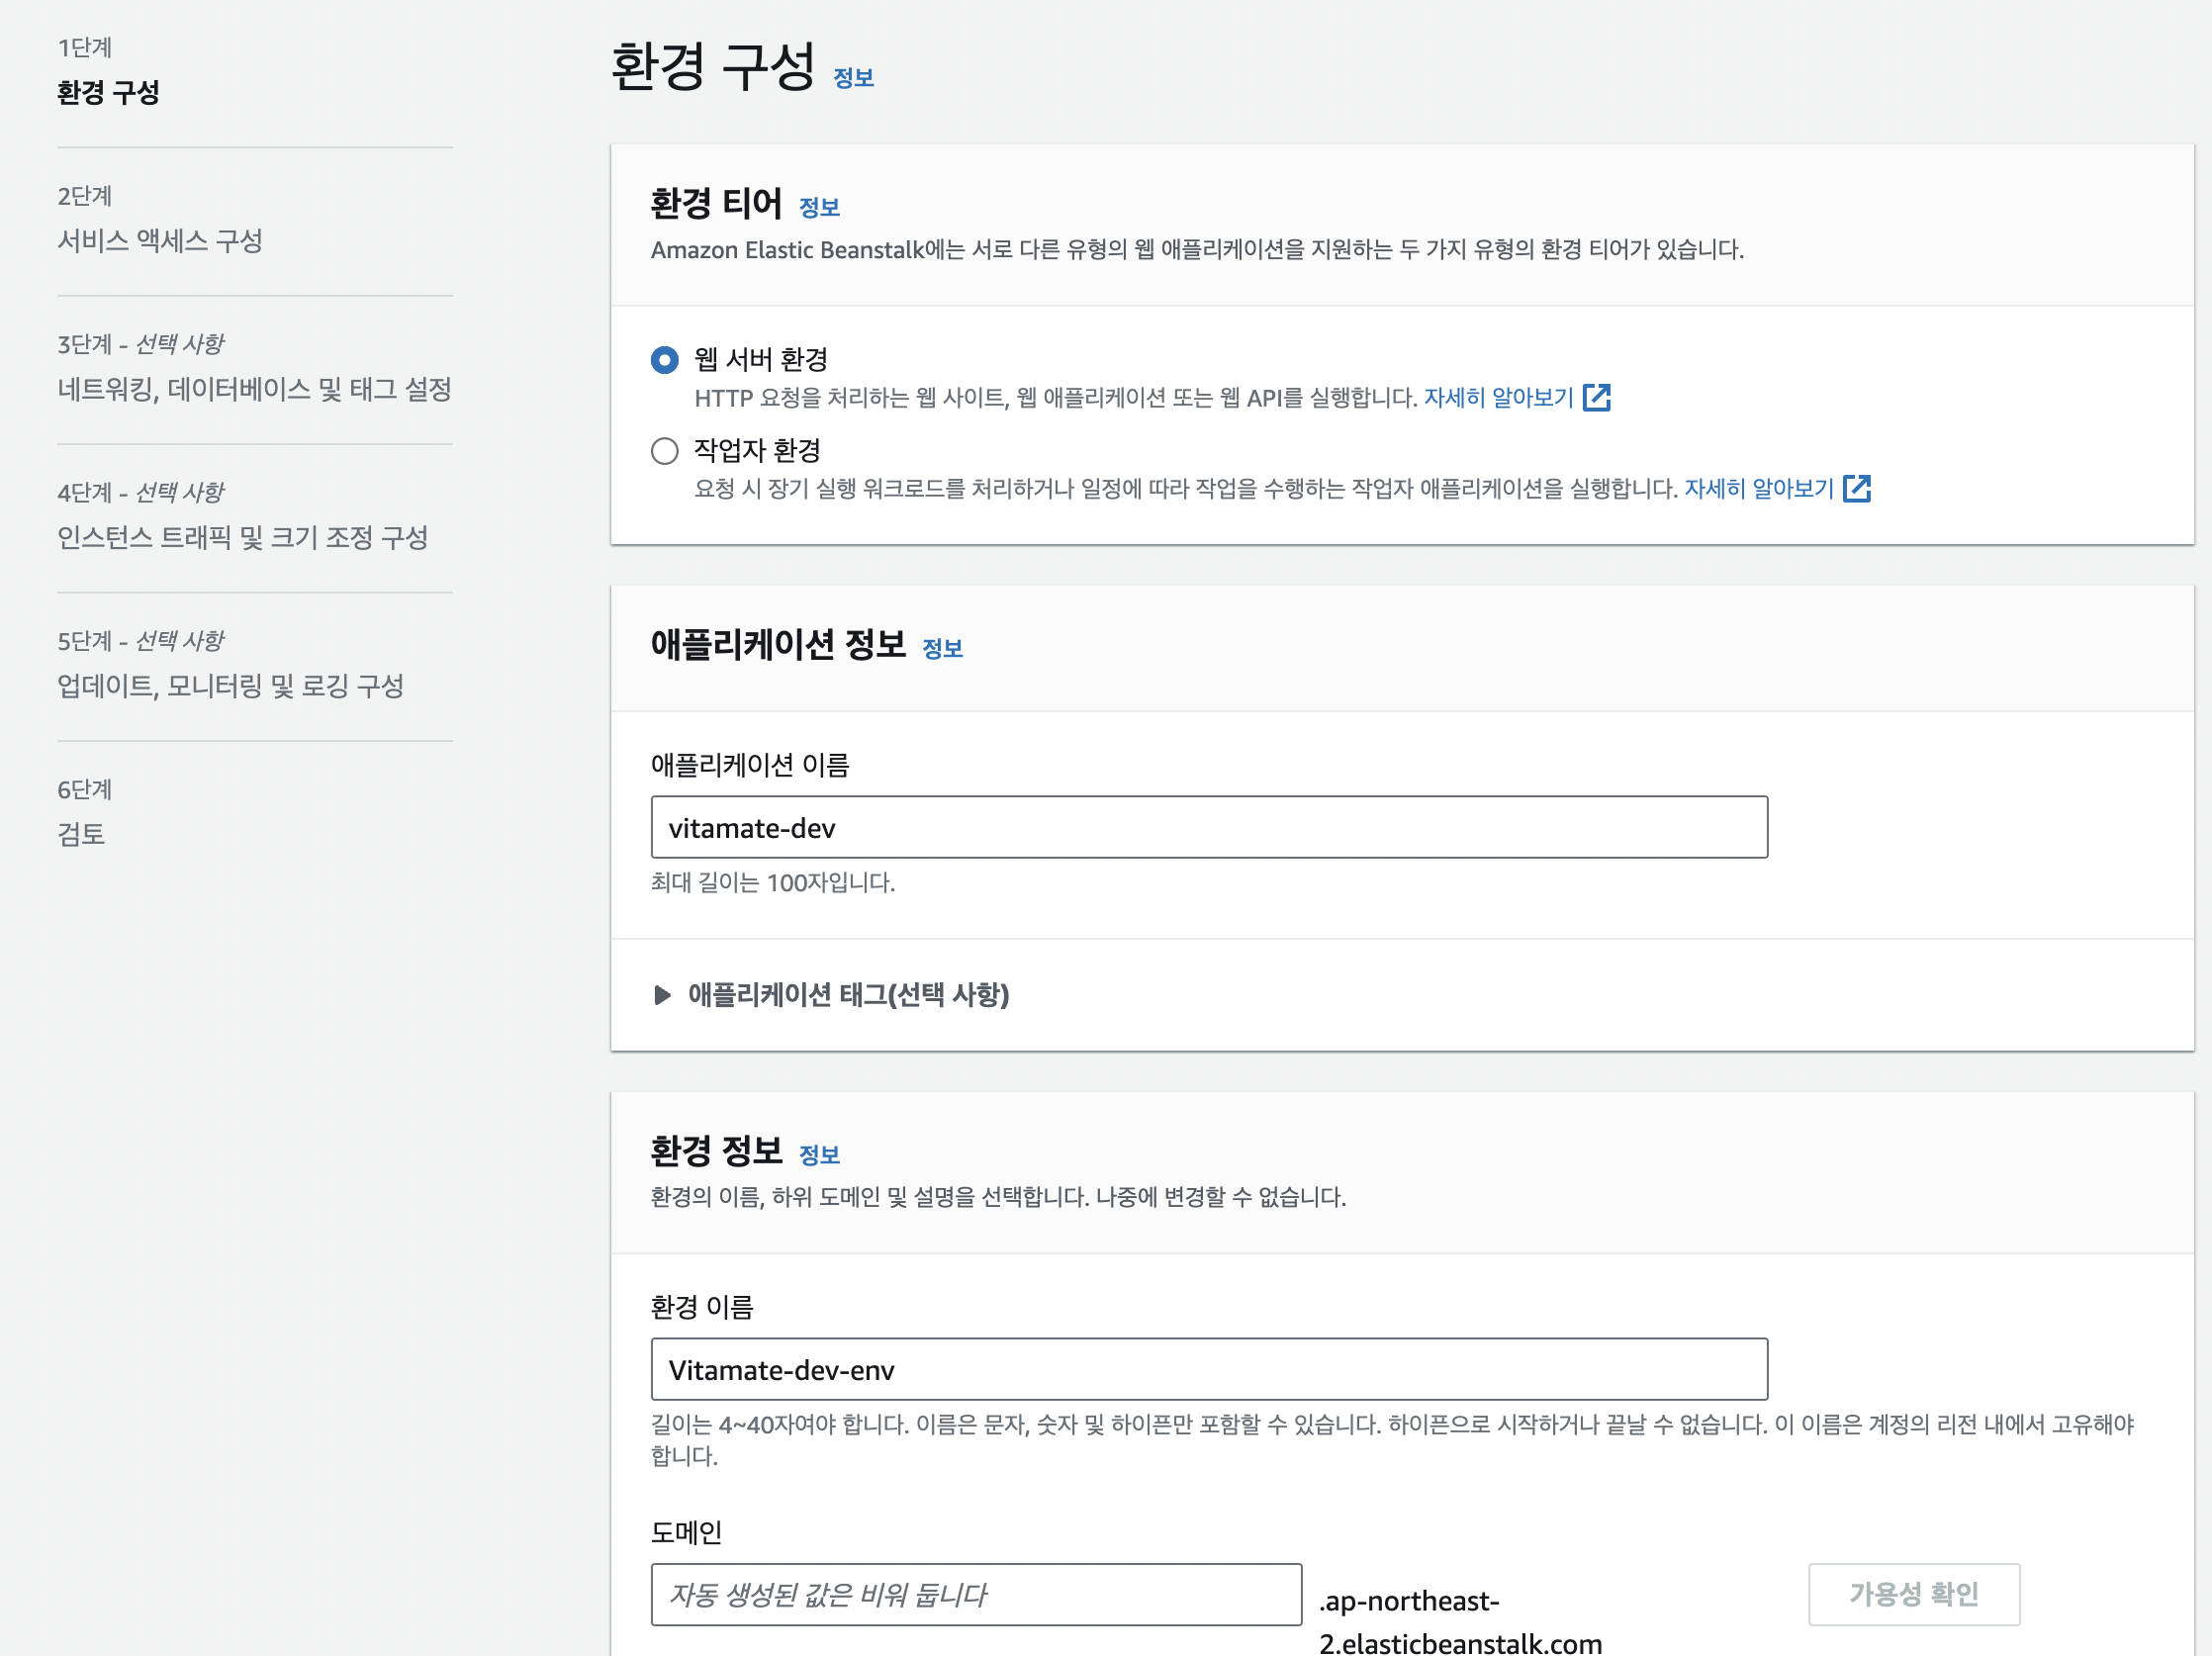
* 환경 이름은 알아서 만들어준다
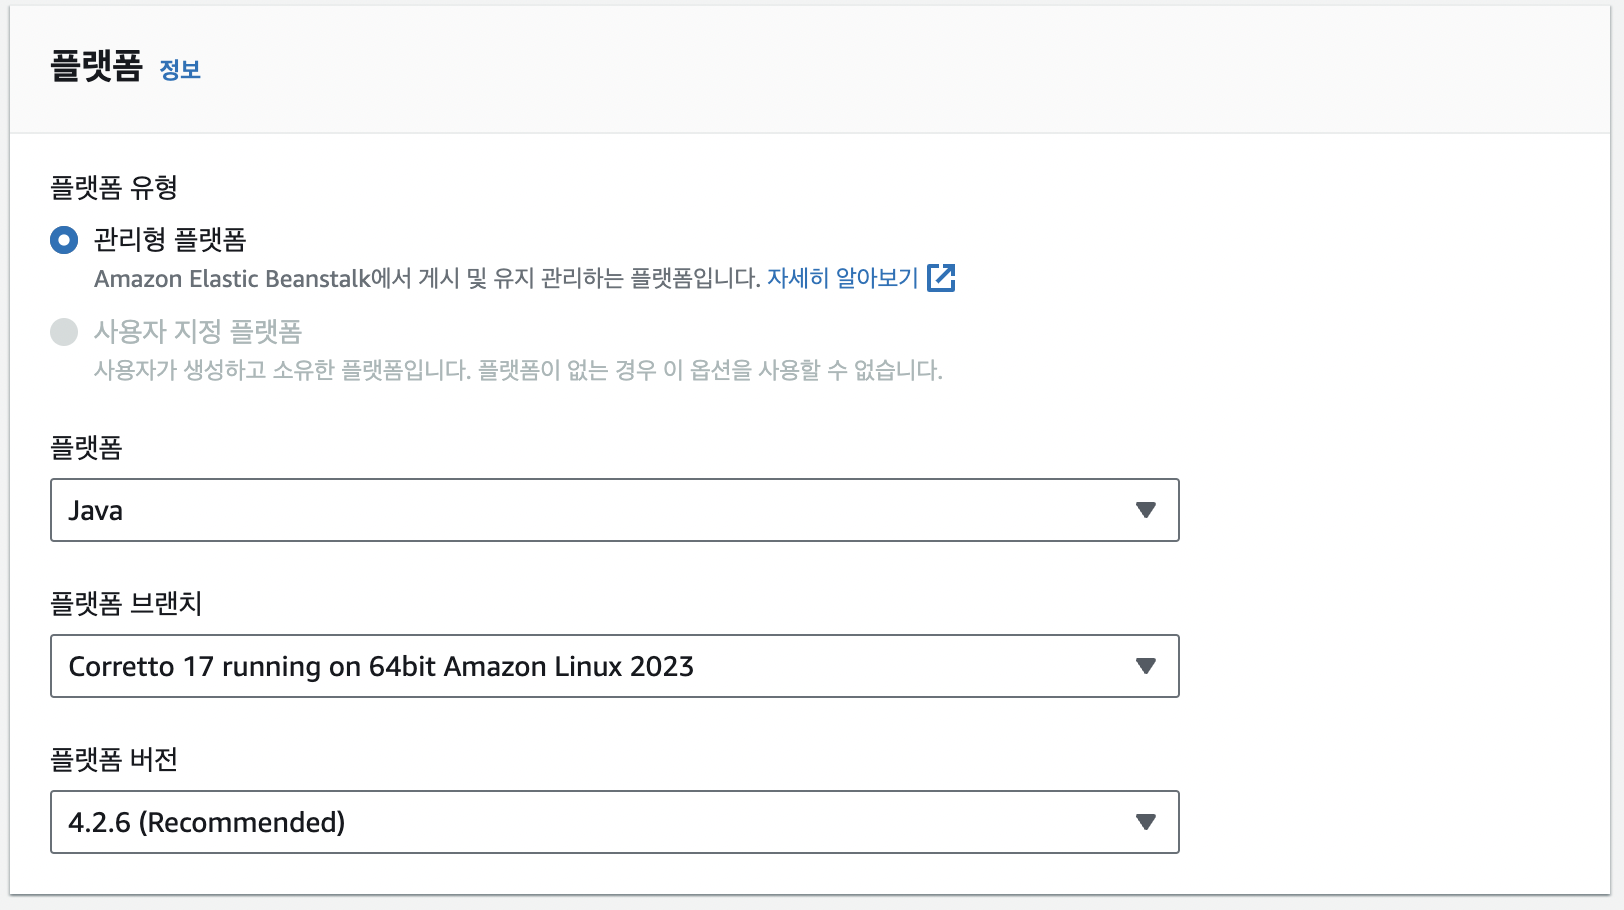
플랫폼은 Java 17
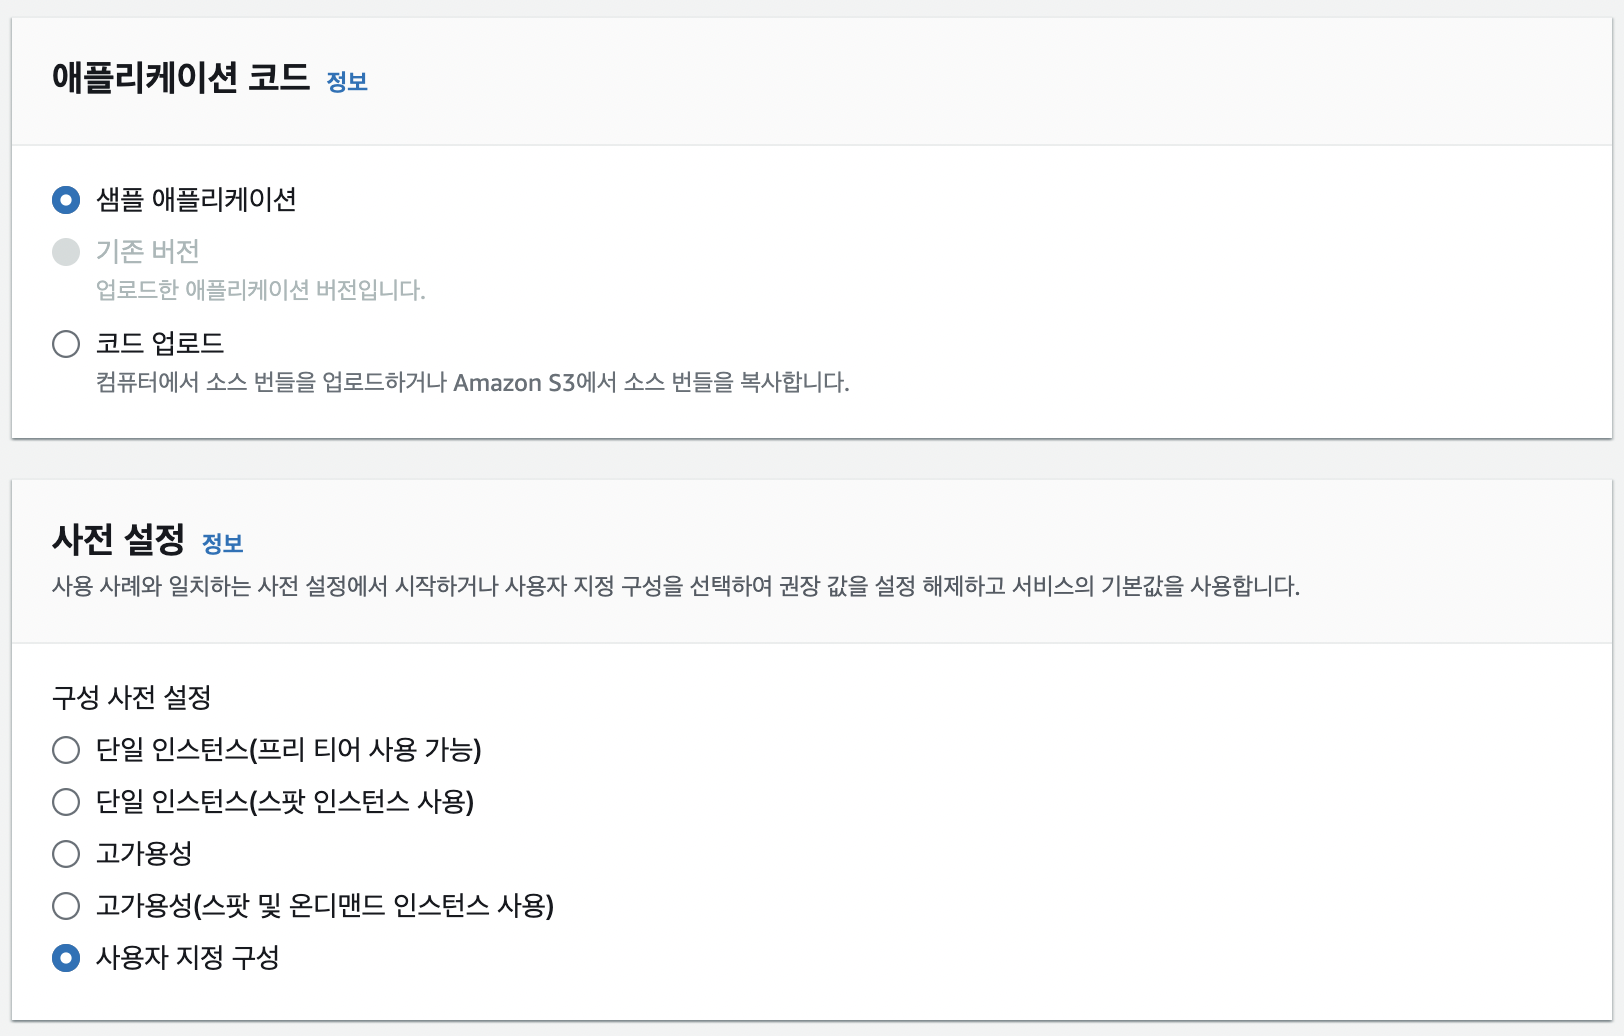
사전 설정 - 사용자 지정 구성! ("무중단" 배포를 위해)
* 키 페어는 미리 만들어놓은 것
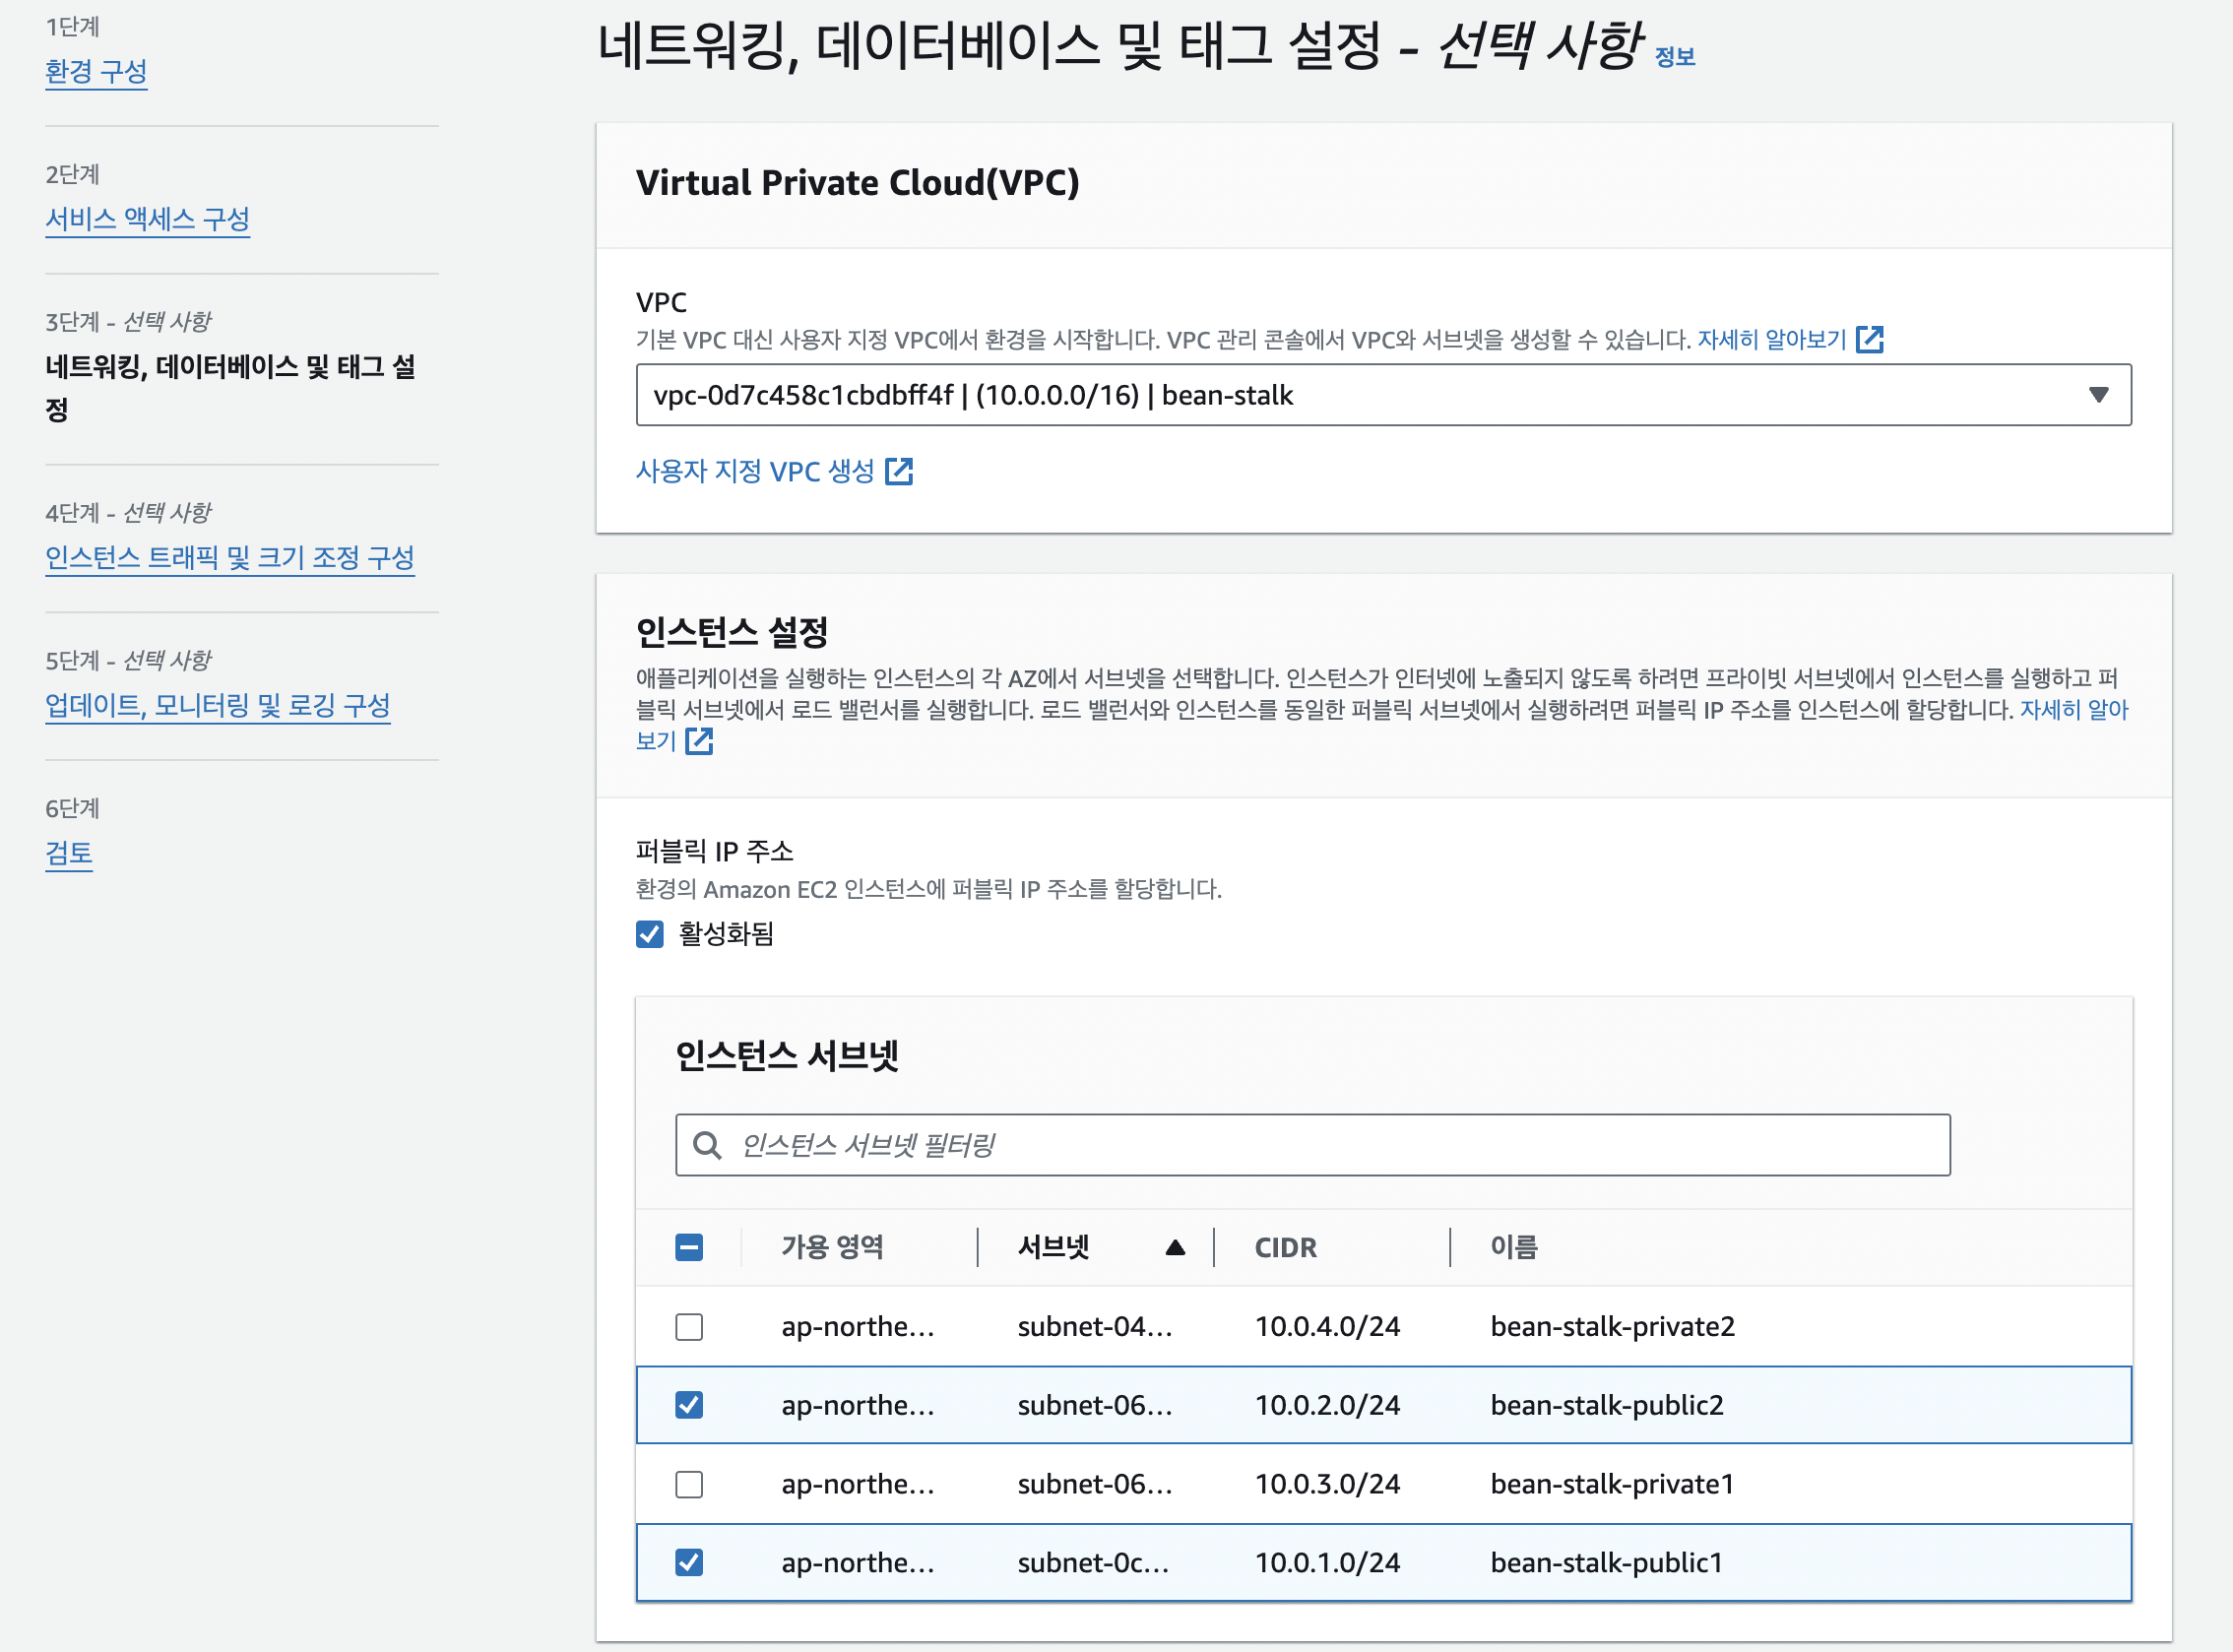
만들어둔 VPC 선택하고
중요!!
퍼블릭 IP 주소 "활성화됨" 체크
인스턴스 서브넷은 public 2개 만들었던 것 체크
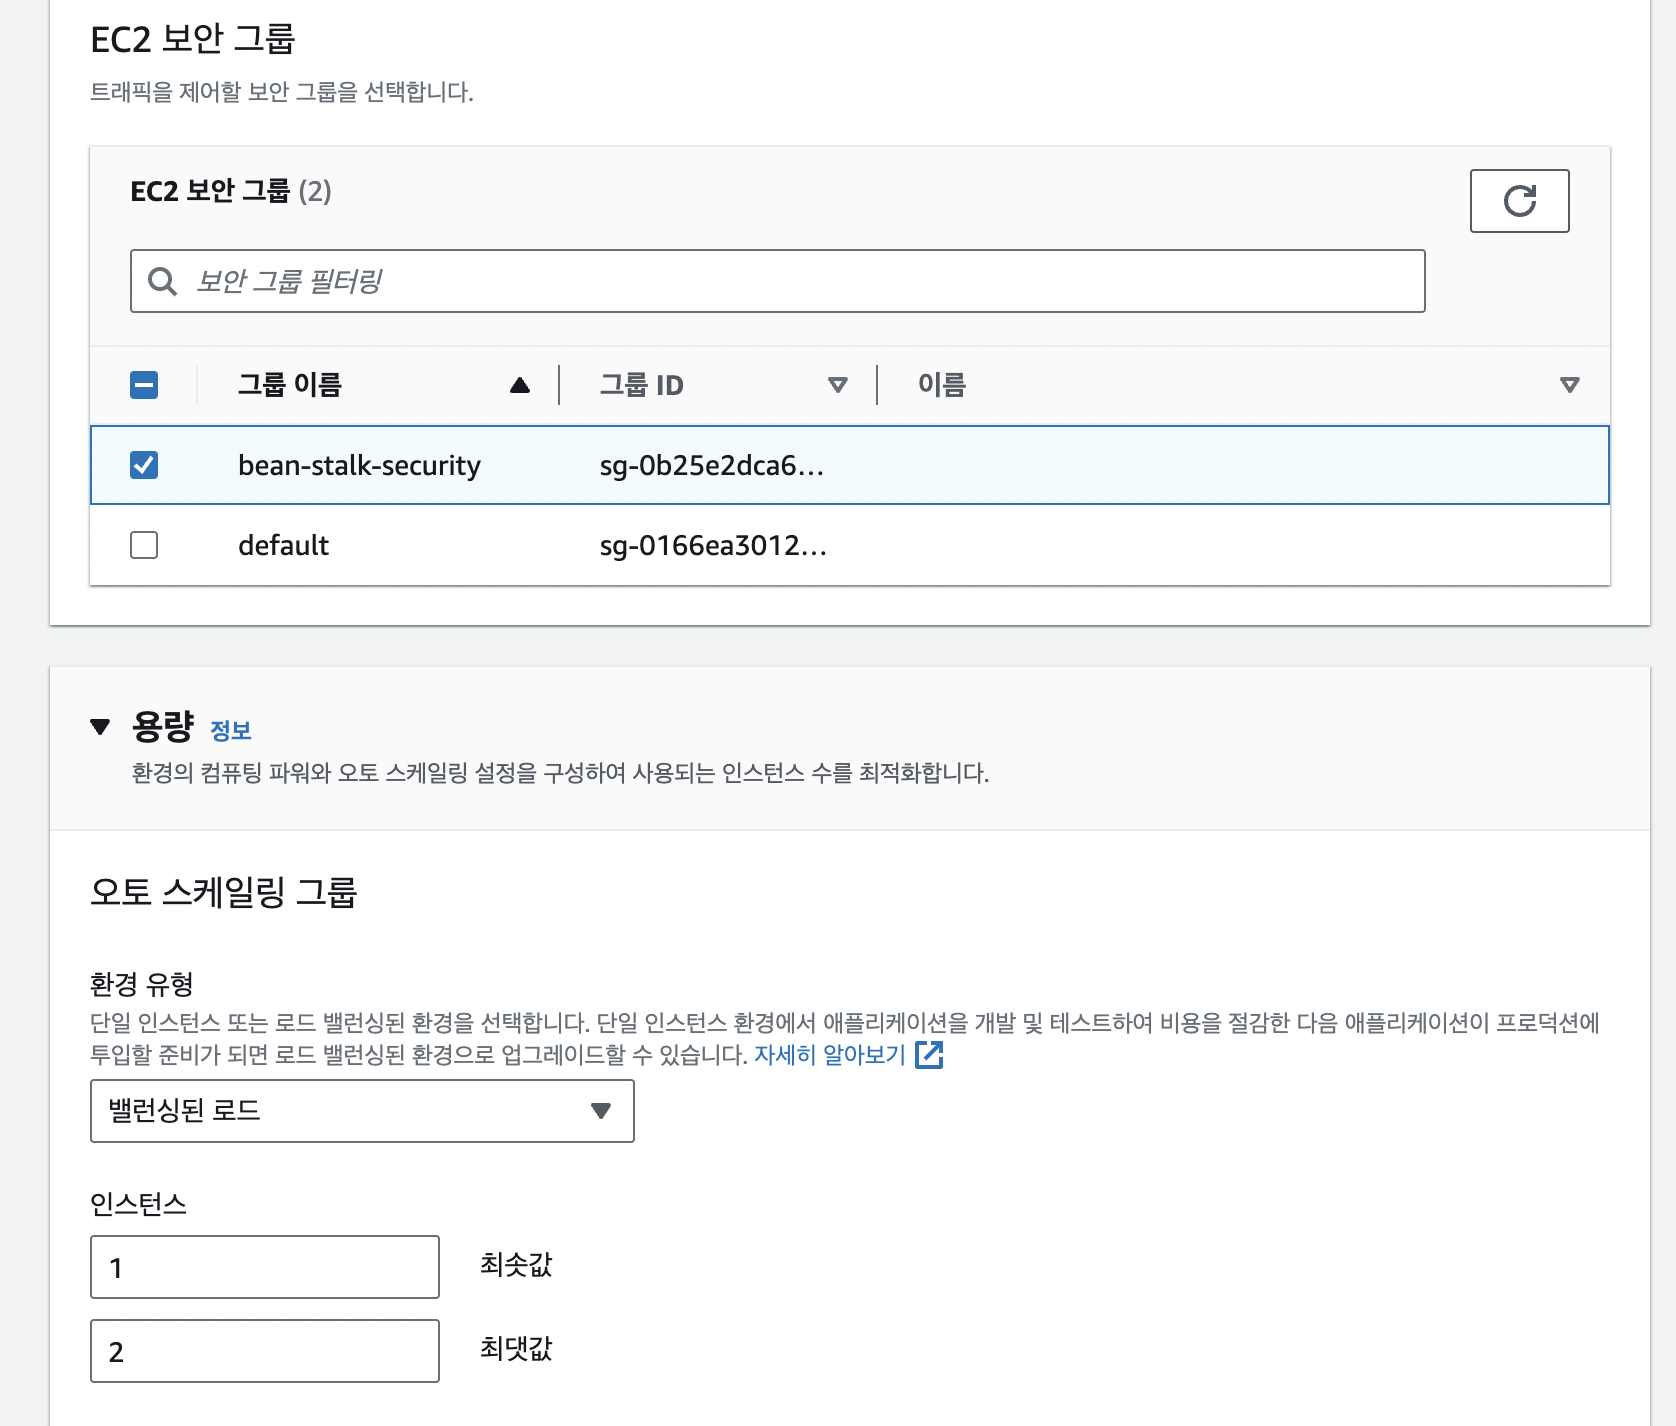
위에서 만든 보안그룹 체크
중요!!
오토스케일링 그룹 - 밸런싱된 로드
인스턴스 최솟값 1, 최댓값 2
* 최댓값 1로 하면 중단 배포가 됨


인스턴스 유형은 t3.micro만 남겨두자
* t3.small -> 돈나감
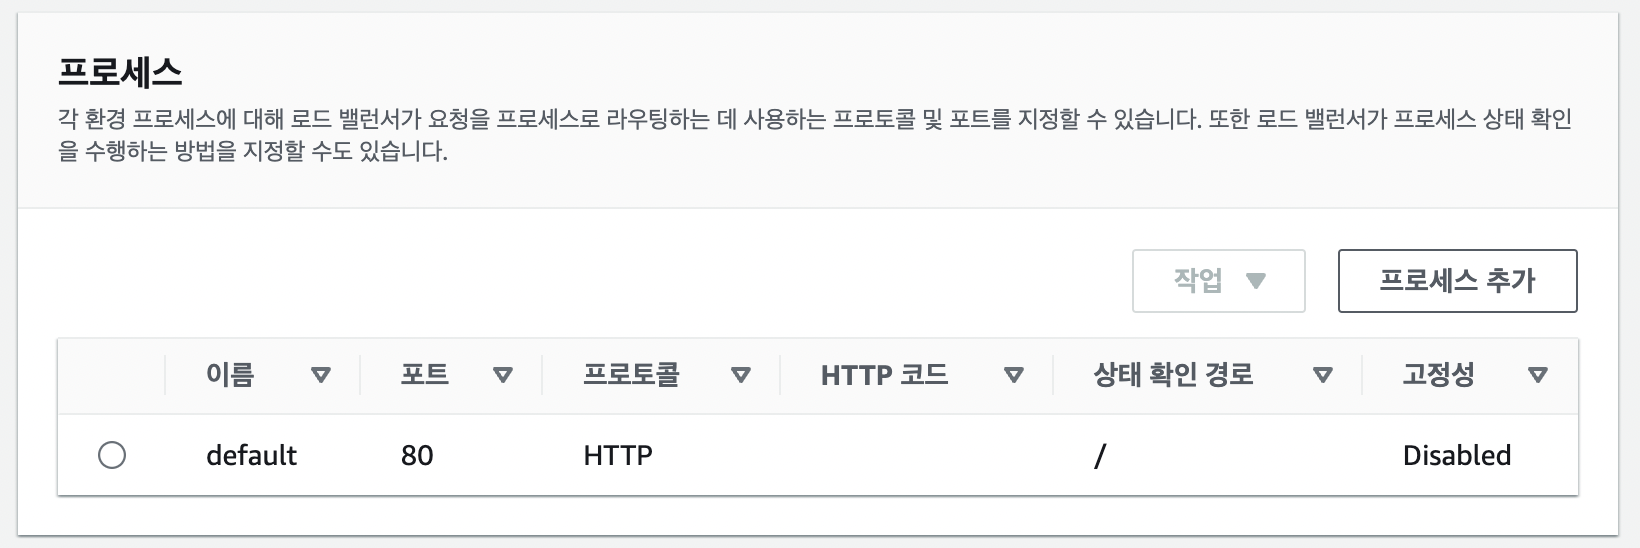
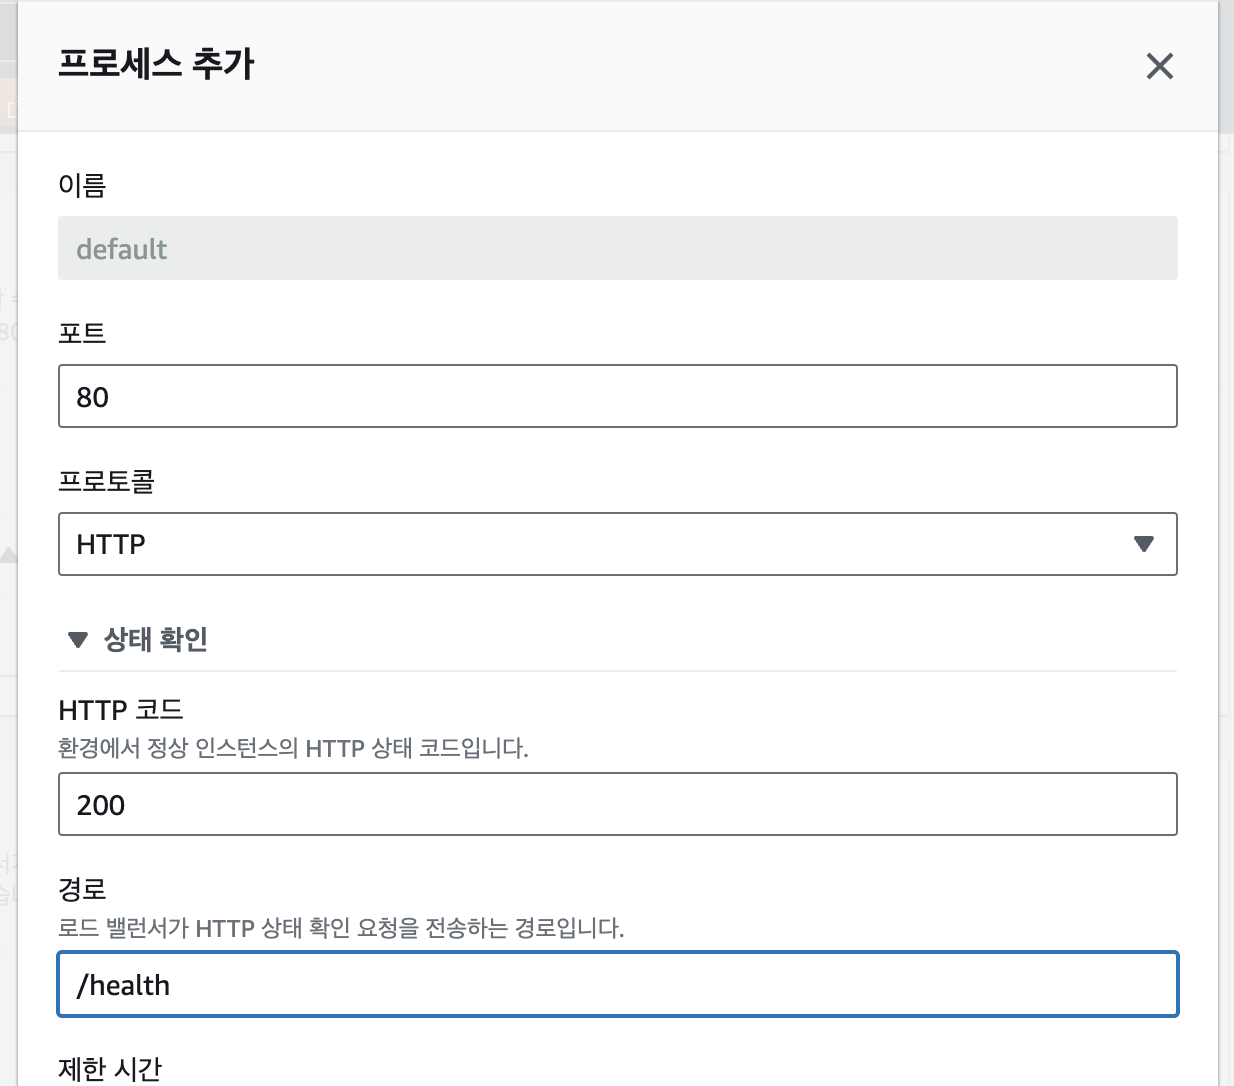
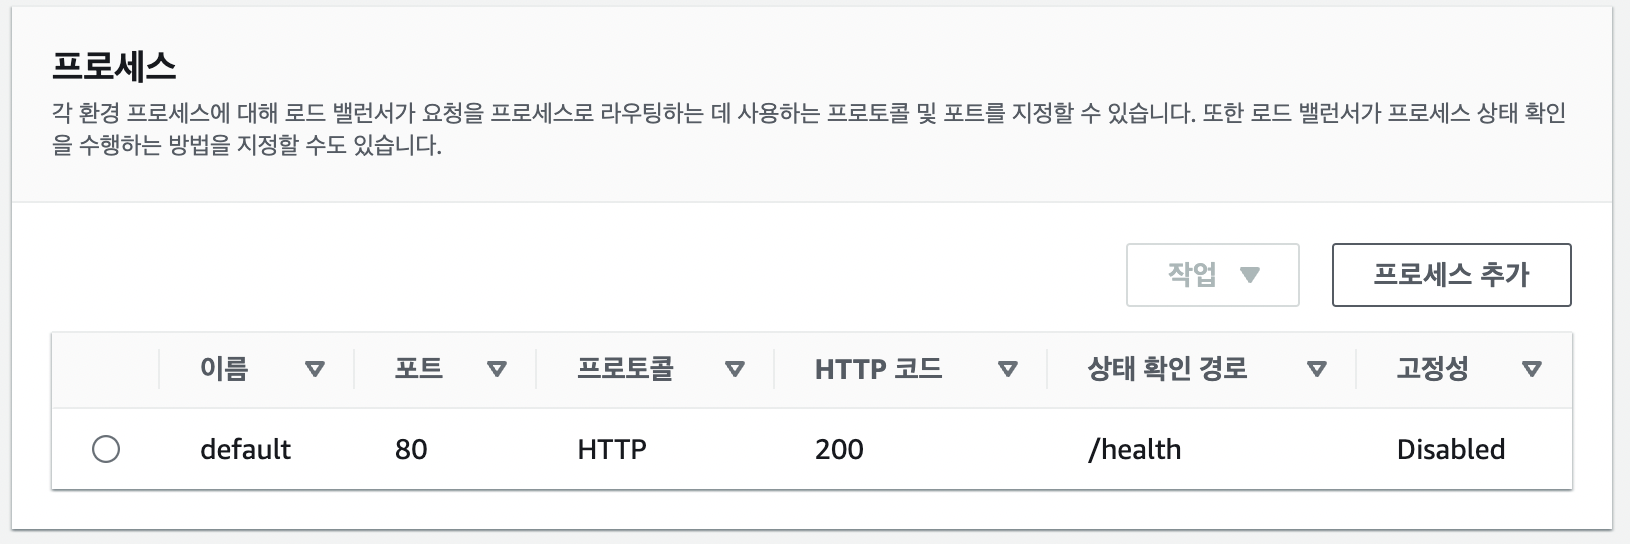
health check!
ec2안에 있는 웹서버가 잘 동작하는지 체크하는 것
-> GET 요청을 보내서 응답이 오는지 체크해봄
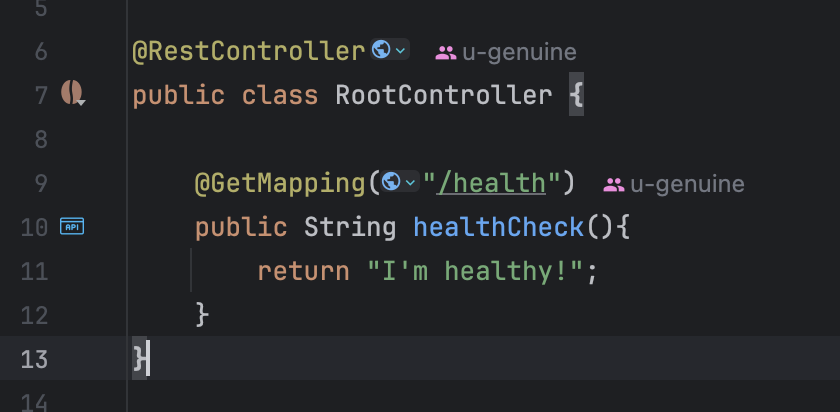
이 요청을 GET / 이 아닌 GET /health 로 보내도록 변경하자
+ /helath API 구현 해야함
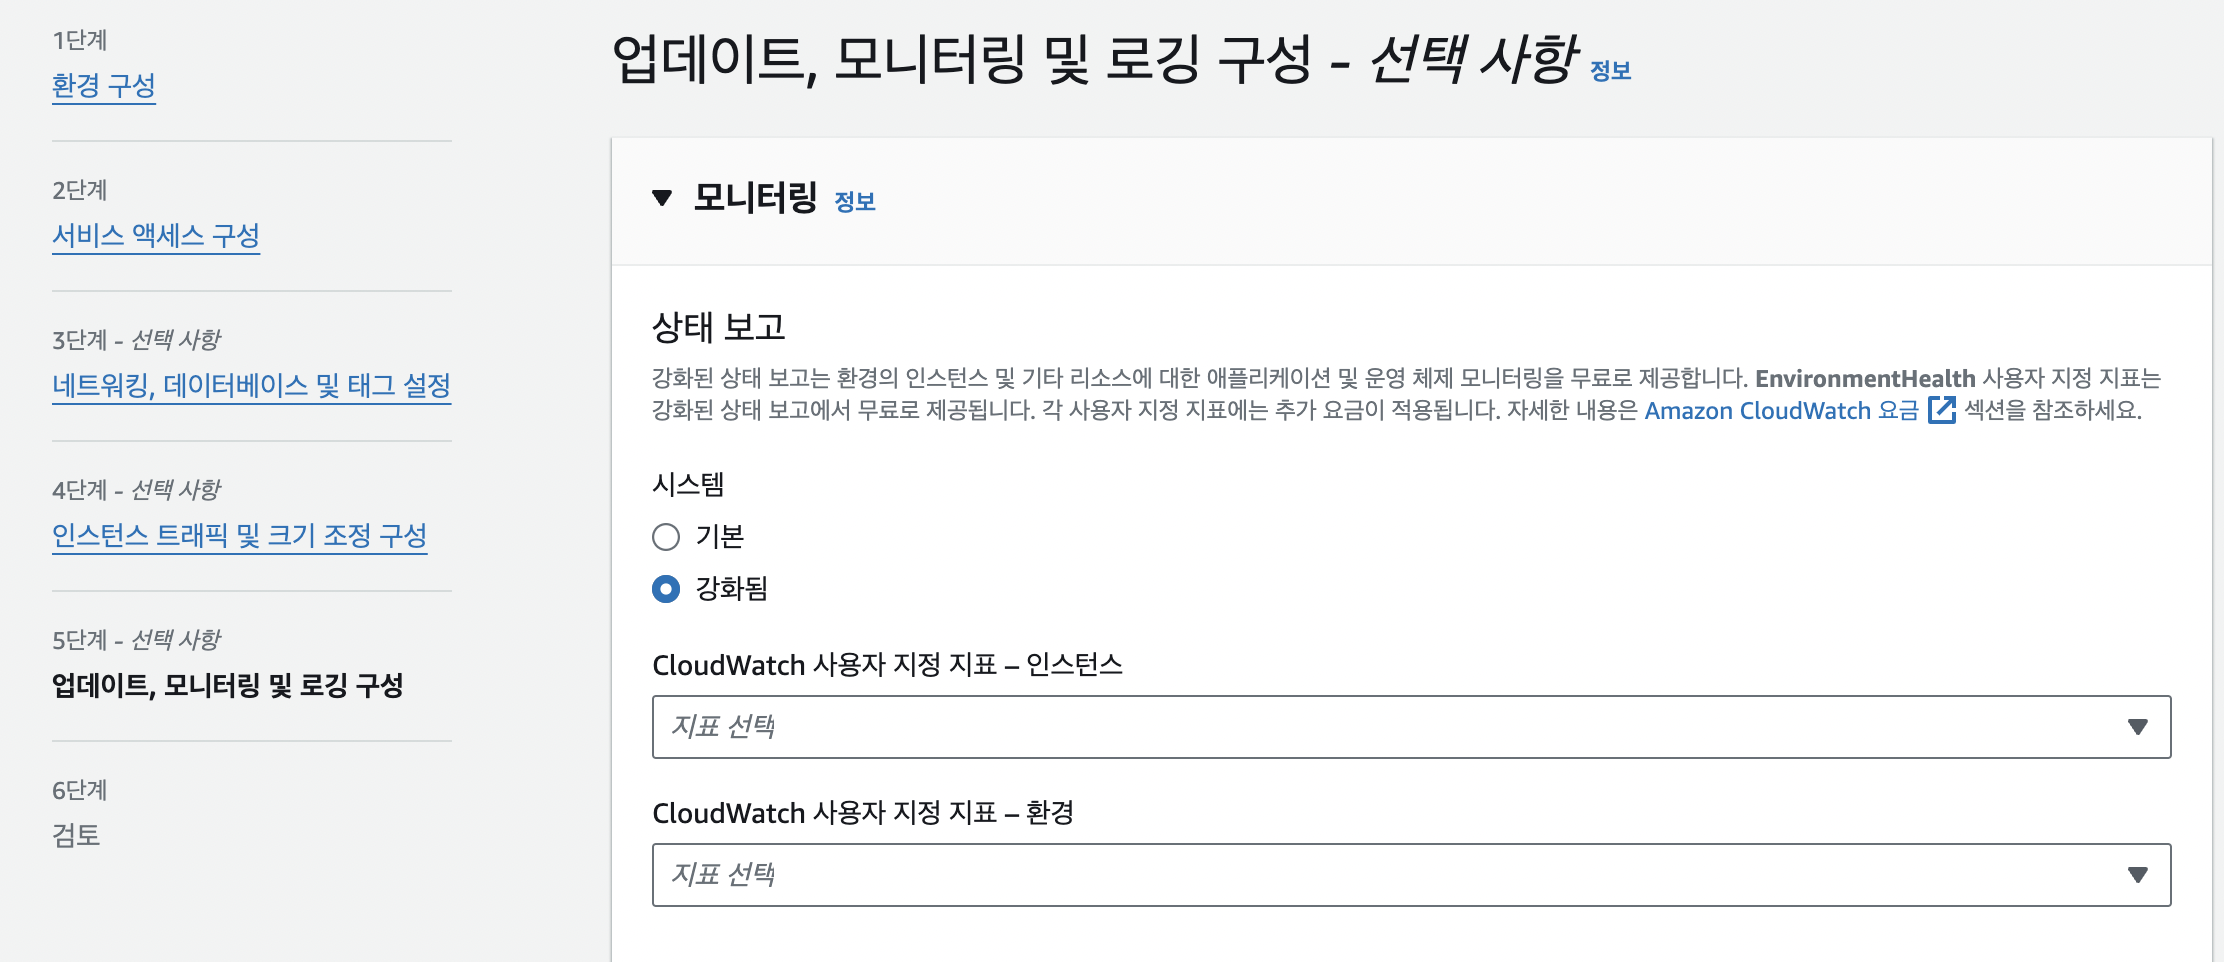
모니터링 - 상태보고 "강화됨" 체크
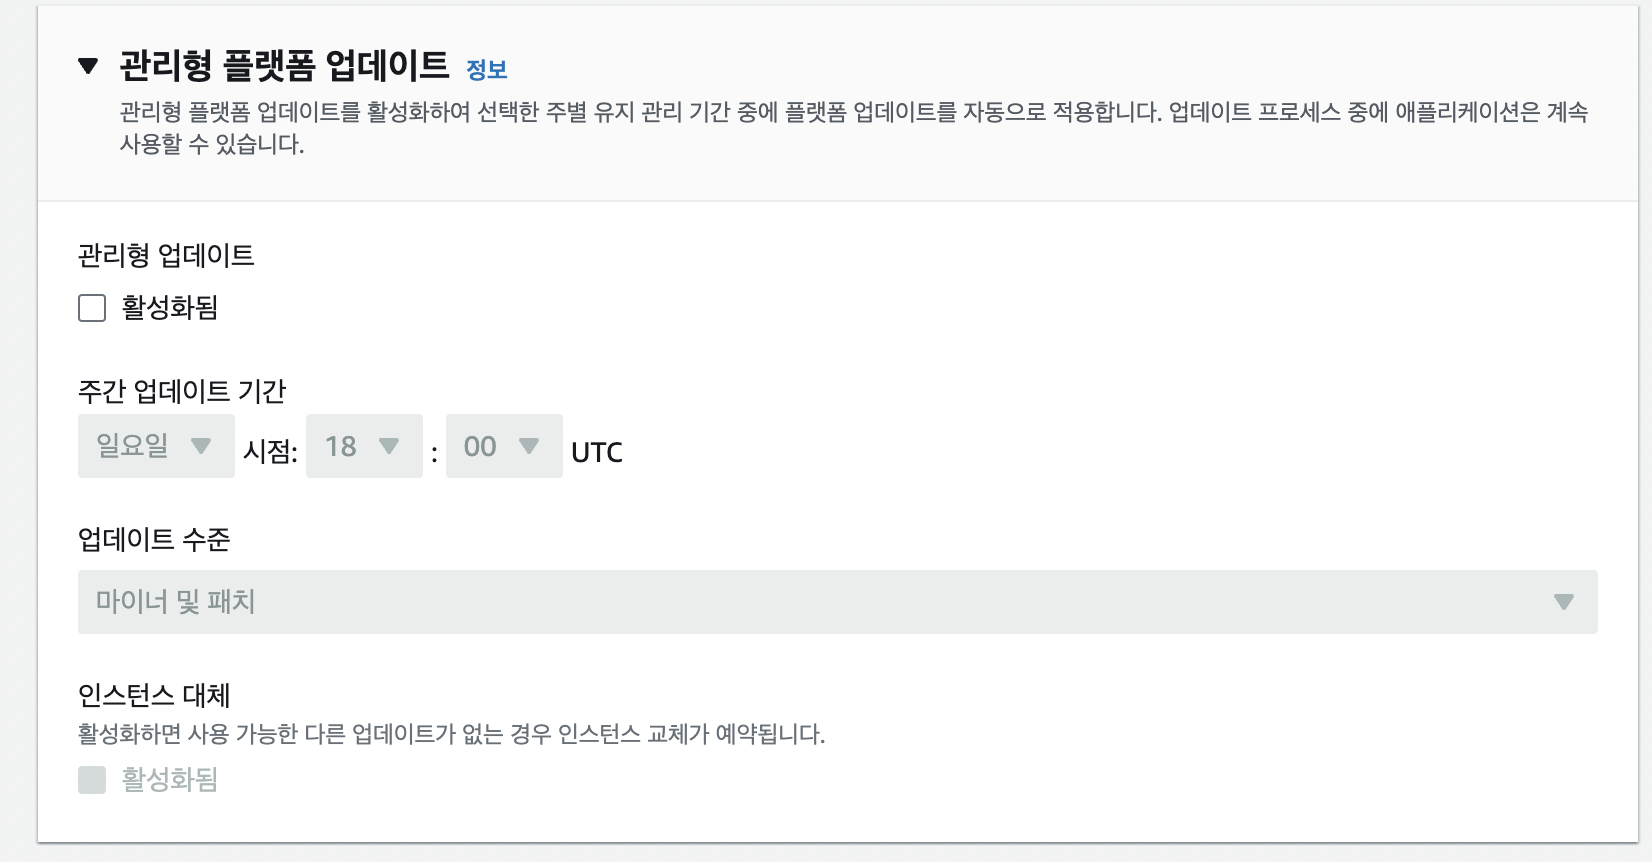
관리형 업데이트 "비활성화"

"추가 배치를 위한 롤링" 선택 - 무중단 배포를 위함
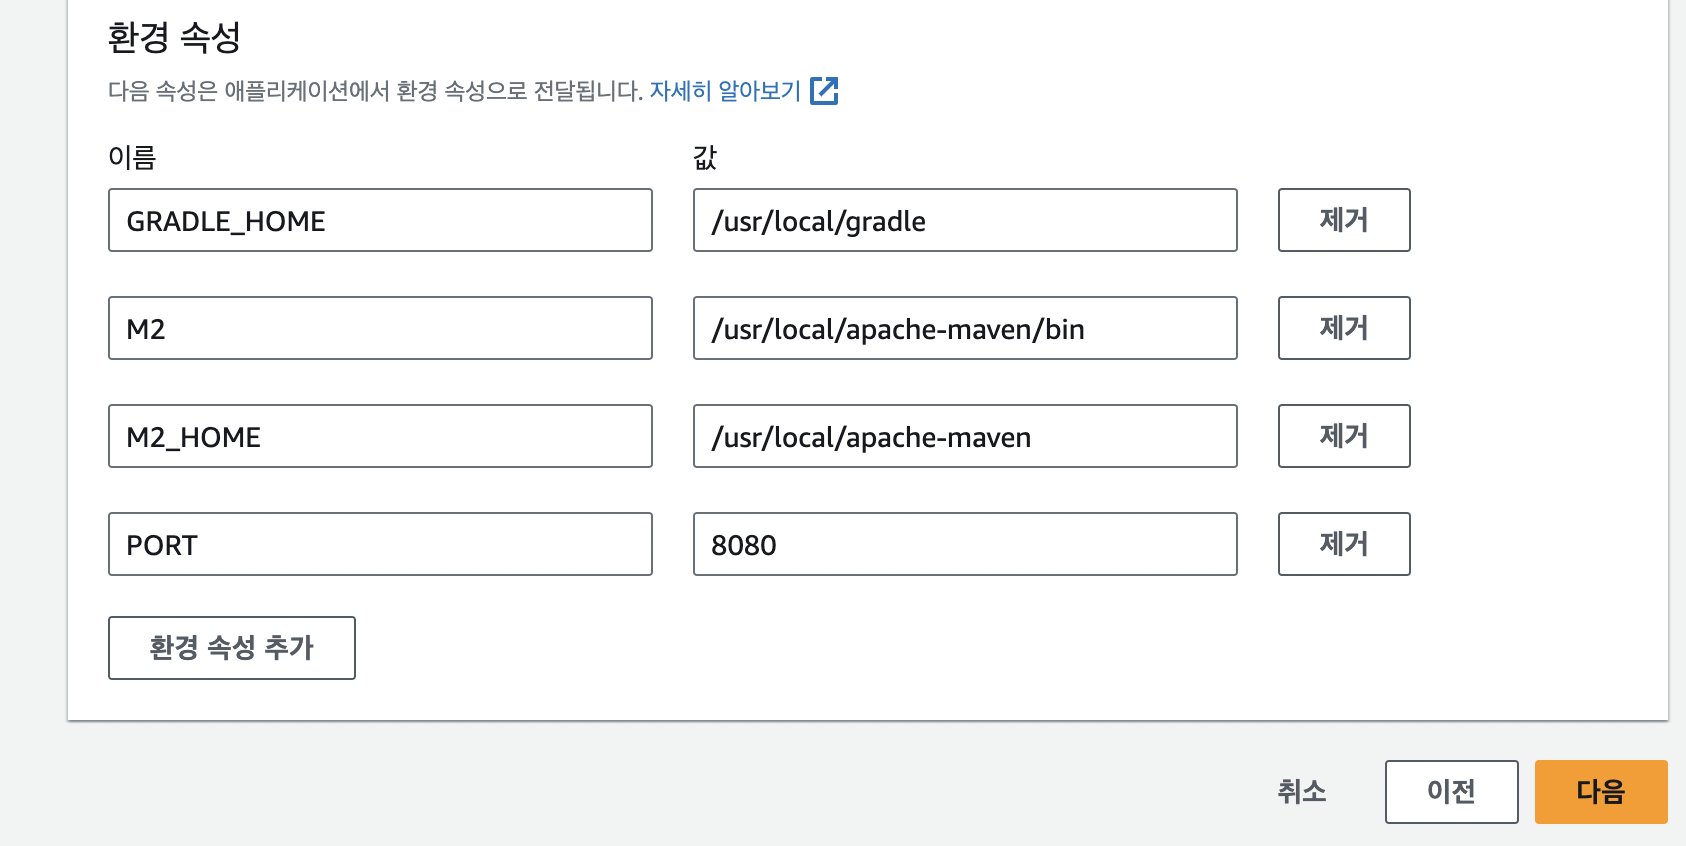
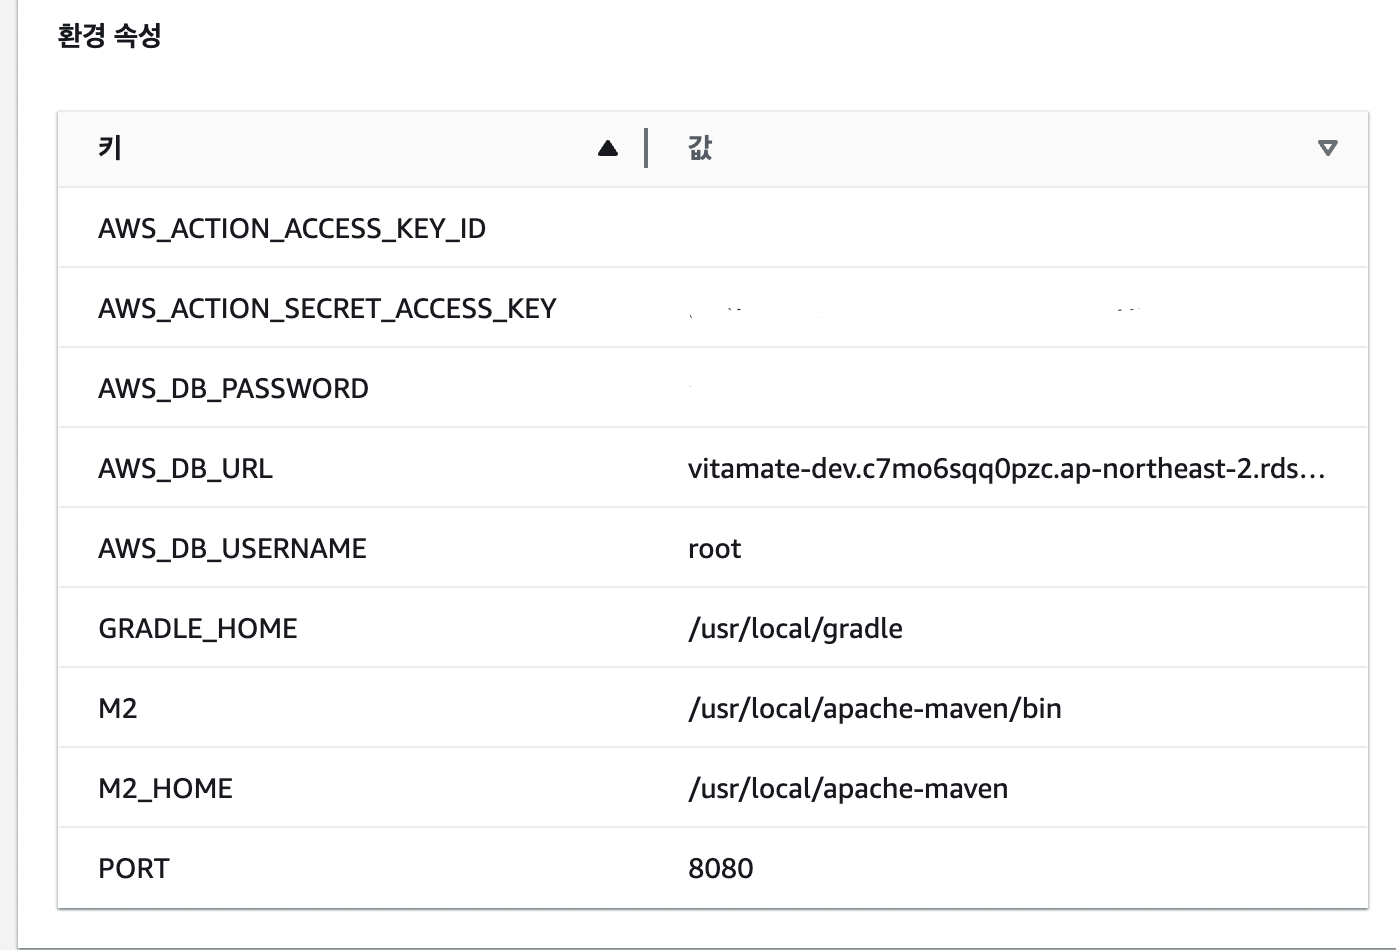
환경 속성에
PORT 8080 추가
로드 밸런싱
외부 요청 시 뒤에 있는 여러 서버들 중 누구에게 갈지를 결정
Elastic Beanstalk의 로드밸런서는
Elastic Beanstalk의 WAS가 5000번 포트에 있을것이라고 생각함 (디폴트로 5000번 포트로 설정되어 있음)
Spring은 8080번 포트를 사용하니까 변경해주기
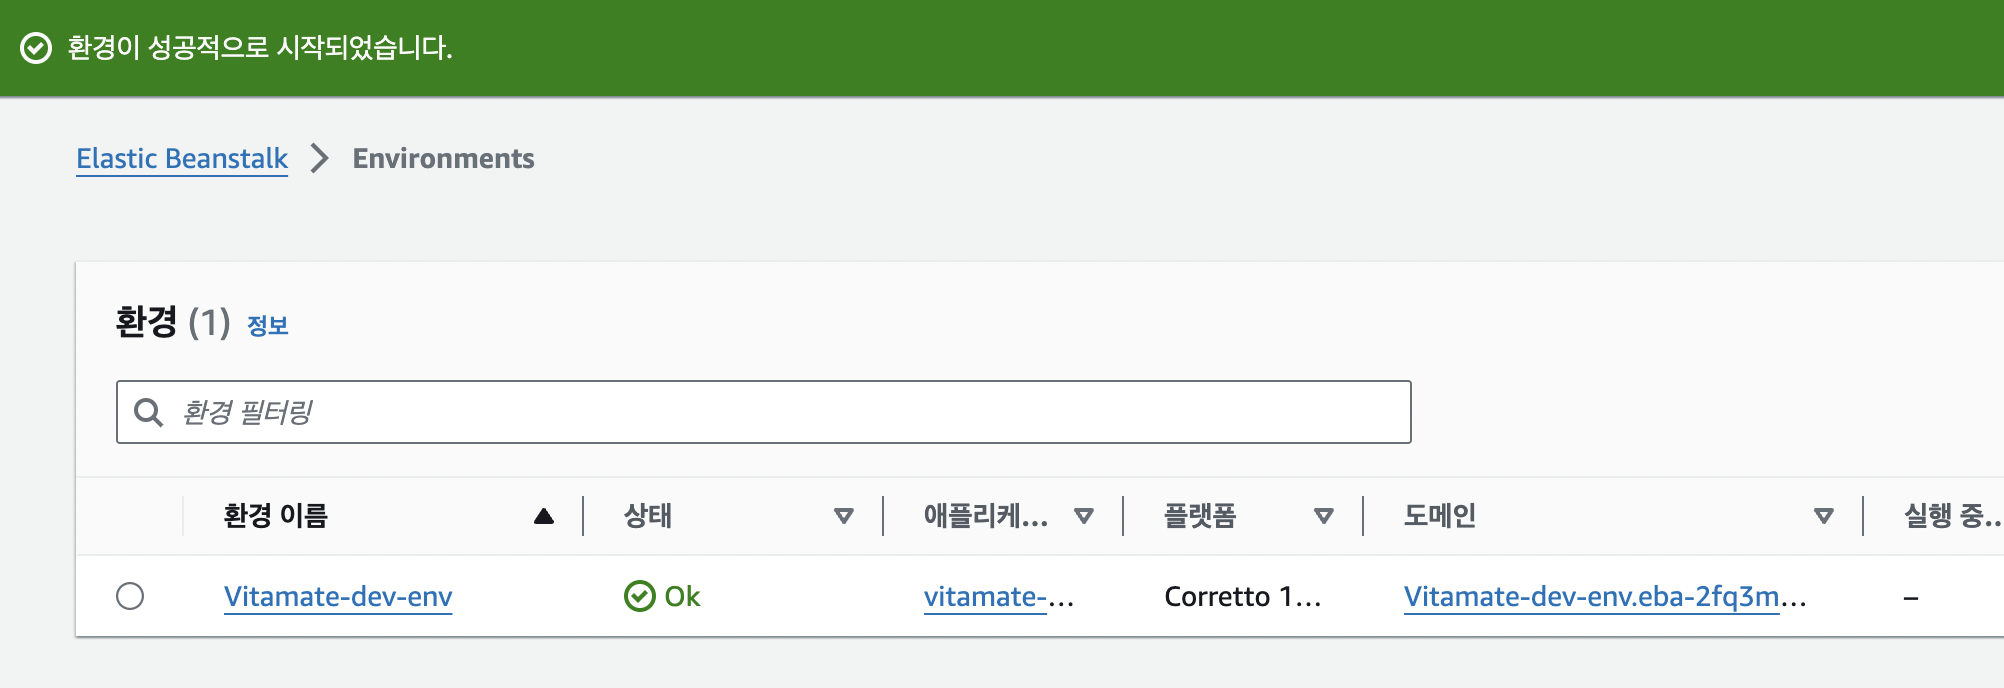
Elastic Beanstalk 생성 완료!
프로젝트 최상단에 필요한 파일, 디렉토리 추가
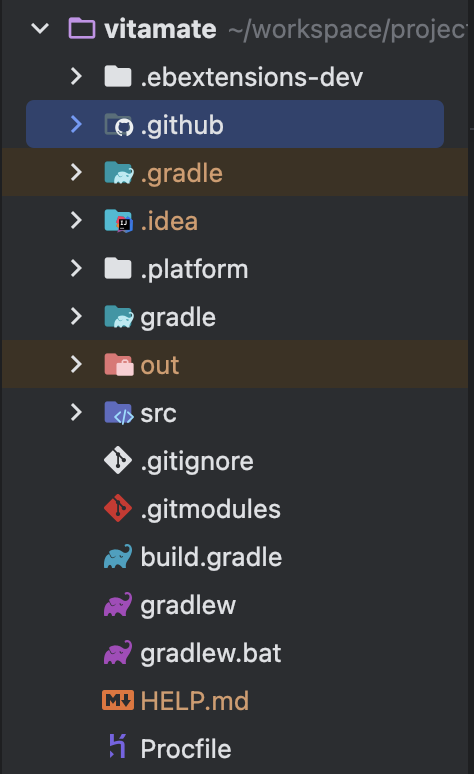
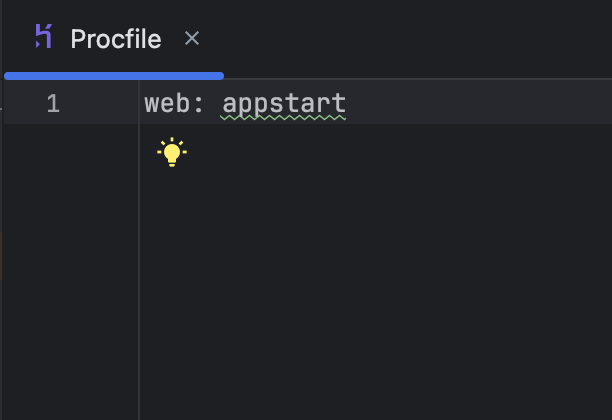
Procfile 파일 생성
web: appstart
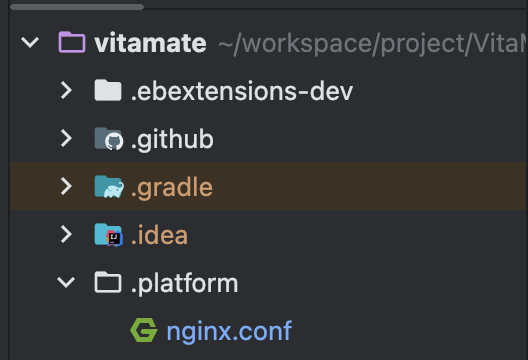
.ebextensions-dev 디렉토리 생성
.github/workflows/dev_deploy.yml 파일에서 아래 표시한 부분에 디렉토리명 일치해야함!
      - name: Generate deployment package
        run: |
          mkdir -p deploy
          cp build/libs/*.jar deploy/application.jar
          cp Procfile deploy/Procfile
          cp -r .ebextensions-dev deploy/.ebextensions ## 이부분 !!
          cp -r .platform deploy/.platform
          cd deploy && zip -r deploy.zip .
cp -r .ebextensions-dev deploy/.ebextensions
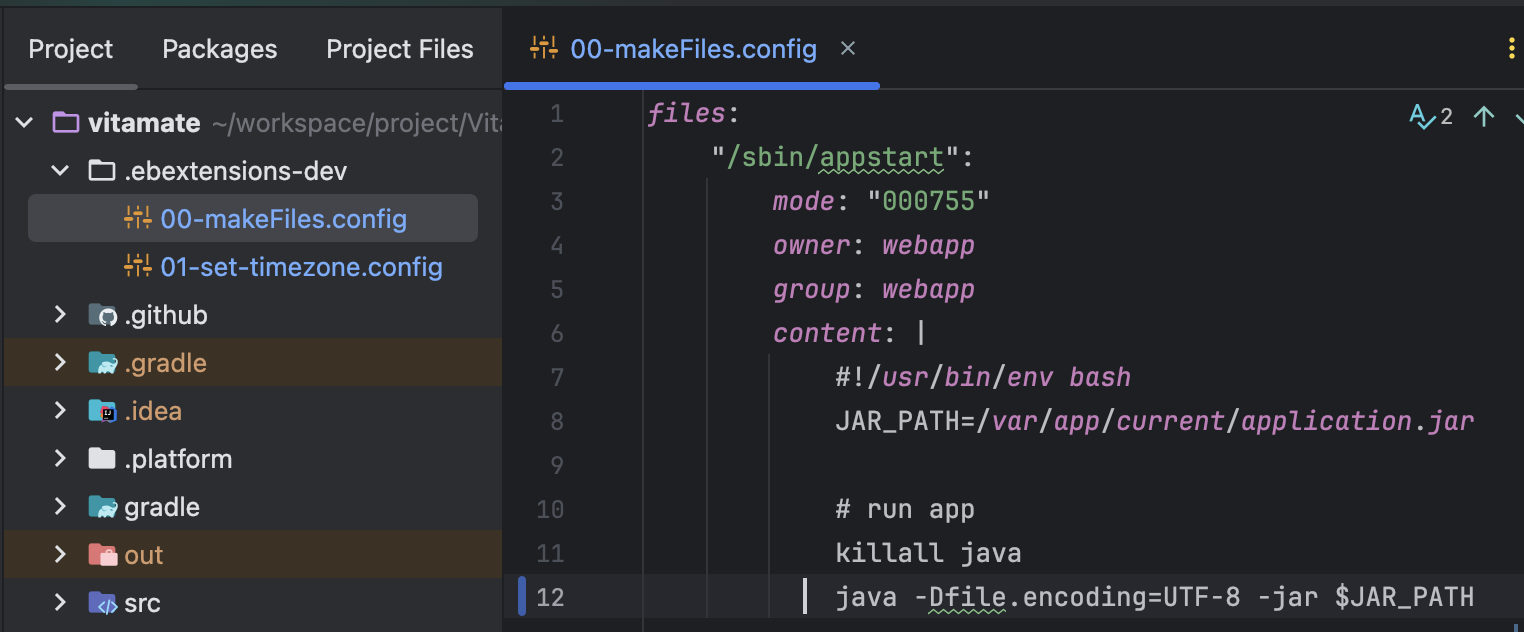
.ebextensions-dev/00-makeFiles.config
files:
    "/sbin/appstart":
        mode: "000755"
        owner: webapp
        group: webapp
        content: |
            #!/usr/bin/env bash
            JAR_PATH=/var/app/current/application.jar

            # run app
            killall java
            java -Dfile.encoding=UTF-8 -jar $JAR_PATH
.ebextensions-dev/01-set-timezone.config
commands:
    set_time_zone:
        command: ln -f -s /usr/share/zoneinfo/Asia/Seoul /etc/localtime
.platform/nginx.conf 생성
nginx.conf
user                    nginx;
error_log               /var/log/nginx/error.log warn;
pid                     /var/run/nginx.pid;
worker_processes        auto;
worker_rlimit_nofile    33282;

events {
    use epoll;
    worker_connections  1024;
    multi_accept on;
}

http {
  include       /etc/nginx/mime.types;
  default_type  application/octet-stream;


  log_format  main  '$remote_addr - $remote_user [$time_local] "$request" '
                    '$status $body_bytes_sent "$http_referer" '
                    '"$http_user_agent" "$http_x_forwarded_for"';

  include       conf.d/*.conf;

  map $http_upgrade $connection_upgrade {
      default     "upgrade";
  }

  upstream springboot {
    server 127.0.0.1:8080;
    keepalive 1024;
  }

  server {
      listen        80 default_server;
      listen        [::]:80 default_server;

      location / {
          proxy_pass          http://springboot;
                  # CORS 관련 헤더 추가
          add_header 'Access-Control-Allow-Origin' '*';
          add_header 'Access-Control-Allow-Methods' 'GET, POST, PUT, DELETE, OPTIONS';
          add_header 'Access-Control-Allow-Headers' 'Authorization, Content-Type';
          proxy_http_version  1.1;
          proxy_set_header    Connection          $connection_upgrade;
          proxy_set_header    Upgrade             $http_upgrade;

          proxy_set_header    Host                $host;
          proxy_set_header    X-Real-IP           $remote_addr;
          proxy_set_header    X-Forwarded-For     $proxy_add_x_forwarded_for;
      }

      access_log    /var/log/nginx/access.log main;

      client_header_timeout 60;
      client_body_timeout   60;
      keepalive_timeout     60;
      gzip                  off;
      gzip_comp_level       4;

      # Include the Elastic Beanstalk generated locations
      include conf.d/elasticbeanstalk/healthd.conf;
  }
}
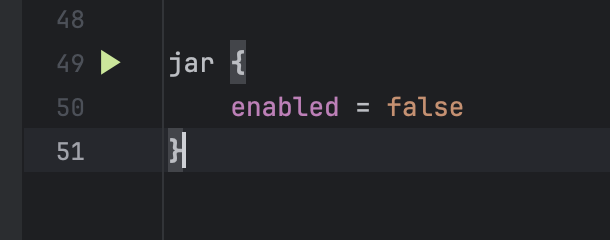
build.gradle에 추가
IAM- 사용자 생성
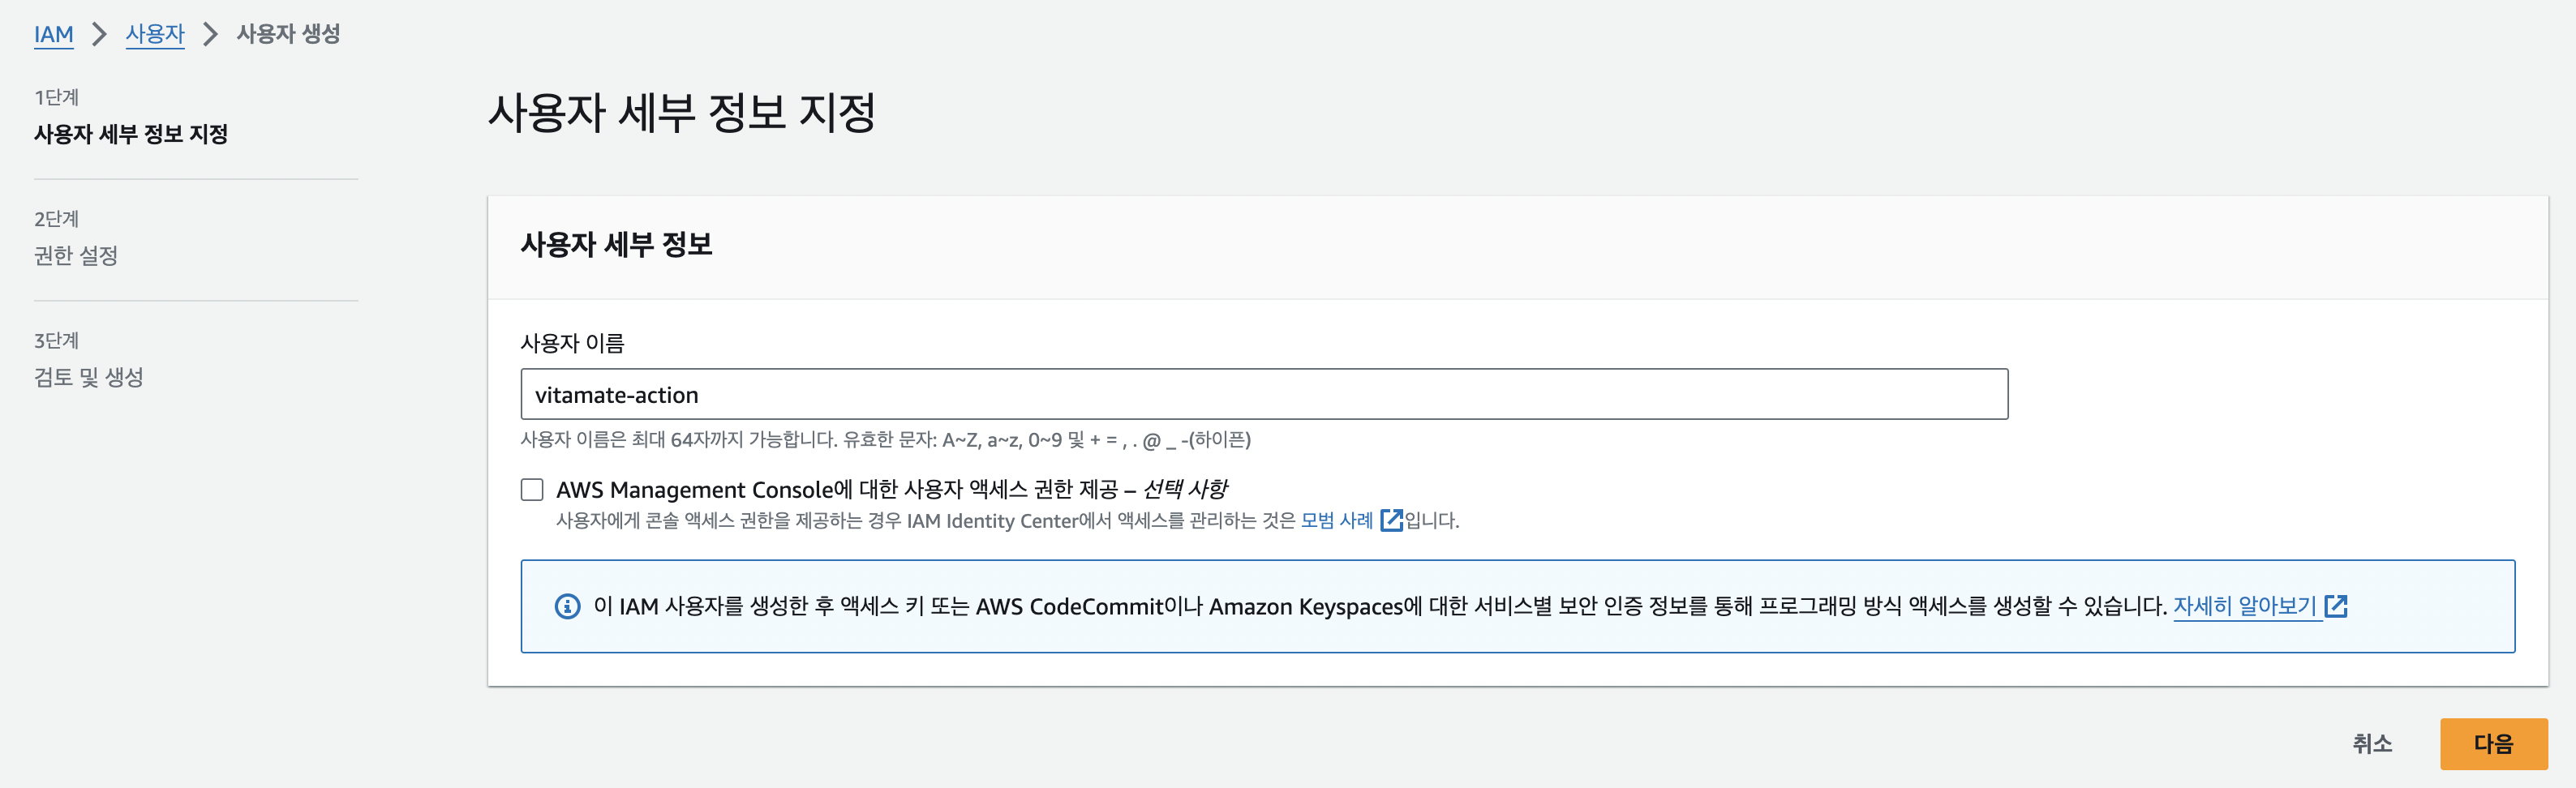
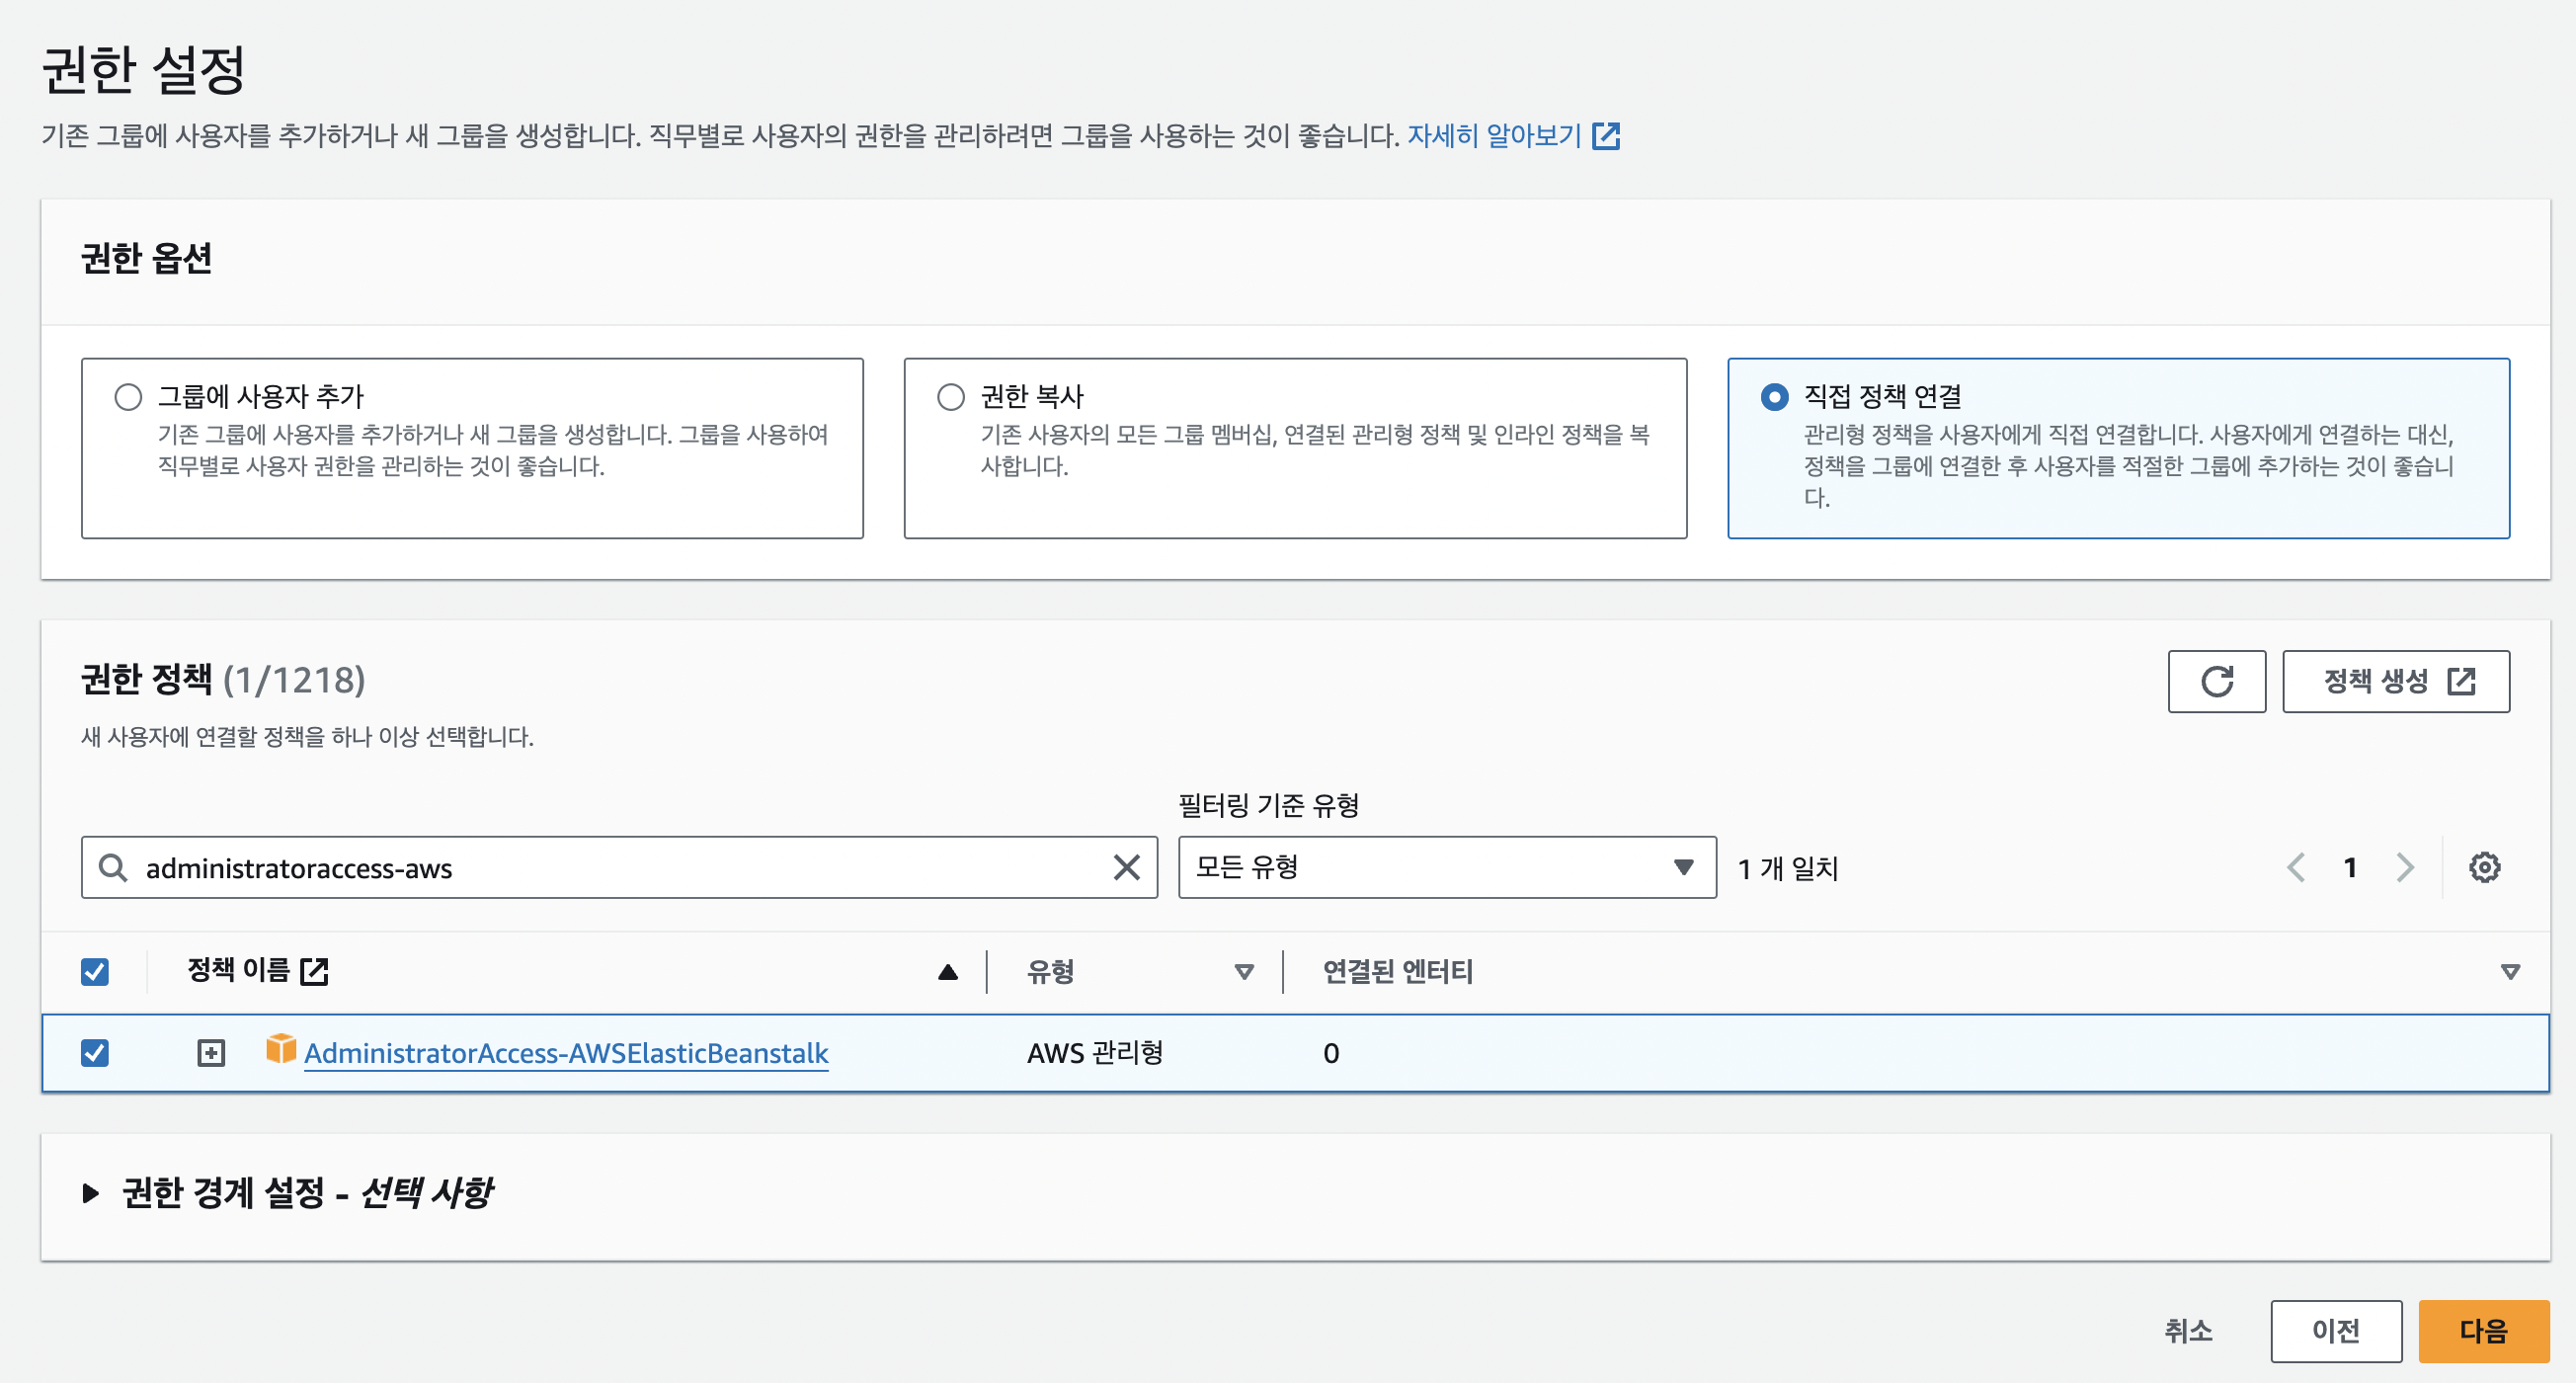
AdministratorAccess-AWSElasticBeanstalk
권한 정책 추가하고 사용자 생성
방금 만든 사용자 -> 액세스키 만들기

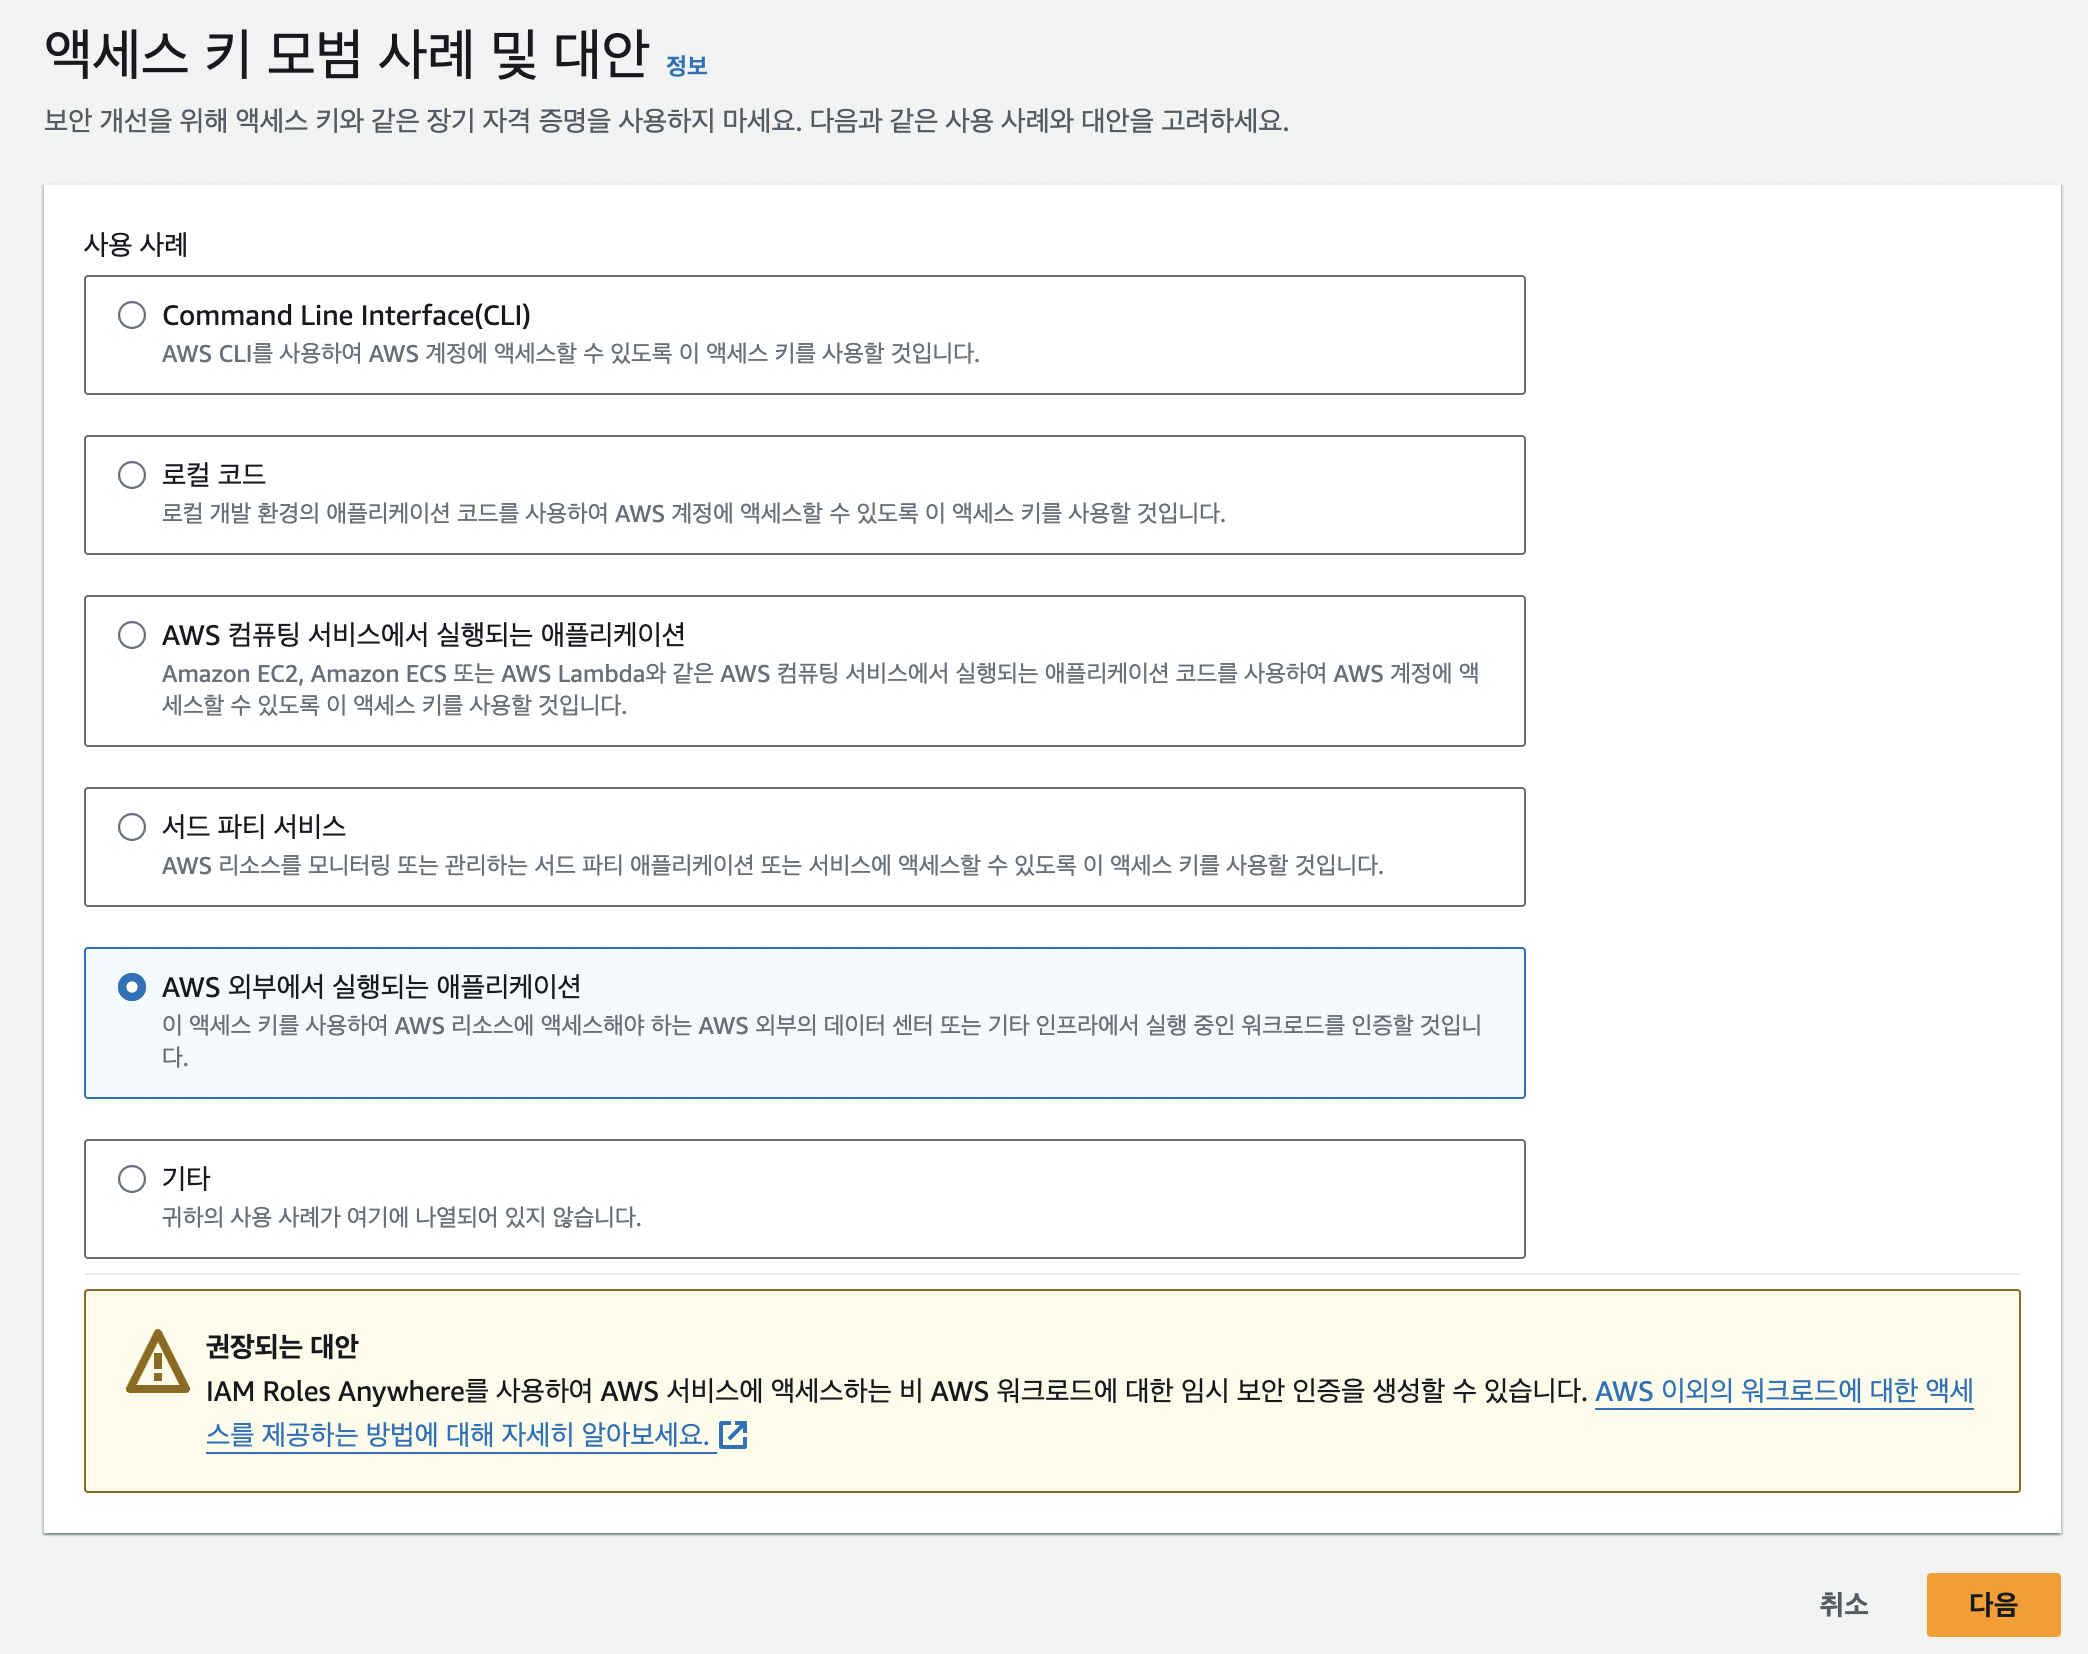
깃허브에 액세스키 등록할거니까 "AWS 외부에서 실행되는 애플리케이션" 선택
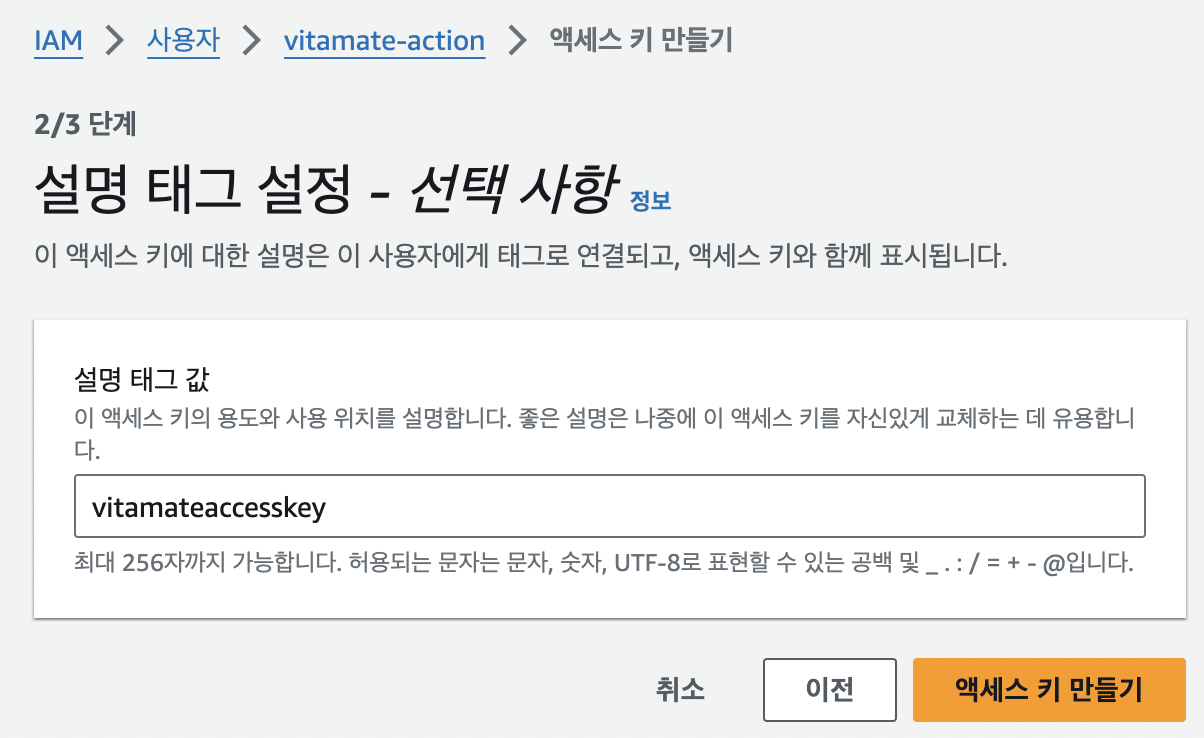
설명 태그값 넣고 액세스 키 만들기
그리고 이 다음에 나오는 액세스 키, 비밀 키는 깃허브 액션에 추가 (페이지 벗어나면 비밀키 다시 못봄 !!)
Health Check API 만들기
이제 커밋 & 푸시 후
develop 브랜치에 merge
502 Bad Gateway 에러 발생
Elastic Beanstalk 로그 파일을 다운받아서 var/log/messages 파일을 열어 'error'를 검색해서 찾아보았다
Jul  8 05:16:51 ip-172-31-13-31 amazon-ssm-agent[1567]: 2024-07-08 05:16:49 WARN EC2RoleProvider Failed to connect to Systems Manager with instance profile role credentials. Err: retrieved credentials failed to report to ssm. RequestId: 4a822542-1bcf-40cd-b54c-8d2d393e92c8 Error: AccessDeniedException: User: arn:aws:sts::851725497504:assumed-role/aws-elaticbeanstalk-ec2-role/i-0be0bbe0ebd2fd37b is not authorized to perform: ssm:UpdateInstanceInformation on resource: arn:aws:ec2:ap-northeast-2:851725497504:instance/i-0be0bbe0ebd2fd37b because no identity-based policy allows the ssm:UpdateInstanceInformation action
Jul  8 05:16:51 ip-172-31-13-31 amazon-ssm-agent[1567]: #011status code: 400, request id: 4a822542-1bcf-40cd-b54c-8d2d393e92c8
Jul  8 05:16:51 ip-172-31-13-31 amazon-ssm-agent[1567]: 2024-07-08 05:16:49 ERROR EC2RoleProvider Failed to connect to Systems Manager with SSM role credentials. error calling RequestManagedInstanceRoleToken: AccessDeniedException: Systems Manager's instance management role is not configured for account: 851725497504
Jul  8 05:16:51 ip-172-31-13-31 amazon-ssm-agent[1567]: #011status code: 400, request id: 80e71b90-be83-49a5-9942-39781a2efe2b
Jul  8 05:16:51 ip-172-31-13-31 amazon-ssm-agent[1567]: 2024-07-08 05:16:49 ERROR [CredentialRefresher] Retrieve credentials produced error: no valid credentials could be retrieved for ec2 identity. Default Host Management Err: error calling RequestManagedInstanceRoleToken: AccessDeniedException: Systems Manager's instance management role is not configured for account: 851725497504
Jul  8 05:16:51 ip-172-31-13-31 amazon-ssm-agent[1567]: #011status code: 400, request id: 80e71b90-be83-49a5-9942-39781a2efe2b
Jul  8 05:16:51 ip-172-31-13-31 amazon-ssm-agent[1567]: 2024-07-08 05:16:49 INFO [CredentialRefresher] Sleeping for 28m51s before retrying retrieve credentials
IAM 역할 권한 부족 문제라고 한다
EC2 인스턴스에 할당된 IAM 역할이 'ssm:UpdateInstanceInformation' 작업을 수행할 권한이 없어서 발생하는 오류
권한을 추가해주자!
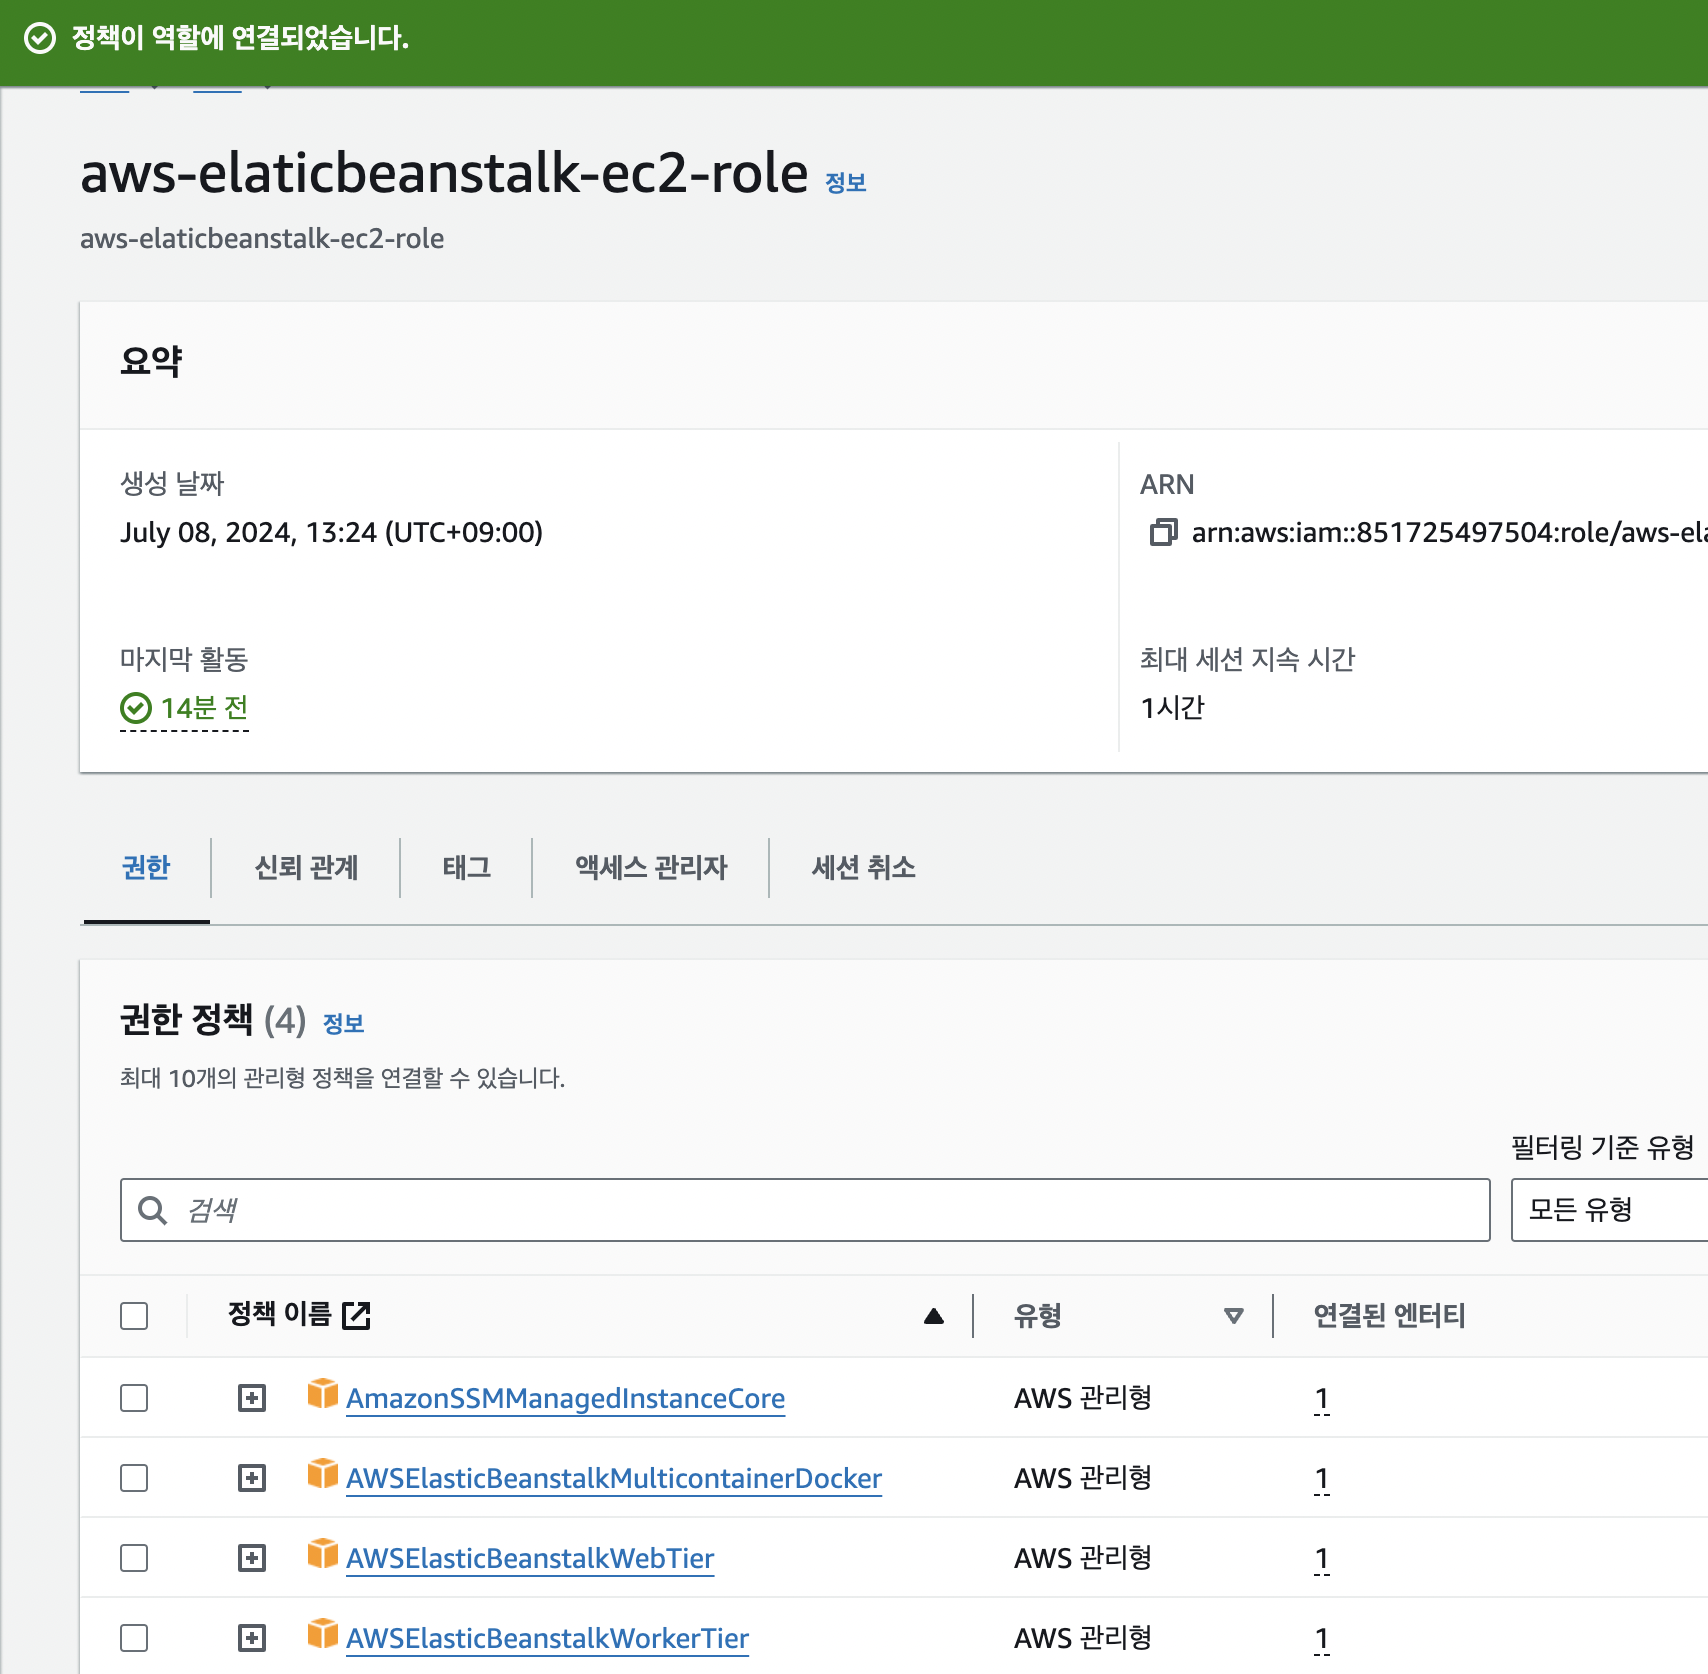
AmazonSSMManagedInstanceCore 정책 추가
실패ㅜㅜ
다시 로그파일에서 에러 찾기,,
Jul  8 18:54:13 ip-10-0-2-29 web[2087]: 2024-07-08T18:54:13.812+09:00 ERROR 2087 --- [           main] j.LocalContainerEntityManagerFactoryBean : Failed to initialize JPA EntityManagerFactory: [PersistenceUnit: default] Unable to build Hibernate SessionFactory; nested exception is java.lang.RuntimeException: Driver org.mariadb.jdbc.Driver claims to not accept jdbcUrl, jdbc:mysql://${AWS_DB_URL}:3306/vitamate
Jul  8 18:54:13 ip-10-0-2-29 web[2087]: 2024-07-08T18:54:13.814+09:00  WARN 2087 --- [           main] ConfigServletWebServerApplicationContext : Exception encountered during context initialization - cancelling refresh attempt: org.springframework.beans.factory.BeanCreationException: Error creating bean with name 'entityManagerFactory' defined in class path resource [org/springframework/boot/autoconfigure/orm/jpa/HibernateJpaConfiguration.class]: [PersistenceUnit: default] Unable to build Hibernate SessionFactory; nested exception is java.lang.RuntimeException: Driver org.mariadb.jdbc.Driver claims to not accept jdbcUrl, jdbc:mysql://${AWS_DB_URL}:3306/vitamate
Jul  8 18:54:13 ip-10-0-2-29 web[2087]: 2024-07-08T18:54:13.817+09:00  INFO 2087 --- [           main] o.apache.catalina.core.StandardService   : Stopping service [Tomcat]
Jul  8 18:54:13 ip-10-0-2-29 web[2087]: 2024-07-08T18:54:13.842+09:00  INFO 2087 --- [           main] .s.b.a.l.ConditionEvaluationReportLogger :
Jul  8 18:54:13 ip-10-0-2-29 web[2087]: Error starting ApplicationContext. To display the condition evaluation report re-run your application with 'debug' enabled.
Jul  8 18:54:13 ip-10-0-2-29 web[2087]: 2024-07-08T18:54:13.877+09:00 ERROR 2087 --- [           main] o.s.boot.SpringApplication               : Application run failed
Jul  8 18:54:13 ip-10-0-2-29 web[2087]: org.springframework.beans.factory.BeanCreationException: Error creating bean with name 'entityManagerFactory' defined in class path resource [org/springframework/boot/autoconfigure/orm/jpa/HibernateJpaConfiguration.class]: [PersistenceUnit: default] Unable to build Hibernate SessionFactory; nested exception is java.lang.RuntimeException: Driver org.mariadb.jdbc.Driver claims to not accept jdbcUrl, jdbc:mysql://${AWS_DB_URL}:3306/vitamate
문제 원인
환경 변수 미설정!!! 나 바보냐?
Elastic Beanstalk 새로 만들고 나서 환경변수 넣는걸 깜빡했다ㅜㅜ
이제 502 Bad Gateway는 뜨지 않는데
기본 Elastic Beanstalk 화면만 뜬다
'인프라 & 배포' 카테고리의 다른 글
| Github Action + SpringBoot + Elastic Beanstalk 무중단 배포 다시 도전 (0) | 2024.08.11 |
|---|---|
| [docker] MySQL 컨테이너 포트 변경, IntelliJ database 연결 오류 (0) | 2023.11.24 |
| [Docker] 컨테이너 생성 오류 (4) | 2023.11.24 |

